1. Copying a Formula
You can use four ways to enter the same formula in multiple cells:
- Copy the entire cell and paste it to the new location.
- Enter the formula in the first cell and then use the fill handle to copy the formula.
- Preselect
the entire range for the formula. Enter the formula in the first cell
and press Ctrl+Enter to simultaneously enter the formula in the entire
selection.
- Define the range as a table. Excel
automatically copies new formulas entered in a table. See the section
“Tables and Table Formulas” for more information.
Copying a Formula by Using Ctrl+Enter
To copy a formula using Ctrl+Enter, follow these steps:
1. | Select the range you want the formula to be in.
|
2. | Type the formula in the first cell.
|
3. | Press Ctrl+Enter. Excel copies the formula to all cells in the selected range.
|
Copying a Formula by Dragging the Fill Handle
To copy a formula by dragging the fill handle, follow these steps:
1. | Select the cell you want the formula to be in.
|
2. | Type the formula in the first cell.
|
3. | Press Ctrl+Enter to accept the formula and keep the cell as your active cell.
|
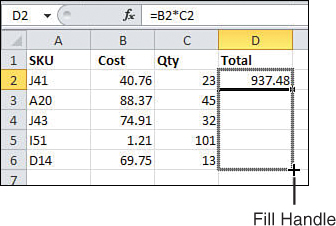
4. | Click
and hold the fill handle, which looks like a little black square in the
lower-right corner of the selected cell. When the cursor is positioned
correctly, it turns into a black cross, as shown in Figure 1.
|
5. | Drag the fill handle to the last cell that needs to hold a copy of the formula.
|
6. | Release the mouse button. The first cell is copied to all the cells in the selected range.
|
2. Formula Operators
Excel offers the mathematical operators listed in Table 1.
Table 1. Mathematical Operators
| Operator | Description |
|---|
| + | Addition |
| - | Subtraction |
| / | Division |
| * | Multiplication |
| ^ | Exponents |
| () | Override the usual order of operations |
| - | Unary minus (for negative numbers) |
| = | Equal to |
| > | Greater than |
| < | Less than |
| >= | Greater than or equal to |
| <= | Less than or equal to |
| <> | Not equal to |
| & | Join two values to produce a single value |
| , | Union operator |
| : | Range operator |
| (space) | Intersection operator |
Order of Operations
Excel
evaluates a formula in a particular order if it contains many
calculations. Instead of calculating from left to right like a
calculator, Excel performs certain types of calculations, such as
multiplication, before other calculations, such as addition.
You can override this default order of operations
using parentheses. If you don’t, Excel applies the following order of
operations:
1. | Unary minus
|
2. | Exponents
|
3. | Multiplication and division, left to right
|
4. | Addition and subtraction, left to right
|
For example, if you have the formula
Excel will return 12, because first it does 3*2, then
adds the result (6) to 6. But, if you use parentheses, you can change
the order:
produces 18 because now Excel will do the addition first (6+3) and multiply the result (9) by 2.
