If your costs are coming out to $110,000 when your maximum
is $95,000, you have to figure out how to trim $15,000 from your
planned project costs or heads will roll—most likely yours. How does one
go about cutting thousands of dollars from a project? Answer: very
carefully.
First,
look at your cost assumptions to make sure mistakes haven't sent project
costs into the stratosphere. If you're lucky, you can correct the
misplaced zero you find and everything becomes hunky-dory. The next line
of defense is to reschedule tasks to reduce costs. You can also examine
resource assignments to look for ways to cut costs.
This
section discusses each of these cost-cutting techniques. However, if
these methods aren't enough to solve your budget crisis, it's time to
take a hard look at the budget itself and propose a change to the
project budget, scope, or schedule.
1. Checking for Cost Errors
When
your TV suddenly doesn't turn on, or you can't get the channel that's
showing world championship bass fishing, you probably don't schedule a
technician service call right away. You poke around, hit buttons on the
remote, turn things off and on, and see if the picture comes back. If
you're really thinking straight, the very first thing you check is
whether your dog unplugged the TV cables or power cord again.
The
same troubleshooting principle applies when planned project costs don't
jibe with your project budget. Don't assume that the project is really
$15,000 over budget just yet. Look for errors, starting with the simple,
most obvious things first. In this section, you learn how to
systematically scan your project plan for mistakes in cost values or
calculations.
Here are cost-related items to check, and where to look for them:
Task durations.
Review task durations for any that approach the length of geologic
eras. Durations affect cost because Project multiplies duration by rates
to calculate cost.
Cost per use. In the Resource Sheet, look for values in the Cost Per Use column .
Remember that a cost per use is levied for each task a resource is
assigned to. For example, suppose a crane costs $5,000 to get it
on-site. If you apply the $5,000 as cost per use, and then assign the
crane to six tasks, your project cost
includes $30,000 for crane setup instead of only $5,000. In this
situation, a cost resource for getting the crane on-site makes more
sense than cost per use. On the other hand, a Dumpster may cost $5 a day
to have on-site as well as $450 each time you empty it. If a resource
has a standard rate combined with a cost per use, make sure they're both
legitimate.
Resource rates. Also in the Resource Sheet, review the rates
you've assigned to human, equipment, and material resources. If you
have a lot of resources, consider sorting by standard rate so that
excessively high or low rates stand out. (For example, if a janitor
comes out higher than your information architect, someone's standard
rate is off.) Click the down arrow to the right of the Std. Rate column
heading and then, on the drop-down menu, choose Sort Descending. To
return the view to its normal order, choose View→Data→Sort→"by ID".
Planned assignment costs.
Apply the Cost table to the Resource Sheet, and then check your
resources' costs on their assignments. The Cost field shows the total
planned cost for a resource for all tasks it's assigned to. To see the
resources that run the tab up the most, sort the view by the Cost field
(click the down arrow to the right of the Cost column heading and then,
on the drop-down menu, choose Sort Largest to Smallest). Then you can
focus on ways to reduce the costs for those resources.
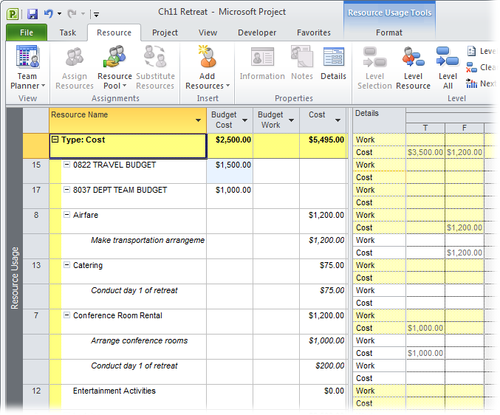
Cost resource amounts.
To easily review cost resource amounts, display the Resource Usage
view, apply the Cost table, and then group the view by resource type
(click the down arrow to the right of the Resource Name column heading
and then, on the drop-down menu, choose "Group by"→Resource Type).
Scroll down to the Type: Cost grouping, and the result looks similar to Figure 11-18.
To return the view to its normal ungrouped arrangement, choose the down
arrow to the right of the Resource Name column heading and then, on the
drop-down menu, choose No Group.
Fixed costs for tasks.
In the Gantt Chart view, check any fixed costs for tasks to see if they
have one or two zeroes too many. Apply the Cost table to the view, and
then sort by the Fixed Cost field. (Click the down arrow to the right of
the Fixed Cost column heading and then, on the drop-down menu, choose
Sort Largest to Smallest to show the highest fixed costs at the top of
the view.) Make sure you're not using a fixed cost and a cost resource
for the same expense on the same task.
After
you've thoroughly reviewed resource cost assumptions, as well as task
information that affects cost, be sure to take a closer look at the
budget itself. Rather than being carved into stone by lightning bolts
from on high, the budget is prepared by a human being like you. Check
the assumptions in the budget, and make sure someone hasn't made any
outlandish mistakes there.
2. Adjusting the Schedule
If
your planned costs and the budget still don't see eye-to-eye after
you've corrected cost mistakes, it's time for Plan B: adjusting the
schedule. Here are some ways you can adjust the schedule to reduce
costs:
Task durations, part deux. You've already scrutinized task durations looking for possible errors. Now see if there's any way to realistically shorten durations and still get the job done. Sometimes shortening tasks actually costs more,.
In
the Gantt Chart view, make sure the Entry table is visible. You can run
down the tasks in order or sort the schedule by duration to cherry-pick
the longest durations for your scrutiny. To show the longest durations
at the top of the view, choose View→Data→Sort→Sort By, and then, in the
"Sort by" box, choose Duration and select the Descending option. Turn
off the "Keep outline structure" checkbox, and then click Sort. To hide
summary tasks, choose Format→Show/Hide and turn off the Summary Tasks
checkbox.
Task relationships. Sometimes by linking tasks more aggressively , you can shorten the time you have to pay resources while they wait for their next task to begin. To most easily review task relationships, in a Gantt Chart view, look at the Gantt bars.
Date constraints.
Any constraints other than As Soon As Possible (or As Late As Possible
for a project scheduled from the finish date) are worth a second look .
If you have a task with a Must Finish On or Start No Earlier Than date
constraint applied, resources may be waiting in limbo unnecessarily for
the right time to work on tasks. Removing that limbo time can help you
cut costs. Add the Constraint Type and Constraint Date fields to a
table, and then sort or group by Constraint Type.
3. Adjusting Assignments
If you've adjusted the schedule to optimize your costs but you still have more belt tightening to do, try adjusting resource assignments. Here are a few strategies to try:
Replace expensive resources with cheaper ones.
Consider having your more experienced (and probably more expensive)
resources mentor your less costly resources for a short time on tasks,
rather than working the entire task. Or use cheaper in-house—perhaps
borrowed—resources, rather than more expensive outside consultants. On
the other hand, sometimes hiring temporary contract labor is cheaper
than using your in-house employees.
Do away with overtime.
If your current schedule involves overtime, see if you can adjust
assignments to eliminate overtime (on resources that cost more for
overtime, of course).
4. Rethinking Your Project Budget
If
your best efforts on project costs still don't line them up with the
project budget, then it's time for renegotiation. You've checked and
rechecked that your costs reflect the project reality—as you know it so
far. The next step is talking to the customer, the project sponsor, or
whichever head honcho holds the purse strings. There are two choices in
this situation.
Get a bigger budget. The first and usually most difficult option you may consider is trying to get more money appropriated for the project.
Cut back on project scope or quality. Cutting the number of tasks, for example, a particular phase, or reducing quality objectives can cut costs—but only if all the stakeholders agree.
