1. Using Names To Simplify References
It can be difficult to
remember what cell you have a specific entry in, such as a tax rate,
when you’re writing a formula. And if the cell you need to reference is
on another sheet, you have to be very careful writing out the reference
properly, or you must use the mouse to go to the sheet and select the
cell.
It would be much simpler if you could just use the
word TaxRate in your formula—and you can, by applying a Name to the
cell. After a name is applied to a cell, any references to the cell or
range can be done by using the name instead of the cell address. For
example, where you once had =B2*$H$1, you could now have =B2*TaxRate, assuming H1 was the cell containing the tax rate.
|
The Web App won’t allow you to create new names, but you can use existing ones.
|
There are only a few limitations to remember when creating a name:
The name must be one word. You can use an underscore (_), backslash (\) or period (.) as spacers.
The
name cannot be a word that might also be a cell address. This was a
real problem when people converted workbooks from legacy Excel because
some names, such as TAX2009, weren’t cell addresses then, but caused
problems when you opened a workbook in 2007 or 2010. So name carefully!
The
name cannot include any invalid characters, such as ? ! or -. The only
valid special characters are the underscore (_),backslash (\) and period
(.).
Names are not case sensitive. Excel will see “sales” and “Sales” as the same name.
You should not use any of the reserved words in Excel. These are Print_Area, Print_Titles, Criteria, Database, and Extract.
Applying and Using a Name in a Formula
To apply a name to a cell and then use the name in a formula, follow these steps:
1. | Select the cell or range you want to apply the name to.
|
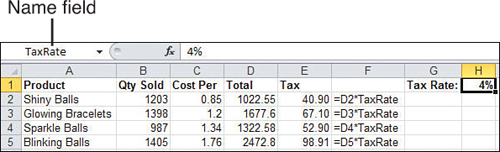
2. | In the name field, type in the name, as shown in Figure 1.
|
If the name already exists in the workbook, typing it in will select the cell it refers to.
|
|
3. | Press Enter for Excel to accept the name.
|
4. | Go to the cell containing the formula that should reference the name.
|
5. | Replace
the cell or range address with the name you just created, or type in a
new formula from scratch using the name where you would use the cell or
range address.
|
If you can’t remember the
name assigned to a range, you can look it up by clicking the drop-down
in the name field or by selecting Formulas, Defined Names, Use in
Formula, which opens up a drop-down of available names. You can also go
to Formulas, Defined Names, Name Manager, which not only lists the
defined names, but shows the range they apply to.
Inserting Formulas into Tables
When your data has been defined as a Table, Excel will automatically copy new formulas down the rest of the cells in the column.
Entering a Formula in a Table
To add a new calculated column to a table, follow these steps:
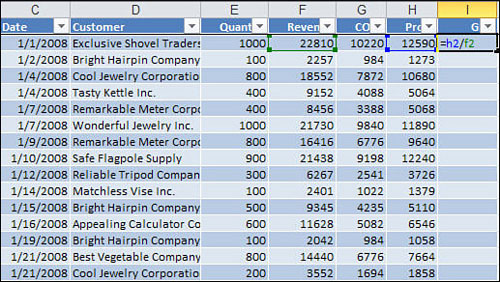
1. | Select the first data cell in the column adjacent to the rightmost column of the table. This would be cell I2 in Figure 2.
|
2. | Enter your formula for the selected cell.
|
3. | Press Enter and Excel copies the formula down the column.
|
After entering the formula, a
lightning bolt drop-down appears by the cell. If you don’t want the
automated formula copied, select Undo Calculated Column or Stop
Automatically Creating Calculated Columns.
