You’ve seen how callouts and
ScreenTips can be used to annotate your diagrams and how layers can be
used to turn details on and off.
If you have a living document
for which several people need to give input, the markup and review
features will be of interest, particularly comments, markup, and ink.
Visio’s reviewing capabilities aren’t as powerful or fluid as Word’s,
but you might still find them useful.
Comments
Comments
allow multiple users to critique a document. They are similar to
ScreenTips but are more noticeable, and they aren’t attached to shapes.
Comments float on the page as
little yellow boxes with the initials of the commenter and an ID number.
To read one, just click it and it expands to reveal its contents.
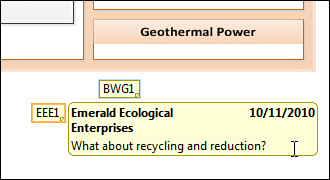
Figure 1
shows a diagram with comments from two different users. The comment
from “BWG” is collapsed, and the comment from “EEE” is expanded so you
can read the message, along with the commenter’s full name and the date
it was made.
Adding Comments to Your Diagram
1. | On
the Review tab, click New Comment in the Comments group. A little
yellow box with your initials appears on the page, with an expanded area
for adding text.
|
2. | Enter a message in the box. As soon as you click somewhere else on the page, the comment collapses to show just the initials.
|
3. | You can freely drag the comment box around the page and position it wherever you want.
|
4. | If
you hover your mouse cursor over the comment box, the full name of the
commenter appears, along with the date the comment was last updated.
Note: The name and
initials of a user are set in the File, Options, General tab, in the
Personalize Your Copy of Microsoft Office area. There you see text
fields for User Name and Initials.
|
5. | If you click a comment box, it expands and the entire comment appears.
|
6. | Notice
also that in the Markup group on the Review tab, the Show Markup button
is now pressed, and the Reviewing pane is visible on the right.
|
7. | Toggle the Show Markup button on and off. Notice that your comments appear and disappear.
|
8. | Toggle
the Reviewing Pane button on and off. The Reviewing pane shows and
hides itself, but your comments remain as long as Show Markup is
pressed.
|
9. | With
Show Markup pressed, go to File, Print, Print Preview. Notice that the
comments are not visible. Review comments do not print.
|
Be aware that comments are
part of Visio’s Review features and are visible only when the Show
Markup button is pressed. This is a little confusing because comments
are actually different from markup, as you see in the next section.
Markup
In Visio, markup is
slightly different from the comments you just explored, even though they
are related by the Show Markup button and the Review tab.
Markup consists of
graphics that a user adds to a page. When you click the Track Markup
button (just above the Reviewing Pane button), Visio creates a special
markup overlay tab for the current user on top of the page. Any edits to
the drawing made while Track Markup is pressed are put on this tab and
given a color that corresponds to the user. Markup is like a hybrid of
pages and layers; each reviewer gets his or her own markup overlay tab,
associated with a particular page and a particular reviewer.
Figure 2 shows a familiar diagram that has been commented on and marked up by two users.
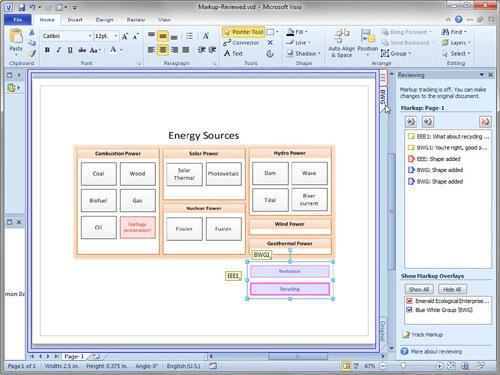
There’s a lot going on in Figure 2, so let’s go over the important bits, one by one:
In the Reviewing pane,
there is a history list under “Markup Page-1.” This shows both comments
and markup added, and which user made the modification. You can see
that EEE and BWG have both added comments and shapes to the drawing.
Each
user has an associated color. When a user creates a shape on the page,
it is shown in this color.
There
are two tabs in the upper right corner of the drawing page, one for
each user. These tabs are colored to match the red and blue of EEE and
BWG, respectively.
Along
the same edge, but at the bottom, you see the Original tab. This is, of
course, where the nonmarkup drawing bits can be accessed. Clicking the
Page-1 tab also returns you to the regular drawing.
Tab
BWG has just been clicked. When this happens, the markup shapes from
BWG are selected in the drawing page. You can see that the Reduction and
Recycling boxes are selected. These boxes are also colored blue,
because they were created by user BWG.
When
the BWG tab is active, only the shapes created by BWG can be selected
and edited. The drawing’s shapes can’t be touched, and neither can EEE’s
markup shapes.
Notice
the shape under “Combustion Power” that says “Garbage incineration?”
This shape is red and was added by user EEE. To edit this shape, you
would need to click the EEE tab in the upper-right corner.
If
you turn off Show Markup, the markup overlay tabs disappear, along with
the corresponding markup shapes. Alternatively, you can turn off markup
from select users by checking and unchecking users in the list beneath
Show Markup Overlays.
Any visible markup will print, although comments do not print, as we discussed earlier.
The markup features for Visio
are great for commenting on living diagrams that are in continuous
flux. The colorization and separate overlay tabs for each user are
useful and keep things tidy. I found these features to be a bit
complicated at first, but if you just experiment for a few minutes,
they’ll start to make more sense.
What is missing from Visio markup, however, is the ability to delete shapes and Accept Changes, as you can in Microsoft Word.
If you’ve used Word’s
reviewing features, you are probably used to being able to accept or
reject a change. Graphics on the markup overlay tabs are stuck in their
own parallel universe, separated from the actual drawing. This has
frustrated Visio users for quite some time.
The workaround is to cut
shapes from an overlay tab, click the Original tab, and then paste them.
Not difficult, but not as smooth as right-clicking and choosing Accept
or Reject. As for deleting shapes, you can simply add a rectangle or
comment that says “delete this” and hope that the document’s owner takes
your advice.
Ink
If you use a tablet PC or
like to scribble with your mouse, you’ll like Ink. Inking allows you to
draw and write freehand on Visio pages. You can leave your inking as Ink
entities, convert it to Visio shapes, or let Visio try to recognize
your handwriting and convert it to text.
You access Ink from the Markup
group of the Review tab, but your inking does not have to be part of a
markup overlay; it can be used in normal drawings independent of markup
and review.
When you click the Ink button,
you are taken to the Ink Tools contextual tab. There you can choose to
scribble with the Ballpoint Pen or Highlighter. You can change the color
and weight of your ink creations and erase strokes using the Stroke
Eraser. Each ink stroke that you add is combined with the previous ones
into a single shape. You can click the Close Ink Shape to finish one
inking entity and begin a new one.
Figure 3
shows two ink entities: one is text created with the Ballpoint Pen
tool, and the other is a Highlighter streak over the “Energy Sources”
title. To make sure the highlighter streak was not combined with the
handwritten text, I used the Close Ink Shape in between.
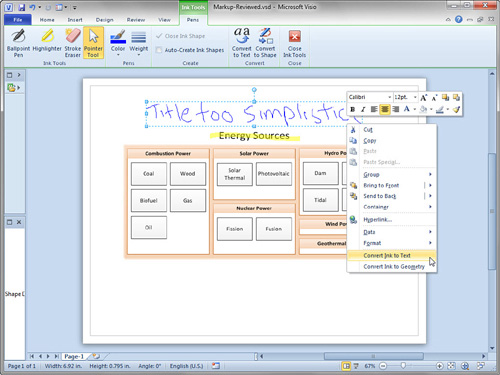
You can
also see that I’ve right-clicked the chicken scrawl and am ready to
click Convert Ink to Text. Believe it or not, this actually worked! A
moment later, a legible block of text in 12-point Calibri appeared in
its place. You can also convert your ink items to Visio shapes that can
be edited with the Line, Pencil or Freeform tools.
