If you’re writing your code in Visual Studio, the
default Azure project templates include code that automatically starts
the diagnostic agent, inserts a listener for the agent in the web.config
file, and configures the agent with a default configuration.
You can see this code in the OnStart() method in the WebRole.cs file.

The agent starts  with the default configuration, all in one line. The line also points
to a connection string in the service configuration that provides access
to the Azure storage account you want the data to be transferred to. If
you’re running in the development fabric on your desktop computer, you
can configure it with the well-known development storage connection
string UseDevelopmentStorage=true. This string provides all the data necessary to connect with the local instance of development storage.
with the default configuration, all in one line. The line also points
to a connection string in the service configuration that provides access
to the Azure storage account you want the data to be transferred to. If
you’re running in the development fabric on your desktop computer, you
can configure it with the well-known development storage connection
string UseDevelopmentStorage=true. This string provides all the data necessary to connect with the local instance of development storage.
You also need to create a
trace listener for the diagnostic agent. The trace listener allows you
to write to the Azure trace log in your code. Create a trace listener by
adding the following lines in your web.config. If you’re using a
standard template, this code is probably already included.
<system.diagnostics>
  <trace>
    <listeners>
      <add type="Microsoft.WindowsAzure.Diagnostics.DiagnosticMonitorTraceListener, Microsoft.WindowsAzure.Diagnostics, Version=1.0.0.0, Culture=neutral, PublicKeyToken=31bf3856ad364e35" name="AzureDiagnostics">
        <filter type="" />
      </add>
    </listeners>
  </trace>
</system.diagnostics>
After
you’ve set up the trace listener, you can use the trace methods to send
information to any trace listeners. When you use them, set a category
for the log entry. The category will help you filter and find the right
data later on. You should differentiate between critical data that
you’ll always want and verbose logging data that you’ll want only when
you’re debugging an issue. You can use any string for the trace category
you want, but be careful and stick to a standard set of categories for
your project. If the categories vary too much (for example, you have
critical, crit, and important), it’ll be too hard to find the data
you’re looking for. To standardize on log levels, you can use the
enumerated type LogLevel in Microsoft.WindowsAzure.Diagnostics. To write to the trace log, use a line like one of the following:
using System.Diagnostics;

System.Diagnostics.Trace.WriteLine(string.Format("Page loaded on {0}", System.DateTime.Now, "Information");

System.Diagnostics.Trace.WriteLine("Failed to connect to database. ", "Critical");
Only people who have access
to your trace information using the diagnostics API will be able to see
the log output. That being said, we don’t recommend exposing sensitive
or personal information in the log. Instead of listing a person’s social
security number, refer to it in an indirect manner, perhaps by logging
the primary key in the customer table.
That way, if you need the social security number, you can look it up
easily, but it won’t be left out in plain text for someone to see.
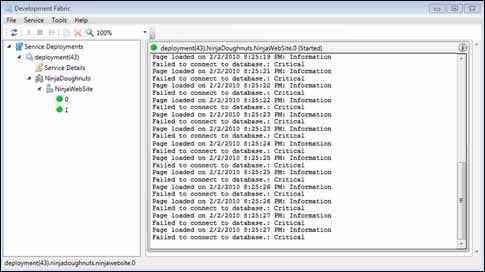
Another benefit of using trace is that the trace output appears in the dev fabric UI, like in figure 1.
At a simple level, this is all
you need to start the agent and start collecting the most common data.
The basic diagnostic setup is almost done for you out of the box because
there’s so much default configuration that comes with it.
1. Default configuration
When the diagnostic agent is
first started, it has a default configuration. The default configuration
collects the Windows Azure trace, diagnostic infrastructure logs, and
IIS 7.0 logs automatically. These are the most common sources you’re
likely to care about in most situations.
When you’re configuring the
agent, you’ll probably follow a common flow. You’ll grab the current
running configuration (or a default configuration) from the agent,
adjust it to your purposes, and then restart the agent. This
configuration workflow is shown in figure 2.

By default, the agent buffers
about 4 GB of data locally, and ages out data automatically when the
limit is reached. You can change these settings if you want, but most
people leave them as is and just transfer the data to storage for
long-term keeping.
Although the agent ages out
data locally to the role instance, the retention of data after it’s
moved to Azure storage is up to you. You can keep it there forever, dump
it periodically, or download it to a local disk. After it’s been
transferred to your account, the diagnostic agent doesn’t touch your
data again. The data will just keep piling up if you let it.
In the next few sections,
we’ll look at some of the common configuration scenarios, including how
to filter the log for the data you’re interested in before it’s uploaded
to storage.
