To create a new Analysis Services data source, you
need to have a deployed cube available. In addition, the unattended
service account you use to connect should be configured to have at least
read permissions. In this example, you connect to a cube named
TheGreenOrange in a database named The Green Orange.
Create a New Analysis Services Data Source
The following steps describe how to create an Analysis Services data source:
1. | There
are two ways to create a new data source in Dashboard Designer. You can
either select Data Source from the Create tab or right-click on a Data
Connections library in the Workspace Browser and then select New Data
Source.
|
2. | Select the type of data source you want to create. In this example, select Analysis Services.
Note
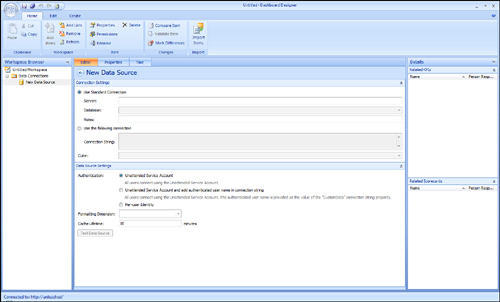
After the data source has been created, you see three tabs called Editor, Properties, and Time, as shown in Figure 1. This example focuses on the Editor tab.

|
3. | Specify
the server and database connections by either specifying the name of
the server and database or by providing a custom connection string. For
this example, connect to localhost and a database named The Green
Orange.
Note
In
step 3, if you use the connection string, you will have access to all
connection string properties, such as packet size, timeout, and
compression.
|
4. | Select
the cube by clicking the Cube drop-down, and then select the cube named
TheGreenOrange from among the list of cubes available on the specific
server.
|
You have now configured the connection settings for the data source. Authentication is discussed in the “Authentication” section.
Note
The Roles setting allows you to
choose a specific Analysis Services database role that you want to use
when you connect. The identity you are using to connect to the cube must
be a member of the role you choose. This can be useful during
development when you want to test different security settings.
Authentication
After you have successfully
connected to a cube, the next step is to specify how you want to connect
to the cube. You have the following options:
Unattended Service Account
In PPS 2007, the Unattended
Service Account was the same as the application pool identity that was
being used for the PPS web service, preview site, and SharePoint site.
If you needed to change the identity, you had to change the application
pool identity.
In PPS 2010, the
Unattended Service Account is defined separately from the application
pool identity. The farm administrator defines the Unattended Service
Account in the Central Administration tool located on the
PerformancePoint Service Application Settings page.
Note
A common issue that occurs
when connecting to a newly deployed cube is that a role that was
previously configured has been overwritten or deleted. Security settings
may be set to prevent this issue.
Using this
configuration for authentication will scale better than the other two
options because all users are connecting as the same user identity.
Therefore, more caching can be done, which results in improved
performance. On the other hand, this option does not allow you to filter
data from the cube based on the user who is logged in. All users will
have access to the same data.
Unattended Service Account and Add Authenticated User Name in Connecting String
The Unattended Service Account
and Add Authenticated User Name in Connecting String setting is similar
to the Unattended Service Account setting. The difference is that after
you have connected to the cube, you can retrieve the name of the
connected user using the CustomData() MDX
function. This allows you to do a look up against a value in the cube
and dynamically return a cell set. This is often called dynamic OLAP security, which can be useful if it is difficult to align security roles with Active Directory groups.
Following is a script that uses CustomData()
to look up a user in the Employee dimension. If the user exists,
Reseller Sales data for every country that has a match in the Geography
dimension is returned:
Exists( [Geography].[Country].[Country].Members,
Filter(Employee.Employee.Employee.Members,
Employee.Employee.CurrentMember.Properties("Login ID") = CustomData()),
"Reseller Sales")
Because this setting depends on the CustomData() MDX function, it is available only when connecting to an Analysis Services cube.
Per-User Identity
The Per-User Identity
setting allows you to connect to the cube using the identity of the
logged-in user. You can also filter data in the cube based on its
security settings. For example,
you can restrict certain dimension members to show up in a filter. The
potential downside to using this option is scalability. If you have a
large number of users that interact heavily with a dashboard, little
data can be cached.
Caution
There are two ways to utilize the Per-User Identity setting.
The easiest is to do a
standalone installation of SharePoint, which automatically configures
per-user security for any requests that do not leave the box. This is
useful in demo scenarios where the cube is deployed locally on the
SharePoint server. Because this requires a standalone configuration,
there are some limitations to the amount of content. Keep in mind that
this scenario does not work in a single-machine farm scenario.
The other way to accomplish this
is to configure Kerberos authentication for the environment. This
requires domain-level settings but enables this authentication mechanism
for all farm scenarios.
Formatting Dimension and Cache Interval
The Formatting Dimension setting allows you to specify which of your cube dimensions has the data formatting information to use.
The Cache Interval setting
allows you to specify the time interval before queries will be re-sent
to the cube. If the cube data changes within the specified time
interval, the change will not be reflected until the cache has expired.
Setting this to zero has the effect of always returning real-time data
but will cause increased load on both the data source and SharePoint
server.