You can view 3D layers from any number of angles and distances using layers called cameras.
When you set a camera view for your composition, you look at the layers
as though you were looking through that camera. You can choose between
viewing a composition through the active camera or through a named,
custom camera. If you have not created a custom camera, then the active
camera is the same as the default composition view.
So far, you have primarily been viewing this
composition from the Custom View 1 angle, which doesn’t take blending
modes or 2D layers into account. Switching to the Active Camera view
doesn’t let you see your composition from an angle. To see everything
you want to see, you’ll create a custom camera.
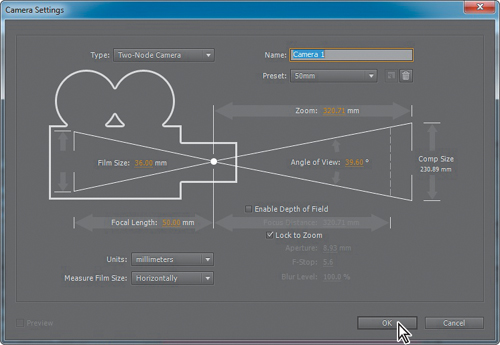
1. | Choose Layer > New > Camera.
|
2. | In
the Camera Settings dialog box, accept all of the defaults, including
the name (Camera 1) and the 50mm preset, and then click OK.
|
The Camera 1 layer appears at the top of the layer
stack in the Timeline panel (with a camera icon next to the layer name),
and the Composition panel updates to reflect the new camera layer’s
perspective. The view doesn’t appear to change, however, because the
50mm camera preset uses the same settings as the default Active Camera
view.
3. | Choose
2 Views – Horizontal from the Select View Layout pop-up menu at the
bottom of the Composition panel. Change the left view to Right and the
right view to Active Camera from the 3D View pop-up menu.
|

Setting the camera’s point of interest
Camera layers have a point of interest
that can be used to determine what the camera looks at. By default, the
camera’s point of interest is the center of the composition. You’ll set
this camera layer to look at the Book and Ground layers from a very
specific angle.
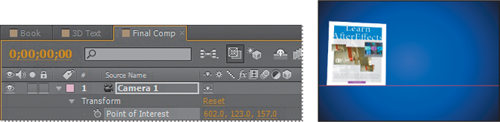
1. | Expand the Camera 1 layer’s Transform property group in the Timeline panel.
|
2. | While
watching the right view (on the left side) in the Composition panel,
drag the Point Of Interest property y-axis value to the left in the
Timeline panel until the point of interest icon ( ) in the Composition panel is in the middle of the book. The final value should be 123; enter it manually if necessary. ) in the Composition panel is in the middle of the book. The final value should be 123; enter it manually if necessary.
|
3. | In the Timeline panel, change the Point Of Interest x-axis value to 602 and the z-axis value to 157.
|
This perspective looks a little more interesting, but
the camera is intersecting the Ground layer plane. The Point Of
Interest property determines where the camera is looking, but its
placement is controlled by its Position property.
4. | Change the Position property values for the Camera 1 layer to 27, 132, -640.
|
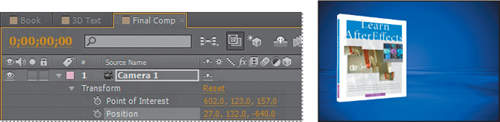
The book in the Active Camera view (on the right) looks a lot better.
5. | Close all the properties for the Camera 1 layer, and choose File > Save. |
