Just as you can create other
3D objects in After Effects, you can create 3D text. Flat text isn’t as
interesting, so you’ll give the text more depth.
Creating the composition
You’ll create a new
composition for the text, and just as you did before, you’ll create a 3D
grid to serve as the floor of the space to help you maintain
perspective.
1. | Click the Create A New Composition button ( ) at the bottom of the Project panel. ) at the bottom of the Project panel.
|
2. | In the Composition Settings dialog box, name the composition 3D Text, and choose NTSC DV from the Preset menu. Then click OK to create the composition.
|
3. | Press Ctrl+Y (Windows) or Command+Y (Mac OS) to create a new solid layer.
|
4. | In the Solid Settings dialog box, name the layer 3D Grid, set the Width and Height both to 800 pixels, and click OK.
|
5. | With the 3D Grid layer selected in the Timeline panel, choose Effect > Generate > Grid.
|
6. | Select the 3D Layer switch ( ) for the 3D Grid layer. ) for the 3D Grid layer.
|
7. | With
the 3D Grid layer selected in the Timeline panel, press R to reveal its
Rotation properties. Then change the X Rotation value to 90 degrees. Press R again to hide the Rotation properties.
 |
8. | With the 3D Grid layer selected in the Timeline panel, choose Layer > Guide Layer.
|
Tip
If you plan to work with 3D
objects in the future, save the composition to use as a basis for later
projects so that you’ll already have a 3D grid in place.
The grid you’ve created will guide you as you work with 3D text, but won’t render with your project.
Creating 3D text
With the grid in place, you’re ready to create the text. You’ll type the words first, and then convert the layer to a 3D layer.
1. | Select the Horizontal Type tool ( ) in the Tools panel. After Effects opens the Character and Paragraph panels. ) in the Tools panel. After Effects opens the Character and Paragraph panels.
|
2. | In the Character panel, do the following:
- Choose Myriad Pro for the font family.
- Choose Bold for the font style.
- Select white for the text color.
- Set the stroke color to none.
- Change the font size to 120 pixels.
|
3. | In the Paragraph panel, select the Center Text alignment option.

|
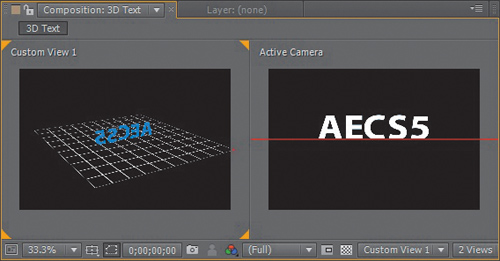
4. | Click anywhere in the Composition panel, in either view, and type AECS5. Then click an empty area of the Timeline panel to deactivate the Horizontal Type tool.
|
5. | Select the 3D Layer switch ( ) for the AECS5 layer. ) for the AECS5 layer.
|
6. | With the AECS5 layer selected in the Timeline panel, press P to reveal its Position property.
|
7. | Right-click
(Windows) or Control-click (Mac OS) the Position property name, and
choose Reset from the context menu. The text moves to the center of the
grid.
|

Note
This technique gives you the
effect of extrusion in some views, but may not provide good results when
you rotate the text at some angles. For true extruded text, use Adobe
Photoshop Extended.
Adding depth to the text with expressions
The text is
three-dimensional, but one of those dimensions—the z axis—is only 1
pixel wide. You’ll duplicate the layer and offset it by 1 pixel to add
depth to the text.
1. | Select the AECS5 layer in the Timeline panel, and choose Edit > Duplicate.
|
A new layer, named AECS6, is
added to the Timeline panel. The duplicate layer is named AECS6 because
After Effects continues the layer numbering from AECS5, but the content
of the layer has not been changed.
2. | Double-click the original AECS5 layer in the Timeline panel to select its contents.
|
3. | In the Character panel, change the text color to blue (R=19, G=125, B=245), and click an empty area of the Timeline panel to deactivate the Horizontal Type tool.
|
Text in the Composition window appears white because it’s in front of the blue layer.
4. | Press
Alt (Windows) or Option (Mac OS) as you click the stopwatch icon next
to the Position property for the original AECS5 layer.
|

Note
While you are editing an
expression, all previews are suspended; a red bar appears at the bottom
of panels until you exit text-editing mode.
After Effects displays the words transform.position
in the expression field in the time ruler. With expressions, you can
create relationships between layer properties and use one property’s
keyframes to dynamically animate another layer.
5. | Type thisComp.layer(index-1).transform.position+[0,0,1] to replace transform.position in the expression field.
|
6. | Click an empty area of the Timeline panel to accept the expression.
|

The expression you
typed instructs After Effects to use the layer immediately above it,
changing the Position property by 1 pixel on the z axis. Here’s how it
breaks down: thisComp.layer refers to this composition, index-1 refers to the layer immediately above the current layer, transform.position means to change the Position property, and +[0,0,1] means add 1 pixel to the z axis.
You don’t have to memorize
this expression or learn JavaScript, the language used in expressions.
You can adapt simple expressions and modify them to meet your needs.
7. | Select the Orbit Camera tool ( ),
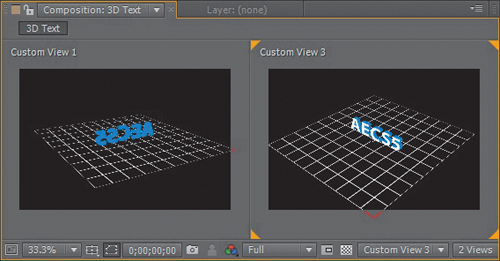
and drag across the left view in the Composition window to see the back
of the text. The back is blue and the front is white. But it’s still
only 2 pixels deep. ),
and drag across the left view in the Composition window to see the back
of the text. The back is blue and the front is white. But it’s still
only 2 pixels deep.
 |
8. | Select
the original AECS5 layer in the Timeline panel, and press Ctrl+D
(Windows) or Command+D (Mac OS) 19 times to create 19 additional layers.
|
9. | Use
the Orbit Camera tool to move around the object. The text object is
much deeper now, as you copied the expression along with each of those
19 layers. The front layer is white, but all the other layers are blue.
To see the effect more clearly, change the right view to Custom View 3.
 |
10. | Choose File > Save to save your work so far. |