Motion blur is clearly essential to a realistic shot
with a good amount of motion. It is the natural result of movement that
occurs while a camera shutter is open, causing objects in the image to
be recorded at every point from the shutter opening to closing. The
movement can be from individual objects or the camera itself. Although
it essentially smears layers in a composition, motion blur is generally
desirable; it adds to persistence of vision and relaxes the eye.
Aesthetically, it can be quite beautiful.
Close-up: Blurred Vision
Motion
blur occurs in your natural vision, although you might not realize
it—stare at a ceiling fan in motion, and then try following an
individual blade around instead and you will notice a dramatic
difference. There is a trend in recent years to use extremely high-speed
electronic shutters, which drastically reduce motion blur. It gives the
psychological effect of excitement or adrenaline by making your eye
feel as if it’s tracking motion with heightened awareness. |
The idea with motion blur
in a realistic visual effects shot is usually to match the amount of
blur in the source shot, assuming you have a reference; if you lack
visual reference, a camera report can also help you set this correctly.
Any moving picture camera has a shutter speed
setting that determines the amount of motion blur. This is not the
camera’s frame rate, although the shutter does obviously have to be fast
enough to accommodate the frame rate. A typical film camera shooting 24
fps (frames per second) has a shutter that is open half the time, or 1/48 of a second.
Decoding After Effects Motion Blur
The Advanced tab of Composition Settings (Ctrl+K/Cmd+K) contains Motion Blur settings (Figure 1):
Shutter Angle controls shutter speed, and thus the amount of blur.
Shutter Phase determines at what point the shutter opens.
Samples Per Frame applies to 3D motion blur and Shape layers; it sets the number of slices in time (samples), and thus, smoothness.
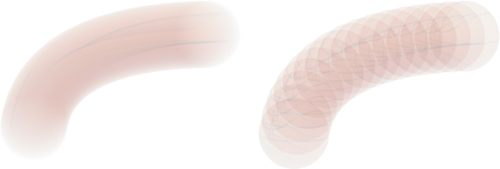
Adaptive Sample Limit applies only to 2D motion blur, which automatically uses as many samples as are needed up to this limit (Figure 2).


Here’s
a bit of a gotcha: The default settings that you see in this panel are
simply whatever was set the last time it was adjusted (unless it was
never adjusted, in which case there are defaults). It’s theoretically
great to reuse settings that work across several projects, but I’ve seen
artists faked out by vestigial extreme settings like 2 Samples Per
Frame or a 720-degree blur that may have matched perfectly in some
unique case.
Shutter Angle refers to
an angled mechanical shutter used in older film cameras; it is a
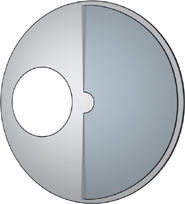
hemisphere of a given angle that rotates on each frame. The angle
corresponds to the radius of the open section—the wedge of the whole pie
that exposes the frame (Figure 3). A typical film shutter is 180 degrees—open half the time, or 1/48 of a second at 24 frames per second.

Electronic shutters are
variable but refer to shutter angle as a benchmark; they can operate
down in the single digits or close to a full (mechanically impossible)
360 degrees. After Effects motion blur goes to 720 degrees simply
because sometimes mathematical accuracy is not the name of the game, and
you want more than 360 degrees.
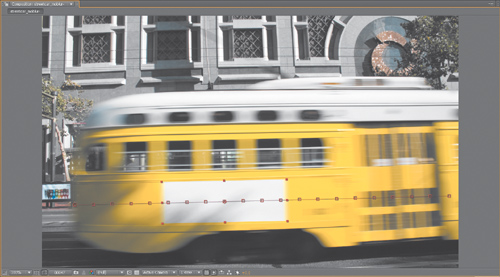
If you don’t know how the
shutter angle was set when the plate was shot, you can typically nail it
by zooming in and matching background and foreground elements by eye (Figure 4). If your camera report includes shutter speed, you can calculate the Shutter Angle setting using the following formula:
shutter speed = 1 / frame rate * (360 / shutter angle)

This isn’t as gnarly as it
looks, but if you dislike formulas, think of it like this: If your
camera takes 24 fps, but Shutter Angle is set at 180 degrees, then the
frame is exposed half the time (180/360 = ½) or 1/48 of a second. However, if the shutter speed is 1/96 per second with this frame rate, Shutter Angle should be set to 90 degrees. A  per second shutter would have a 9-degree shutter angle in order to obey this rule of thumb.
Shutter Phase determines
how the shutter opens relative to the frame, which covers a given
fraction of a second beginning at a given point in time. If the shutter
is set to 0, it opens at that point in time, and the blur appears to extend forward through the frame, which makes it appear offset.
The default –90 Shutter
Phase setting (with a 180-degree shutter angle) causes half the blur to
occur before the frame so that blur extends in both directions from the
current position. This is how blur appears when taken with a camera, so a
setting that is –50% of shutter angle is essential when you’re adding
motion blur to a motion-tracked shot. Otherwise, the track itself
appears offset when motion blur is enabled.
Enhancement Easier Than Elimination
Although software may one day
be developed to resolve a blurred image back to sharp detail, it is
much, much harder to sharpen a blurred image elegantly than it is to add
blur to a sharp image. Motion blur comes for free when you keyframe
motion in After Effects; what about when there is motion but no blur and
no keyframes, as can be the case in pre-existing footage?
If
you have imported a 3D element with insufficient blur, or footage shot
with too high a shutter speed, you have the options to add the effect of
motion blur using
Directional Blur, which can mimic the blur of layers moving in some uniform X and Y direction
Radial Blur, which can mimic motion in Z depth (or spin)
Timewarp, which can add motion blur without any retiming whatsoever
Yes, you read that last one
correctly.