Once you've developed your HTML and JavaScript
application in Dreamweaver and tested it thoroughly, you're ready to
convert it to a full-fledged AIR application. The key component of the
AIR Extension for Dreamweaver is a packaging utility that gathers the
indicated files, sets the window parameters, determines an icon, and
creates a secure, digitally signed application.
To package an AIR application, follow these steps:
Open the page that will appear when your AIR application is first run. Choose Site => AIR Application Settings. When the AIR Application And Installer Settings dialog first opens (see Figure 1), enter the name you want to use for the executable file in the File Name field. By
default, Dreamweaver uses the site name for the executable. Make sure
that whatever name you choose is operating system–friendly and does not
use any special characters. I also recommend that you remove any spaces,
substituting underscores for them instead. In the Name field, enter the name you want to appear on the installer screen. You're free to make this name as user-friendly as you like: there are no restrictions on special characters. Enter a unique ID for your application in the ID field. Again, no special characters are allowed. Be sure to use only 0–9, a–z, A–Z,. (period), and - (dash). Set the version of your application in the Version field. If you're planning to do minor and/or major upgrades, it's a good idea to use a multi-decimal system, like 1.0.0.
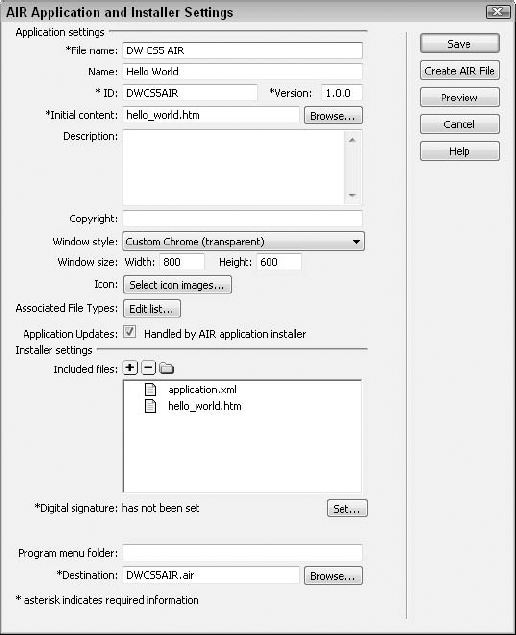
Click Browse next to the Initial Content field and locate the HTML page you want to display when your AIR application opens. If you like, enter a brief description of your application in the Description field, which will appear on the installer screen. Optionally,
enter copyright information in the Copyright field, which will appear
on the About screen for Macs. There is no equivalent screen in Windows. From the Window Style list, choose the type of chrome to apply to your AIR application. The choices are: System Chrome: Uses the standard operating system chrome. Custom Chrome (Opaque): Uses the interface elements included in your HTML page and results in a rectangular frame. Custom Chrome (Transparent):
Uses the interface elements in your HTML page and applies a
transparency to the edges, which can result in non-rectangular shapes.
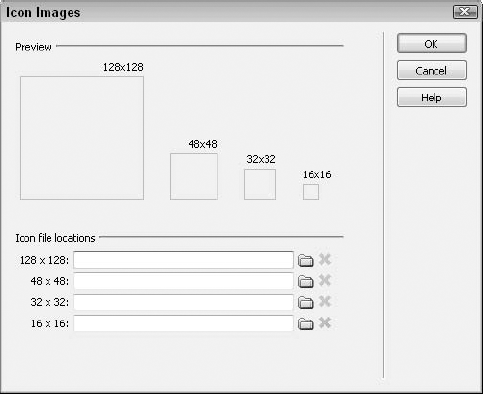
Set the dimensions of your application in the Window Size Width and Height fields. If you'd like your application to have a custom icon, click Select Icon Images and, in the Icon Images dialog box (see Figure 2),
choose the file and path for the four required sizes (in pixels): 128 ×
128, 48 × 48, 32 × 32, and 16 × 16. The default AIR icon is used if no
custom one is defined. Icon images must be in PNG format and stored in the current site.
|
Don't want to hassle with
creating four different versions of your icon? No worries — there's an
AIR application available on the Adobe AIR Marketplace that will do it
for you! Visit http://adobe.com/cfusion/exchange/index.cfm?event=extensionDetail&extid=1700072
to download the PNG Icon Generator for Adobe AIR applications by Muzak.
All you'll need is an initial icon at 256 × 256 pixels in PNG format
and the app does the rest!
|
|
If
you'd like to associate one or more file types to your application,
click Edit List. When the Associated File Type dialog box appears,
choose Add (+). In the File Type Settings dialog, enter the name of the
file type (up to 38 characters), the file extension (without a leading
period), an optional description, the MIME type (that is, text/html),
and the icon image locations, if custom icons are desired. If
you want the AIR installer to manage updates to your application, leave
the Application Updates option selected. If your application is capable
of managing the updates itself, deselect this option. That's all of the application settings; there are just a few more settings to define for the installer. Add
any additional files used in your application in the Included Files
area. To include an individual file, click Add (+) and select the file.
To include a folder, such as SpryAssets, click the folder icon. Make
sure not to include any system files, including those created by
Dreamweaver, such as any _note or _mmServerScript files. If you
accidentally include these in the list, select them and click Remove
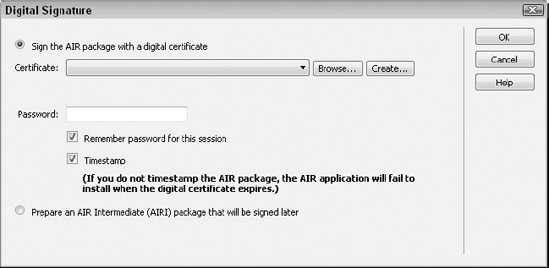
(–). To define your digital signature, click Set. The
digital signature is a key piece in AIR security and a requirement for
installation. When an application is digitally signed, it assures the
user that the application has not been modified since it was created and
signed. In the Digital Signature dialog box (see Figure 3), choose one of the following options: Sign the AIR package with a digital certificate.
Select this option if you already have a certificate or if you would
like to create one. If you already have a certificate, click Browse and
locate it. If you'd like to make a self-signed digital certificate,
click Create and complete the dialog that appears. Enter your password
and, optionally, choose to remember it for the session. Choose the
Timestamp option to ensure that the application will continue to install
when the digital certificate expires. NOTE
If you intend
to distribute AIR applications publicly, it is highly recommended that
you purchase a digital certificate from a known authority, such as
GeoTrust. With only a self-signed certificate, the AIR installer lists
the publisher as "unknown" — not a very reassuring indication.
Prepare an AIR Intermediate (AIRI) package that will be signed later. This option is viable for testing purposes only and the application cannot be installed without a full certificate.
If
you'd like to create a subdirectory in the Windows Start menu, enter
its name in the Program Menu Folder field. This option has no equivalent
on the Mac. If
you'd like to save your application installer in a different location
than the site root, click Browse and select a new path. The name of the
installer is automatically supplied for you, but can be modified as long
as you keep the .air extension. Click Preview to display your AIR application. If you're ready to create the application installer, click Create AIR File. As you'll see shortly, you can also use another command to create this file once your settings are saved. Click Save to store your settings and create the AIR file at a later time.
In the normal process, you
would typically create a build of your AIR application and then test it.
To make changes, return to Dreamweaver and add any refinements or
modifications needed. If you need to add additional files, re-open the
AIR Application Settings dialog box and include them.
With your settings stored, you
can continue to make changes. When you're ready to create a new build of
your application, choose Site =>
Create AIR File. Dreamweaver will note that the file exists and ask if
you'd like to replace it; click Yes. After a progress screen is
displayed, Dreamweaver informs you whether the operation was successful
and, if so, where the AIR installer file can be found.
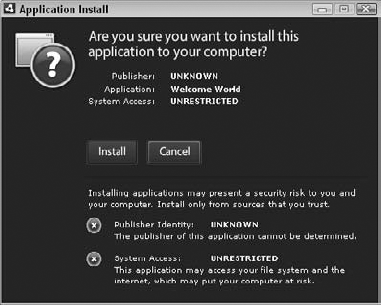
You can double-click the AIR installer right in Dreamweaver's Files panel and it will begin the installation process, shown in Figure 4. Here, you can see that using a self-identifying certificate results in the publisher being listed as unknown.
After Install is clicked, a
second screen displays the name of application and description
previously defined. It also asks if you'd like an icon placed on the
desktop and if you'd like the application to start after the
installation is complete; click Continue to proceed.
Next, your fully functioning desktop application is displayed, like mine in Figure 5.
Here, I've added a Spry Accordion panel, rounded corners via WebKit's
enhanced CSS styling, with transparent chrome to show them off, and, of
course, a lovely image to complete the Hello World application.

|
