After Effects is more flexible when working with time
than most video applications. You can retime footage or mix and match
speeds and timing using a variety of methods.
Absolute (Not Relative) Time
After Effects measures time in
absolute seconds, rather than frames, whose timing and number are
relative to the number per second. If frames instead of seconds were the
measure of time, changing the frame rate on the fly would pose a much
greater problem than it does.
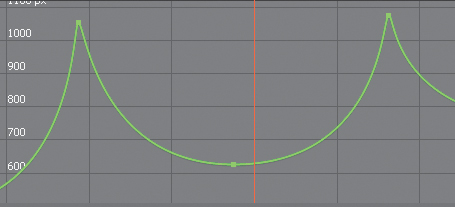
Change the frame rate of a
composition and the keyframes maintain their position in actual time, so
the timing of an animation doesn’t change (Figure 1), only the position of the keyframes relative to frames. Here’s a haiku:

| keyframes realign |
| falling between retimed frames |
| timing is unchanged |
Likewise,
footage (or a nested composition) with a mismatched frame rate syncs up
at least once a second, but the intervening source frames may fall in
between composition frames. Think of a musician playing 3 against 4; one
second in After Effects is something like the downbeat.
Time Stretch
Time Stretch lets you alter
the duration (and thus the speed) of a source clip—but it doesn’t let
you animate the retiming itself (for that, you need Time Remap or
Timewarp). The third of the three icons at the lower left of the
Timeline panel reveals the In/Out/Duration/Stretch columns.
I mostly change the Stretch
value and find the inter-related settings of all four-columns
redundant. I also never use a Time Stretch setting that is anything but
an integer multiple or division by halves: 300%, 200%, 50%, or 25%. You
can do without the columns altogether using the Time Stretch dialog
(context-click > Time > Time Stretch). Ctrl+Alt+R (Cmd+Opt+R)
or Layer > Time > Time-Reverse Layer sets the Stretch value to
–100%. The layer’s appearance alters to remind you that it is reversed (Figure 2).

Layer > Time > Freeze Frame applies the Time Remap effect with a single Hold keyframe at the current time.
Frame Blend
Suppose you retime a source
clip with a Stretch value that doesn’t factor evenly into 100%; the
result is likely to lurch in a distracting, inelegant fashion. Enable
Frame Blend for the layer and the composition, and After Effects
averages the adjacent frames together to create a new image on frames
that fall in between the source frames. This also works when you’re
adding footage to a composition with a mismatched frame rate. There are
two modes:
Frame Mix mode overlays adjoining frames, essentially blurring them together.
Pixel
Motion mode uses optical flow techniques to track the motion of actual
pixels from frame to frame, creating new frames that are something like a
morph of the adjoining frames.
Confusingly, the icons for these modes are the same as Draft and Best layer quality, respectively (Figure 3),
yet there are cases where Frame Mix may be preferable instead of merely
quicker. Pixel Motion can often appear too blurry, too distorted, or
contain too many noticeable frame artifacts, in which case you can move
back to Frame Mix, or move up to the Timewarp effect, with greater
control of the same technology .

Notes
The
optical flow in Pixel Motion and the Timewarp effect was licensed from
the Foundry. The same underlying technology is also used in Furnace
plug-ins for Shake, Flame, and Nuke. |
Nested Compositions
Time Stretch (or Time Remap)
applies the main composition’s frame rate to a nested composition;
animations are not frame-blended; instead the keyframe interpolation is
resliced to this new frame rate. If you put a composition with a lower
frame rate into a master composition, the intention may be to keep the
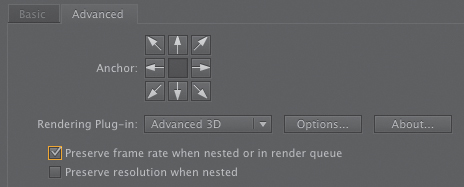
frame rate of the embedded composition. In such a case, go to the nested composition’s Composition Settings > Advanced panel and toggle Preserve Frame Rate When Nested or in Render Queue (Figure 4).
This forces After Effects to use only whole frame increments in the
underlying composition, just as if the composition were pre-rendered
with that frame rate.

Notes
Effect
> Time > Posterize Time can also force any layer to take on the
specified frame rate, but effects in the Time category should be applied
before all other effects in a given layer. Posterize Time often breaks
preceding effects. |
Tip
The
final Time Remap keyframe is one greater than the total timing of the
layer (in most cases a nonexistent frame) to guarantee that the final
source frame is reached, even when frame rates don’t match. To get the
last visible frame you must often add a keyframe on the penultimate
frame. |
Time Remap
For tricky timing, Time
Remap trumps Time Stretch. The philosophy is elusively simple: A given
point in time has a value, just like any other property, so it can be
keyframed, including eases and even loops — it operates like any other
animation data.
Ctrl+Alt+T (Cmd+Opt+T)
or Layer > Time > Enable Time Remapping sets two Time Remap
keyframes: at the beginning and one frame beyond the end of the layer.
Time remapped layers have a theoretically infinite duration, so the
final Time Remap frame effectively becomes a Hold keyframe; you can then
freely scale the layer length beyond that last frame.
Beware when applying Time
Remap to a layer whose first or last frame extends beyond the
composition duration; there may be keyframes you cannot see. In such a
case, I tend to add keyframes at the composition start and end points,
click Time Remap to select all keyframes, Shift-deselect the ones I can
see in the Timeline panel, and delete to get rid of the ones I can’t
see.
Tip
There
is also a Freeze Frame option in After Effects; context-click a layer,
or from the Layer menu choose Time > Freeze Frame, which sets Time
Remap (if not already set) with a single Hold keyframe. |
Timewarp
The Foundry’s
sophisticated retiming tool known as Kronos provides the technology used
in Pixel Motion and Timewarp. Pixel Motion is an automated setting
described earlier, and Timewarp builds this up by adding a set of effect
controls that allow you to tweak the result. Timewarp uses optical flow
technology to track any motion in the footage. Individual, automated
motion vectors describe how each pixel moves from frame to frame. With
this accurate analysis it is then possible to generate an image made up
of those same pixels, interpolated along those vectors, with different
timing. The result is new frames that appear as if in between the
original frames. When it works, it has to be seen to be believed.

So flipping the Frame Blend toggle in the Timeline panel (Figure 5)
to Pixel Motion with Time Stretch or Time Remapping gets you the same
optical flow solution as Timewarp with the same Pixel Motion method.
What’s the difference?
All methods can be
used to speed up or slow down footage, but only Time Remapping and
Timewarp dynamically animate the timing with keyframes.
All methods can access all three Frame Blending modes (Whole Frames, Frame Mix, and Pixel Motion).
Time
Remapping keyframes can even be transferred directly to Timewarp, but
it requires an expression (see note) because Timewarp uses frames and
Time Remapping seconds.
Timewarp is worth any extra trouble in several ways:
It can be applied to a composition, not just footage.
It includes the option to add motion blur with the Enable Motion Blur toggle.
The Tuning section lets you refine the automated results of Pixel Motion.
To apply Timewarp to the
footage, enable Time Remapping and extend the length of the layer when
slowing footage down—otherwise you will run out of frames. Leave Time
Remapping with keyframes at the default positions and Timewarp will
override it.
The
example footage has been pre-keyed, which provides the best result when
anyone (or anything) in the foreground is moving separate from the
background. Swap in the gs_timewarp_source footage and you’ll see some
errors. Add the keyed_timewarp_source layer below as a reference, set it
as the Matte Layer in Timewarp, and the errors should once again
disappear, with the added benefit of working with the full unkeyed
footage.
You can even further adjust
the reference layer and precomp it (for example, enhancing contrast or
luminance to give Timewarp a cleaner source), and then apply this
precom-posed layer as a Warp Layer—it then analyzes with the adjustments
but applies the result to the untouched source.
The Tuning section is where
you trade render time and accuracy, but don’t assume that greater
accuracy always yields a better result—it’s just not so. These tools
make use of Local Motion Estimation (LME) technology, which is
thoroughly documented in the Furnace User Guide, if you ever want to
fully nerd out on the details.
Now try a shot that needs more
tuning and shows more of the flaws of Pixel Motion, and how Timewarp can
help solve them. The footage in the 02_rotoSetup_sk8rboi folder on the
disc features several planes of motion—the wheels of the minivan, the
van itself, the skater—and at the climatic moment where the skater pulls
the 360 flip, the board utterly lacks continuity from one frame to the
next, a classic case that will break any type of optical flow currently
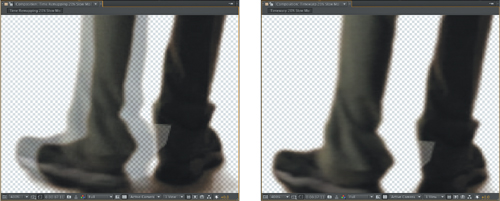
available (Figure 6).

Here are a few tweaks you can try on this footage, or your own:
While raising Vector
Detail would seem to increase accuracy, it’s hard to find anywhere in
this clip where it helps. Not only does a higher number (100)
drastically increase render time, it simply increases or at best shifts
artifacts with fast motion. This is because it is analyzing too much
detail with not enough areas to average in.
Smoothing
relates directly to Vector Detail. The Foundry claims that the
defaults, which are balanced, work best for most sequences. You can
raise Global Smoothness (all vectors), Local Smoothness (individual
vectors), and Smoothing Iterations in order to combat detail noise, but
again, in this case it changes artifacting rather than solving it.
During
the skateboard ollie itself, the 360 flip of the board is a tough one
because it changes so much from frame to frame. Build From One Image
helps quite a bit in a case like this—instead of trying to blend two
nonmatching sets of pixels, Timewarp favors one of them. The downside is
that sudden shifts occur at the transition points—the pixels don’t
flow.
There’s
no need in this clip to enable Correct Luminance Changes—it’s for
sudden (image flicker) or gradual (moving highlights) shifts in
brightness.
Error
Threshold evaluates each vector before letting it contribute; raise
this value and more vectors are eliminated for having too much perceived
error.
Block
Size determines the width and height of the area each vector tracks; as
with Smoothing, lower values generate more noise, higher values result
in less detail. The Foundry documentation indicates that this value
should “rarely need editing.”
Notes
Twixtor
(RE:Vision Effects) is a third-party alternative to Timewarp; it’s not
necessarily better but some artists—not all—do prefer it. A demo can be
found on the disc. |
Weighting lets you control how much a given color channel is factored. The defaults correspond to how the eye perceives color to produce a
monochrome image. If one channel is particularly noisy—usually blue—you
can lower its setting.
Filtering
applies to the render, not the analysis; it increases the sharpness of
the result. It will cost you render time, so if you do enable it, wait
until you’re done with your other changes and are ready to render.
Tip
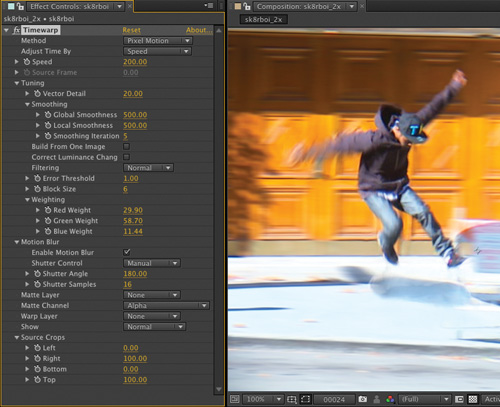
Did you
notice back in the Motion Blur section that Timewarp can be used to
generate procedural motion blur without retiming footage (Figure 7)?

|
The biggest thing you could do overall to improve results with a clip like sk8rboi is to use Roto Brush to separate out each moving element—the van, skater, and background.