Letting Camera Raw Auto-Correct Your Photos
If
you’re not quite comfortable with manually adjusting each image, like I
mentioned at the end of the last tutorial, Camera Raw does come with a
one-click Auto function, which takes a stab at correcting the overall
exposure of your image (including shadows, fill light, contrast, and
recovery), and at this point in Camera Raw’s evolution, it’s really not
that bad. If you like the results, you can set up Camera Raw’s
preferences so every photo, upon opening in Camera Raw, will be
auto-adjusted using that same feature.
Step One. | Once
you have an image open in Camera Raw, you can have Camera Raw take a
stab at setting the overall exposure (using the controls in the Basic
panel) for you by clicking on the Auto button (shown circled in red
here). In older versions of Camera Raw, this Auto correction feature
was...well...let’s just say it was less than stellar, but it’s gotten
much better since then, and now it does a somewhat decent job
(especially if you’re stuck and not sure what to do), so click on it and
see how it looks. If it doesn’t look good, no sweat—just press Command-Z (PC: Ctrl-Z) to Undo.

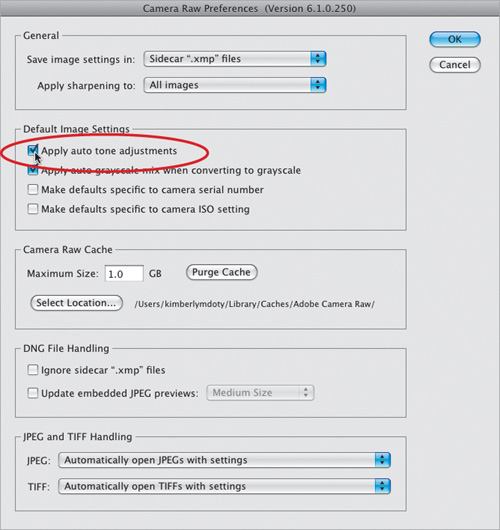
| Step Two. | You
can set up Camera Raw so it automatically performs an Auto Tone
adjustment each time you open a photo—just click on the Preferences icon
up in Camera Raw’s toolbar (it’s the third icon from the right), and
when the dialog appears, turn on the checkbox for Apply Auto Tone
Adjustments (shown circled here), then click OK. Now, Camera Raw will
evaluate each image and try to correct it. If you don’t like its tonal
corrections, then you can just click on the Default button, which
appears to the right of the Auto button (the Auto button will be grayed
out because it’s already been applied).
 |
Adding “Snap” (or Softening) to Your Images Using the Clarity Slider
This
is one of my favorite features in Camera Raw, and whenever I show it in
a class, it never fails to get “Oooohs” and “Ahhhhs.” I think it’s
because it’s just one simple slider, yet it does so much to add “snap”
to your image. The Clarity slider (which is well-named) basically
increases the midtone contrast in a way that gives your photo more punch
and impact, without actually sharpening the image (much like certain
Curves adjustments in Photoshop can add snap and punch to your photos).
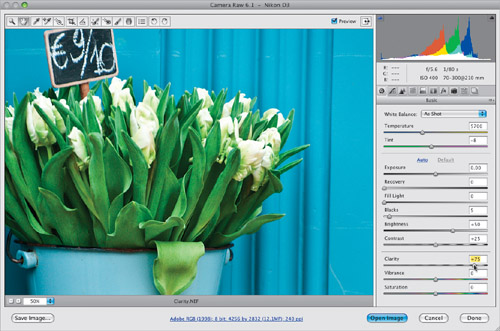
Step One. | The
Clarity slider is found in the bottom section of the Basic panel in
Camera Raw, right above the Vibrance and Saturation sliders. (Although
its official name is Clarity, I heard that at one point Adobe engineers
considered naming it “Punch” instead, as they felt using it added punch
to the image.) To clearly see the effects of Clarity, first zoom in to a
100% view by double-clicking on the Zoom tool up in the toolbar (it
looks like a magnifying glass). In the example shown here, I only zoomed
to 50% so you could see more of the image.
 | Step Two. | Using
the Clarity control couldn’t be easier—drag the slider to the right to
increase the amount of snap (midtone contrast) in your image (compare
the top and bottom images shown here). Almost every image I process gets
between +25 and +50 Clarity. If the image has lots of detail, like a
cityscape, or a sweeping landscape shot, or something with lots of
little details like a motorcycle (or leaves and flowers), then I’ll go
as high as +75 to +80, as seen here. If the subject is of a softer
nature, like a portrait of a child, then in that case, I don’t generally
apply any Clarity at all.
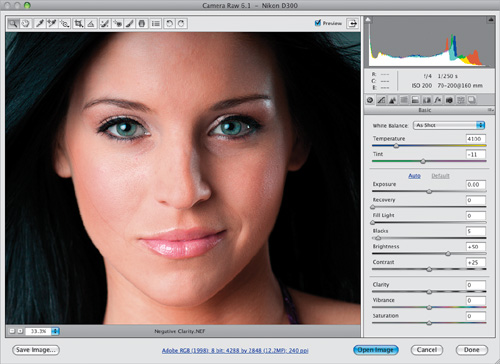
 | Step Three. | You
can also use the Clarity control in reverse—to soften skin. This is
called adding negative Clarity, meaning you can apply less than 0 (zero)
to reduce the midtone contrast, which gives you a softening effect. For
example, here’s an original image without any negative Clarity applied.
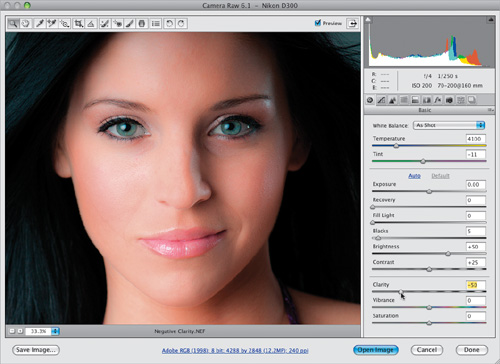
 | Step Four. | Now
drag the Clarity slider to the left (which gives you a negative amount
of Clarity), and take a look at how much softer our subject’s skin
looks. Everything else in the image looks softer too, so it’s an overall
softening, you’ll learn how to apply softening just to your subject’s skin (or
anything else you need softened), while leaving the rest of the image
sharp.
 |
|
