Logo
programming4us
programming4us
programming4us
programming4us
Home
programming4us
XP
programming4us
Windows Vista
programming4us
Windows 7
programming4us
Windows Azure
programming4us
Windows Server
programming4us
Windows Phone
 
Windows Vista

Adobe Photoshop CS5 : Maximizing Filters - Getting the Best Results - Fade and Blend

- Free product key for windows 10
- Free Product Key for Microsoft office 365
- Malwarebytes Premium 3.7.1 Serial Keys (LifeTime) 2019
8/28/2012 6:24:43 PM
Many people simply “slap” filters on their images and expect great results. This bandage approach does not usually create award-winning results. With a little bit of care, you can achieve significantly better looks.

Better Define the Target Area

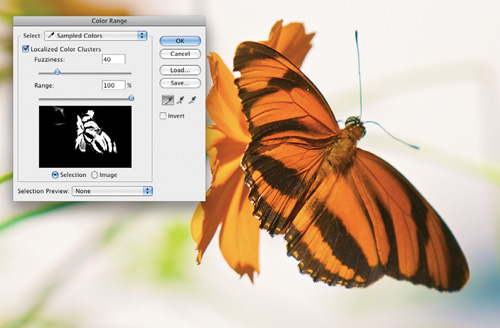
For the best results, you’ll want to accurately select the area to be filtered. Depending on what you want to achieve, filters can be run on the entire image, a small portion of the image, or even a single channel. Also, it’s not a bad idea to test a filter first by running it on a small area.


Smooth the Edges

A hard-edged selection creates a visible border where the filter processed the image. It is absolutely essential to soften your selections. Two techniques work well (and can be combined):

  • Choose Select > Modify > Smooth to round out hard corners in your selection.

  • Choose Select > Modify > Feather to create a gradual edge. This is similar to the difference between a line drawn by a ballpoint pen and a line drawn by a felt-tip pen.

Note: Smart Fade?

The Fade command is not available for Smart Filters (for that functionality, use the Blending Options icon).


Fade and Blend

The Fade command is a little-known secret in Photoshop. It allows you to further modify filters by harnessing the power of blending modes. Use this command to access all 24 blend modes besides Normal. It makes your filter collection 24 times larger.

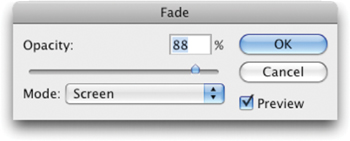
You must choose the Fade command immediately after the filter is run (even before you deselect the active selection). Let’s try it out:

1.
Open the file Ch14_Butterfly.tif.

2.
Choose Filter > Stylize > Glowing Edges.

3.
Adjust the sliders as desired until you have an image that looks much like a black velvet painting.
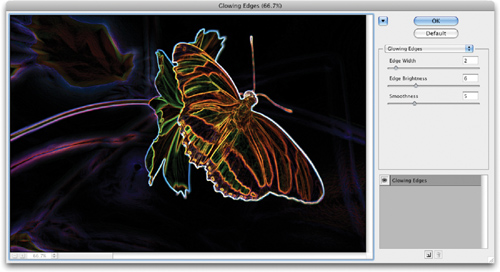
4.
Click OK.

5.
Invoke the Fade command by choosing Edit > Fade <name of filter>, or press Command+Shift+F (Ctrl+Shift+F). To remember this shortcut, think of it as though you want to command (or control) the shifting (fading) of the filter.

6.
Try different blending modes and Opacity settings to modify the look of the filter.

Tip: Using the Fade Command

If you forget to invoke the Fade command, step backwards through your History panel until the filter is removed. Then run the last filter again (with the same settings) by pressing Command+F (Ctrl+F). You can then invoke the Fade command.

Other -----------------
- Security in Windows Vista : Architectural and Internal Windows Vista Security Improvements (part 2)
- Security in Windows Vista : Architectural and Internal Windows Vista Security Improvements (part 1)
- Adobe Fireworks CS5 : Extra Credit (part 2) - Stroking rendered text
- Adobe Fireworks CS5 : Extra Credit (part 1) - Applying blending modes for image correction
- Adobe Flash Catalyst CS5 : Grouping and transforming
- Adobe Flash Catalyst CS5 : Binding the Data to the Visual Component
- Adobe After Effects CS5 : Building a 3D object (part 2)
- Adobe After Effects CS5 : Building a 3D object (part 1)
- Creating Basic Windows Images : Deploying Custom Images
- Creating Basic Windows Images : Capturing Custom Images
 
 
Top 10
- Microsoft Visio 2013 : Adding Structure to Your Diagrams - Finding containers and lists in Visio (part 2) - Wireframes,Legends
- Microsoft Visio 2013 : Adding Structure to Your Diagrams - Finding containers and lists in Visio (part 1) - Swimlanes
- Microsoft Visio 2013 : Adding Structure to Your Diagrams - Formatting and sizing lists
- Microsoft Visio 2013 : Adding Structure to Your Diagrams - Adding shapes to lists
- Microsoft Visio 2013 : Adding Structure to Your Diagrams - Sizing containers
- Microsoft Access 2010 : Control Properties and Why to Use Them (part 3) - The Other Properties of a Control
- Microsoft Access 2010 : Control Properties and Why to Use Them (part 2) - The Data Properties of a Control
- Microsoft Access 2010 : Control Properties and Why to Use Them (part 1) - The Format Properties of a Control
- Microsoft Access 2010 : Form Properties and Why Should You Use Them - Working with the Properties Window
- Microsoft Visio 2013 : Using the Organization Chart Wizard with new data
 
programming4us
Windows Vista
programming4us
Windows 7
programming4us
Windows Azure
programming4us
Windows Server