Skipping the Camera Raw Window Altogether
If
you’ve already applied a set of tweaks to a RAW photo, you probably
don’t need the Camera Raw editing window opening every time you open the
file. So, just press-and-hold the Shift key when you double-click on
the RAW file in Mini Bridge, and the image will open in Photoshop, with
the last set of edits already applied, skipping the Camera Raw window
altogether. If you didn’t apply any tweaks in Camera Raw, it just opens
with the Camera Raw defaults applied. Either way, it’s a big time saver.
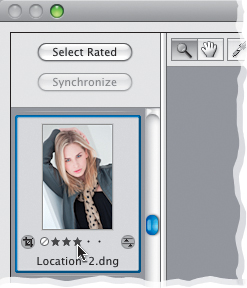
Rate Your Images in Camera Raw
You don’t have to be in Mini Bridge to add or change
star ratings. If you’ve got multiple images open, you can do it right in
Camera Raw. Just press Command-1, -2, -3 (PC: Ctrl-1, -2, -3),
and so on, to add star ratings (up to five stars). You can also just
click directly on the five little dots that appear below the thumbnails
in the filmstrip on the left.
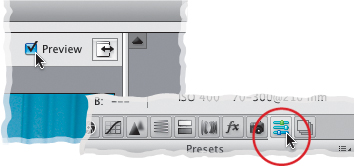
Seeing a True Before/After
The weird thing about the way Camera Raw handles
previews is it does them on a panel-by-panel basis, so if you make a
bunch of changes in the Basic panel, then switch to the Detail panel,
and makes changes there, when you turn off the Preview checkbox (on the
top right of the Preview area), it doesn’t give you a real before/after.
It just gives you a before/after of the panel you’re in right now,
which doesn’t give you a true before/after of your image editing. To get
a real before/after of all your edits in Camera Raw, click on the
Presets icon (the second icon from the right at the top of the Panel
area) or the Snapshots icon (the far right icon), and now when you
toggle on/off the Preview checkbox, it shows you the real before/after.
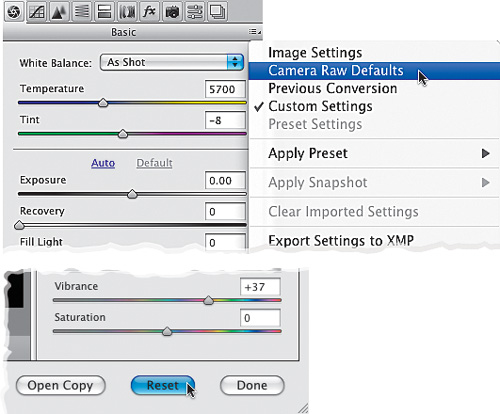
Don’t Get Fooled by the Default Button
If you’ve edited your image in Camera Raw, and then
you decide you want to start over, clicking the Default button in the
Basic panel (it’s to the left of the Auto button) won’t return your
image to how it looked when you opened it. Instead, to get back to the
original way your image looked when you first opened it in Camera Raw,
go to the Camera Raw flyout menu and choose Camera Raw Defaults. You can also press-and-hold the Option (PC: Alt) key, and the Cancel button will change to a Reset button.
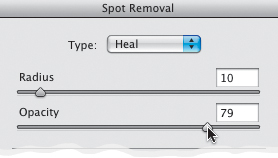
Cool Raw Retouching Trick
There’s a pretty common retouching technique in
Photoshop for reducing hot spots (shiny areas on a subject’s face),
which uses the Healing Brush to completely remove the hot spot, then
under the Edit menu, choosing Fade Healing Brush, and lowering the
Opacity there. A little hint of the hot spot comes back, so it looks
more like a highlight than a shine (it actually works really well). You
can do something similar in Camera Raw when using the Spot Removal tool
(set to Heal) by removing the hot spot (or freckle, or wrinkle) and then
using the Opacity slider in the Spot Removal options panel.
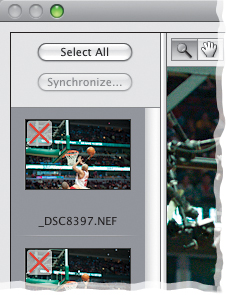
Deleting Multiple Images While Editing in Camera Raw
If
you have more than one image open in Camera Raw, you can mark any of
them you want to be deleted by selecting them (in the filmstrip on the
left side of Camera Raw), then pressing the Delete key on your keyboard.
A red “X” will appear on those images. When you’re done in Camera Raw,
click on the Done button, and those images marked to be deleted will be
moved to the Trash (PC: Recycle Bin) automatically. To remove the mark
for deletion, just select them and press the Delete key again.
Get a Larger Preview Area
If you have multiple images open in Camera Raw, and
need more room to see the preview of the image you’re currently working
on, just double-click right on that little divider that separates the
filmstrip from the Preview area, and the filmstrip tucks in over to the
left, out of the way, giving you a larger preview. To bring it back,
just double-click on that divider again (it’s now over on the far left
side of the Camera Raw window) and it pops back out.

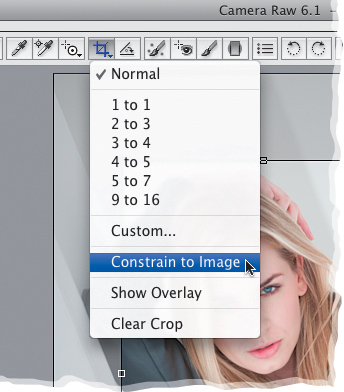
Constrained Cropping Is Here
In CS5, they added the ability to crop while keeping
the same aspect ratio as the original image. Click-and-hold on the Crop
tool in Camera Raw’s toolbar, and from the pop-up menu that appears,
choose Constrain to Image.
Rule-of-Thirds Cropping Is Here
This one Adobe borrowed from Camera Raw’s sister
program Photoshop Lightroom, because now (like in Lightroom), you can
have the “Rule-of-Thirds” grid appear over your cropping border anytime
by just clicking-and-holding on the Crop tool in the toolbar, then
choosing Show Overlay.
Jump to Full Screen Mode in Camera Raw
If you want to see your image in Camera Raw as large as possible, just press the F key, and Camera Raw expands to Full Screen mode, with the window filling your monitor, giving you a larger look at your image.
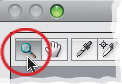
Shortcut for Viewing Sharpening
The best zoom magnification to view your sharpening
in Camera Raw is a 100% view, and the quickest way to get there is to
just double-click the Zoom tool.
Help with Fixing Chromatic Aberrations
If you have an image where you have more than one
chromatic aberration (which is quite common), this might make things
easier: when you’re fixing the first color, press-and-hold the Option
(PC: Alt) key before you start dragging the slider. This isolates that
color slider, and lets you focus on fixing just that one color for now.

