Using Deployment Workbench,
you configure the distribution share in the following ways (at a
minimum, you must add Windows Vista):
Add, remove, and configure operating systems.
Add, remove, and configure applications.
Add, remove, and configure operating system packages, including updates and language packs.
Add, remove, and configure out-of-box device drivers.
When you add operating systems, applications,
operating system packages, and out-of-box device drivers to the
distribution share, Deployment Workbench stores the source files in the
distribution share folder specified during BDD 2007 installation. The
default is D:\Distribution, where D
is the volume with the most available space. You associate source files
in the distribution share with builds later in the development process.
In the distribution share’s Control folder, Deployment Workbench stores
metadata about operating systems, applications, operating system
packages, and out-of-box device drivers in the following files:
Application.xml Contains metadata about applications in the distribution share
Drivers.xml Contains metadata about device drivers in the distribution share
OperatingSystems.xml Contains metadata about operating systems in the distribution share
Packages.xml Contains metadata about operating system packages in the distribution share
Adding Windows Vista
All
Windows Vista editions are in a single image file, Install.wim, which
is in the Sources folder on the distribution media. For more information
about the Windows Vista distribution media and Install.wim, see the
Windows AIK. To build images based on Windows Vista, you must add the
Windows Vista media to the BDD 2007 distribution share. Distribution
shares must contain at a minimum the Windows Vista source files.
In addition to adding Windows Vista media to the
distribution share, you can add Windows Vista images that already exist
in Windows DS. BDD 2007 will not copy these files to the distribution
share. Instead, BDD 2007 uses the files from their original location
during deployment. There are two requirements for doing this. First, you
must specify an image catalog to use when adding the image from Windows
DS, because an image catalog cannot be created from a Windows DS image.
Second, you must copy the following files from the \Sources directory
on the Windows Vista media to C:\Program Files\BDD 2007\bin:
Wdsclientapi.dll
Wdscsl.dll
Wdsimage.dll
Note
A catalog
(.clg) is a binary file that describes the components and settings in a
Windows image. Servicing a Windows Vista image (adding device drivers
and packages, for example) requires a catalog. For example, when you use
Windows SIM to create an answer file for a Windows Vista image, Windows
SIM first creates a catalog that describes the image’s contents.
Likewise, Deployment Workbench catalogs the images you add to the
distribution share. For more information about catalog files, see the
topic “Understanding Windows Image Files and Catalog Files” in the
Windows AIK. |
To add Windows Vista to a distribution share
1. | In
the Deployment Workbench console tree, right-click Operating Systems
under Distribution Share and click New to start the New OS Wizard.
|
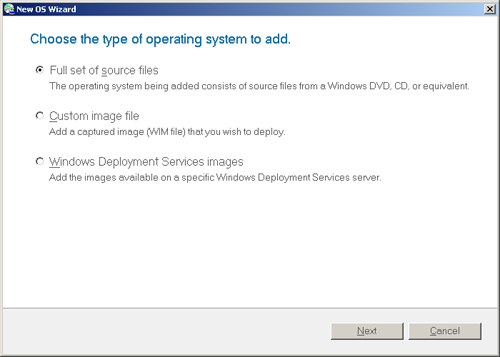
2. | On
the Choose The Type Of Operating System To Add page, select Full Set Of
Source Files, and then click Next. This option copies the entire set of
operating system source files from the distribution media or folder
containing the distribution media. Optionally, you can add operating
system images from a specific Windows DS server by selecting Windows
Deployment Services Images. You can also click Custom Image File to add a
custom image, created by using the Windows Deployment Wizard.
|
3. | On
the Select The Location Of The Operating System Files page, type the
path containing the operating system source files you’re adding to the
distribution share or click Browse to select the path, and then click
Next. If you’ve staged (pre-copied the source files to the local
computer) the operating system files on the local hard disk, you can
select Move The Files To The Distribution Share Instead Of Copying Them
to speed the process.
|
4. | On
the Specify The Destination page, type the name of the operating system
folder to create in the distribution share, and then click Copy. You
can accept the default name, which Deployment Workbench derives from the
source files, or use a name that describes the operating system version
and edition. For example, you can use Windows Vista Enterprise and
Windows Vista Business to distinguish between the different editions of
Windows Vista. Deployment Workbench uses this name to create a folder
for the operating system in the distribution share’s Operating Systems
folder.
|
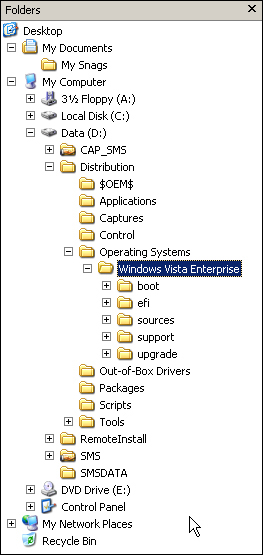
The copy process can take several minutes to
complete; the move process takes only seconds. After you add an
operating system to the distribution share, it appears in the details
pane of Operating Systems. Also, the operating system appears in the
distribution share in Operating Systems\subfolder (shown in Figure 1), where subfolder is the destination specified when adding the operating system.
To remove Windows Vista from the distribution share
1. | In the Deployment Workbench console tree, click Operating Systems.
|
2. | In the details pane, right-click the operating system you want to remove, and then click Delete.
|
Note
When
an operating system is deleted from Deployment Workbench, Deployment
Workbench also removes it from the Operating Systems folder in the
distribution share. In other words, removing an operating system from
Deployment Workbench also removes it from the file system. |
