Internet Explorer’s Protected Mode
When a process gets
launched—by a user, for example—the process is allowed to do only what
the user’s level of privilege (rights and permissions) allows. This is
true for all processes that run on a computer, including startup
services. Startup services usually run under the privilege of a user
account that is called the System account. So when a bad guy exploits a
vulnerability in (hacks) an application running on a computer, the bad
guy acquires the same level of privilege as the user account that was
used to launch the hacked application. The bad guy can do only what that
user is allowed to do on the computer.
Because Internet Explorer is the
application you use to attach to public servers all over the very
dangerous Internet, it is the application that gets most exposed to the
bad guys and malware. To make your system more secure while you are
potentially exposing yourself to the malware and bad guys, Microsoft
runs IE7, by default, in Protected Mode
any time you are connected to restricted sites, the Internet, or the
local intranet. The only zone that Protected Mode is not automatically
enabled for is Trusted Sites.
Protected Mode reduces the
level of privilege for the user account that launched Internet Explorer.
This way, if malware (or a bad guy) attacks and compromises the
browser, it can access only a bare minimum of resources on your
computer. Protected Mode isolates IE7 from all other applications that
are running on the computer and limits the browser to writing only to
the Temporary Internet Files folder without explicit user approval. If the browser attempts to write to any other area, the UAC prompt is displayed.
You can observe
whether Protected Mode is currently enabled by viewing the status bar,
on the lower edge of your browser. Protected Mode is enabled by default
for websites in the Internet, Local Intranet, and Restricted zones.
Note
If the status bar is not visible, you can turn it on by right-clicking the command bar and enabling the status bar.
You
can access the configuration for Protected Mode by double-clicking this
area on the status bar or by accessing the Security tab in Internet
Options (from the File menu or the command bar: Tools > Internet
Options).
Exam Alert
The
Security tab in Internet Options is an important area to become
familiar with. This is the place where you configure the security
parameters for each of the four security zones: Internet, Local
Intranet, Trusted Sites, and Restricted Sites. You can also identify
which security zone a specific website belongs in.
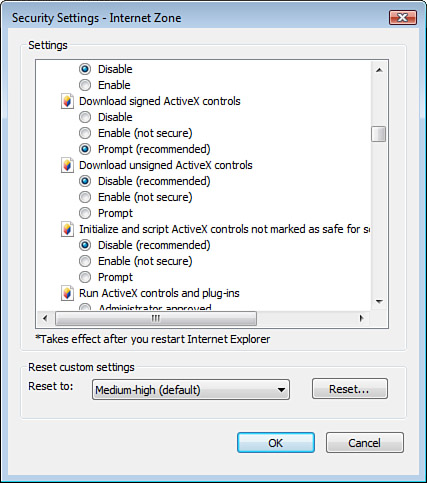
In the Custom Level Security Settings dialog box, as shown in Figure 4, you can adjust settings to Disable, Enable, or Prompt you for approval as your browser accesses .NET components, Signed and Unsigned ActiveX controls, and file downloads.

|
If you select Enable to turn
on more options, your browsing experience is more enhanced and feature
rich, with lots of cool cartoons and stuff, but you are more exposed to
potentially malicious mobile code and other types of malware.
If you select Disable to
turn off more options, you are more secure, minimizing your exposure to
the malware, but you see more blank boxes where the active content and
mobile code would have presented you some slick banners, cartoons, or
other attractive content.
If you select Prompt, with
each new web page that you access, you may be prompted one or more times
(sometimes in the teens or twenties) to allow or disallow the mobile
code and active content.
Make your decisions
carefully when configuring these settings. More cartoons and more cute
content equal more risk. Ask yourself, “Is it worth it?” or as Clint
would say, “You’ve got to ask yourself one question: ‘Do I feel lucky?’
Well, do ya?”
|
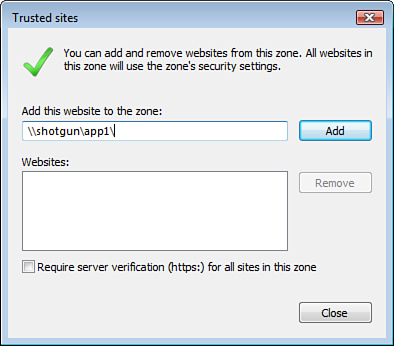
If
you use Internet Explorer 7 to attach to intranet resources by using
their Universal Naming Convention (UNC) path, you may receive a warning.
To avoid getting this warning, you can add the UNC path to the Trusted
security zone on the Security tab in Internet Options, as shown in Figure 5.

Tip
To accomplish the task of entering a UNC path in the Trusted Sites list to avoid this warning, you must clear the Require Server Verification check box on the Trusted Sites dialog box.
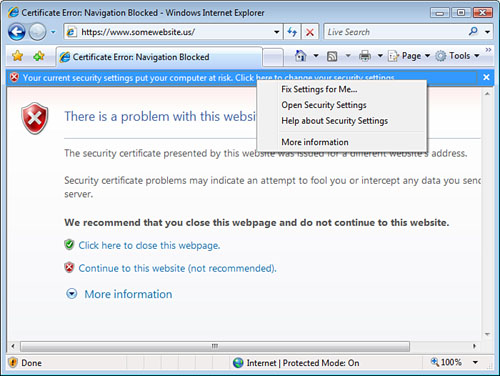
Fix Settings for Me...
IE7
monitors the security settings and alerts you if your settings put you
at risk. If your IE7 security settings put you at risk while browsing, a
warning bar drops down from the address bar to alert you.
You can identify which settings
are below the recommended settings by viewing the security settings in
Internet Options > Security, where you see a red Security shield on
the misconfigured zone. If you select the Custom level button for that
zone, any security items highlighted in red are below recommended
security settings.
You can right-click the drop-down alert and select the Fix Settings for Me option, as shown in Figure 6,
to restore the security settings to their original, recommended levels,
like the Medium-High configuration for the Internet zone.

Caution
Use Caution with Fixing Settings
Selecting the Fix Settings for Me option causes you to lose any
settings you have configured, including all allowed sites, trusted
sites, and restricted sites that have been added to various lists. You
may actually weaken security by resetting the security settings to their
“recommended” levels.