12. Dynamic elements
With one exception,
dynamic elements in Dreamweaver refer to form elements, linked to a data
source field. Data-connected form elements are typically used in Web
applications that update records. The single exception is Dynamic Text,
which is described in the following section. Dynamic Form Elements are
covered later.
12.1. Dynamic Text
Inserting a Dynamic
Text server behavior is the same as dragging a field from a recordset on
the Bindings panel onto the page. It's a matter of individual
preference which technique you use; personally, I find
dragging-and-dropping from the Bindings panel much faster and more
intuitive than using the Dynamic Text server behavior.
Requirements: A dynamic page.
To use the Dynamic Text server behavior, follow these steps:
Place your cursor on the page where you'd like the dynamic text to appear.
From the Server Behaviors panel, choose Dynamic Elements => Dynamic Text. The Dynamic Text dialog box is displayed, as shown in Figure 15.
If necessary, expand the recordset or other data source to select the desired dynamic data.
Choose any necessary server format from the Format list.
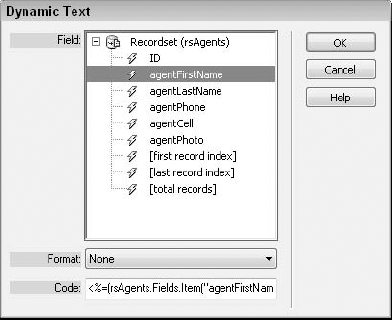
Enter any required adjustments to the dynamic data in the Code field. In most situations, no changes are necessary.
Click OK when you're finished.
12.2. Dynamic List/Menu
The Dynamic List/Menu server
behavior binds data to one or more aspects of a drop-down list. Dynamic
data from a recordset is typically bound to both the values and labels
of a list or menu element; static values and labels may also be combined
with the dynamic data. In addition, you have the option to dynamically
set the selected value, a feature often used when updating a record.
Requirements: A list/menu form element and a recordset.
To link a drop-down list to dynamic data, follow these steps:
Insert a list/menu form element on a dynamic page with a recordset.
If you have more than one list/menu on the page, select the one you want to convert.
From the Server Behaviors panel, choose Dynamic Form Elements => Dynamic List/Menu. The Dynamic List/Menu dialog box, shown in Figure 16, is displayed.
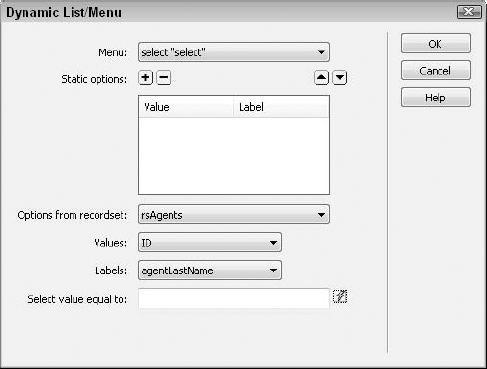
Verify that the desired drop-down list is displayed in the Menu list.
In
the Static Options box, add any nondynamic items you want to the top of
the list menu. This could be something as simple as a label for the
list menu or as complicated as a full URL with query strings for search
pages.
Choose the recordset you want to work with from the Options From Recordset list.
Choose the field from your data source containing the items that you want displayed to the user from the Labels list.
Choose the field from your data source containing the items you want submitted by the user from the Values list.
To
preselect an item, enter its value in the Select Value Equal To field
or use the lightning bolt icon to choose a value from the established
data sources.
Click OK when you're finished.
12.3. Dynamic Text Field
Unlike the Dynamic Text
server behavior, the Dynamic Text Field server behavior is not just for
show. The Dynamic Text Field server behavior is often used for
applications that update records and may be applied to either a text
field or text area form element. According to the server model used, the
data in the text field can be formatted server-side in a number of
ways, such as upper- or lowercase.
Requirements: A text field or text area form element and a recordset.
To link a text field or text area to dynamic data, follow these steps:
Insert
a text field into a form on a page with a recordset or other data
source. It's a good idea to name the text field and form at this point.
Although you can always change the names later, naming the elements
early on avoids problems later.
From the Server Behaviors panel, choose Dynamic Form Elements => Dynamic Text Field.
|
Be sure to choose
Dynamic Text Field and not Dynamic Text from the Dynamic Elements
submenu. If you select Dynamic Text while your text field is
highlighted, the form element is replaced.
|
|
In the Dynamic Text Field dialog box that appears (see Figure 17), verify that the correct form element was chosen in the Text Field list. If necessary, choose a different text field.
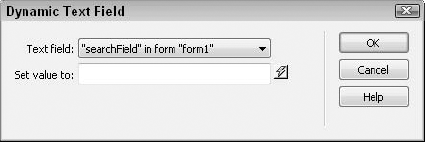
Click the Set Value To lightning bolt icon to display the available data sources.
Choose a field from the Dynamic Data dialog box.
If desired, you can apply a server format to the data by choosing an entry in the Format list.
Click
OK to close the Dynamic Data dialog box and, after reviewing your
choices, click OK again to close the Dynamic Text Field dialog box.
12.4. Dynamic CheckBox
Checkboxes provide users with a
method of selecting one or more options in a group; a Dynamic CheckBox
server behavior marks any affiliated checkbox as selected if the desired
criteria are met. This server behavior is often used in conjunction
with a Boolean data field, also known as a True/False or Yes/No data
field.
Requirements: A checkbox form element and a recordset.
To convert a static checkbox to a dynamic one, follow these steps:
Select a checkbox in a form on a page with a recordset.
From the Server Behaviors panel, choose Dynamic Form Elements => Dynamic CheckBox. The Dynamic CheckBox dialog box appears, as shown in Figure 18.
Verify that your selected checkbox is correctly named in the CheckBox list.
Click the Check If lightning bolt icon to display the available data sources.
Choose a field from the Dynamic Data dialog box.
If
desired, you can apply a server format to the data by choosing an entry
in the Format list. Click OK when you're finished to close the Dynamic
Data dialog box.
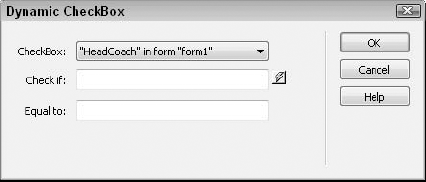
Enter
the value expected for a selected checkbox in the Equal To field. This
value is data source–dependent. For many data sources, 1 is used to
represent True; for others, a −1 is used. When working with Yes/No
fields from Access databases, enter True; be sure to capitalize the word, because lowercase does not work properly.
Click OK when you're finished.
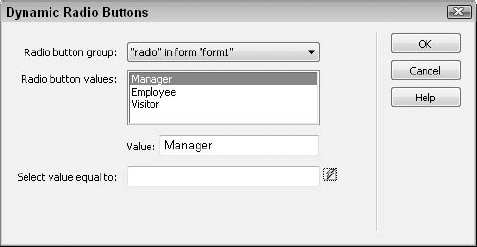
12.5. Dynamic Radio Buttons
Radio buttons are employed in a
form when the designer wants the user to make an exclusive choice among a
set number of options. As with the Dynamic CheckBox server behavior,
the Dynamic Radio Buttons server behavior is used to mark a particular
element as selected when the defined criteria are met.
Requirements: Two or more radio button form elements and a recordset.
To link radio buttons to dynamic data, follow these steps:
Select a group of radio buttons on a dynamic page with an available data source.
From the Server Behaviors panel, choose Dynamic Form Elements => Dynamic Radio Buttons. The Dynamic Radio Buttons dialog box appears, as shown in Figure 19.
Verify that your selected form element is displayed in the Radio Button Group list.
In
the Radio Button Values area, choose the first entry shown and, if
necessary, change the Value field to reflect the expected data.
Repeat Step 4 for every radio button in the group.
Click the Select Value Equal To lightning-bolt icon to display the available data sources.
Choose
a field from the Dynamic Data dialog box. Be sure to select a data
source field with values parallel to those entered in the radio button
group.
If
desired, you can apply a server format to the data by choosing an entry
in the Format list. Click OK to close the Dynamic Data dialog box.
When you're finished, click OK to close the Dynamic Radio Buttons dialog box.
