6. Go To Detail Page
The Go To Detail Page
server behavior is used in master-detail Web applications to navigate
from a chosen link on the master page to a designated detail page. This
server behavior passes a unique record ID via the URL query string
method. The Go To Detail Page server behavior is only available with ASP
VBScript.
Requirements: A selected page element and at least one recordset.
To attach a Go To Detail Page server behavior, follow these steps:
Select the page element — text, graphic, or dynamic data — you'd like to use as the link to the detail page.
From
the Server Behaviors panel, click the Add (+) button and select Go To
Detail Page from the drop-down list. The Go To Detail Page dialog box,
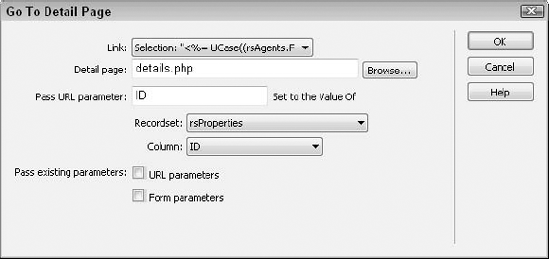
shown in Figure 6, is displayed.
Make
sure that the page element selected is represented in the Link field.
If no selection was made, Dreamweaver creates a new Detail text link.
Enter the path to the detail page in the Detail Page field or click Browse to locate the file in the Select File dialog box.
Enter
the variable name you'd like to be sent in the Pass URL Parameter
field. You can use a name of your own choosing or the name of the field
in the database. Whichever name you decide upon, make a note of it
somewhere because you need to reference it when the detail page itself
is constructed.
Select the recordset of the URL parameter from the Recordset list.
From the Column list, choose the field to which the URL parameter's value is related.
Unless
you have preexisting URL or Form parameters to send to the detail page,
leave the Pass Existing Parameters options unchecked.
Click OK when you're finished.
7. Go To Related Page
The Go To Related Page
server behavior links to a new page that conveys the form and/or URL
variables previously passed to the current page.
Requirements:
A selected page element and at least one recordset. The page on which
the server behavior is inserted must have had form or URL values passed
to it.
To attach a Go To Related Page server behavior, follow these steps:
Select the page element — text, image, or dynamic data — you'd like to use as the trigger for your behavior.
From
the Server Behaviors panel, click the Add (+) button and select Go To
Related Page from the list. The Go To Related Page server behavior
dialog box appears, as shown in Figure 7.
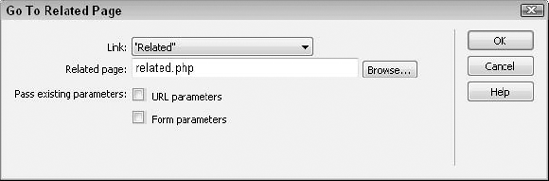
In the dialog box, verify that the text or code for the selected element displayed in the Link field is correct.
Enter the path to the target page in the Related Page field or click Browse to locate an existing dynamic page.
If you want to carry over values received from a query string, select the URL Parameters option.
If you want to pass values received from a form, select the Form Parameters option.
Click OK when you're finished.
8. Insert Record
The Insert Record server behavior adds a new record to a chosen table in a data source.
Requirements: A form with form elements and a Submit button.
To add the Insert Record server behavior, follow these steps:
From
the Server Behaviors panel, click the Add (+) button and select Insert
Record. The Insert Record dialog box appears, as shown in Figure 8.
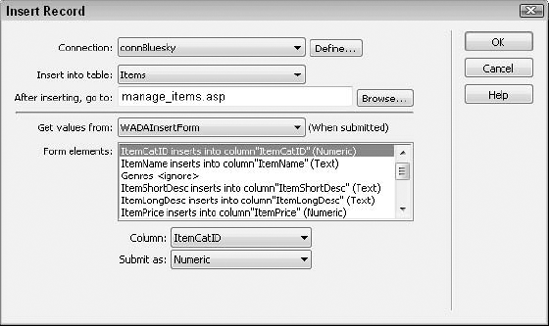
From
the Insert Record dialog box, choose the connection from the drop-down
list. If you need to establish a new connection, click Define.
Select the data table you want to use from the Insert table list.
Enter
the path to the destination page in the After Inserting, Go To field,
or click the Browse button to locate the file. It's important that you
select a confirmation or other page to go to after the form is
submitted. If you don't, no feedback is provided to the user, and no
change is apparent.
Select
the name of the form to be used from the Get Values From list. If there
is only one form on the page, the form is preselected.
For each object listed in the Form Elements area:
Select the data source field into which the form object's value is to be inserted from the Columns list.
Choose
the data source type for the data from the Submit As list. The options
are Text; Numeric; Date; Date MS Access; Checkbox Y, N; Checkbox 1,0;
Check −1,0; and Checkbox MS Access.
NOTE
Be sure to give your form fields meaningful names so you can easily choose which form field goes into each database column.
Click OK when you're finished.
