Dreamweaver ships with more than 25 server behaviors,
and it offers the option to add many more. The default server behaviors
are geared toward handling basic Web application tasks such as
repeating an area and inserting records in a data source.
1. Recordset (Query)
To create a simple recordset, follow these steps:
From
the Server Behaviors panel, click the Add (+) button and choose
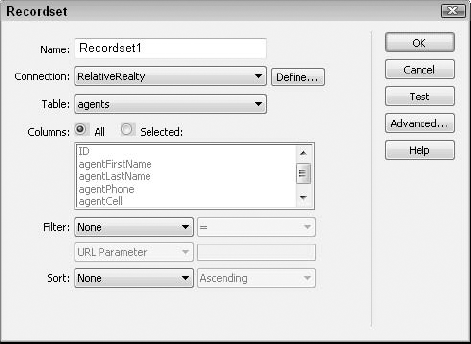
Recordset (Query) from the drop-down list. The Recordset dialog box,
shown in Figure 1, is displayed.

In
the Recordset dialog box, enter an identifying label for your recordset
in the Name field. It's considered good practice to prefix your
recordset name with rs — as in rsDBA. This prefix quickly identifies the recordset in the code. Select a connection from the drop-down list of that name. If
the desired connection has not been declared, click Define to open the
Connections dialog box. After a connection has been selected, the
available tables are shown. Select a table to work with from the Tables drop-down list. The chosen table's fields are displayed in the Columns list. By
default, all the columns are included in the recordset. To specify
certain columns, choose the Selected option and select any desired
field. Shift+click to select contiguous columns, and Ctrl+click
(Command+click) to select noncontiguous columns. By
default, all the records in the selected columns are available. To
limit the recordset further, use the four Filter drop-down lists as
follows: Choose the
field on which you want to base your filter from the first drop-down
list. This list changes dynamically according to which table you've
selected. From
the second drop-down list, select the expression with which to compare
the data from the selected column in the first drop-down list. Available
expressions are =, >, <, >=, <=, <>, Begins With, Ends With, and Contains. Choose
the type of value to compare to the selected field from the third
drop-down list. Available types are URL Parameter, Form Variable,
Cookie, Session Variable, Application Variable, and Entered Value. In the fourth input field, enter the value to compare to the selected field. Values entered are not case-sensitive.
To
sort the data, select a column from the first drop-down list under Sort
and choose either Ascending or Descending from the second list. At any time, you can see what results will be returned for the recordset by clicking Test. |
To see how your simple
recordset translates into SQL, click the Advanced button. You can
return to the original dialog box by clicking Simple on the advanced
Recordset dialog box.
|
|
Click OK when you're finished.
2. Repeat Region
The Repeat Region server
behavior replicates a selected page area as many times as specified. If
the Repeat Region surrounds dynamic data, the record pointer advances
for each repetition. A tab and highlight note the boundaries of the
Repeat Region when the Invisible Elements option is enabled.
Requirements: One or more selected page elements, such as a table row or a line ending in a line break tag (<br>).
To implement a Repeat Region, follow these steps:
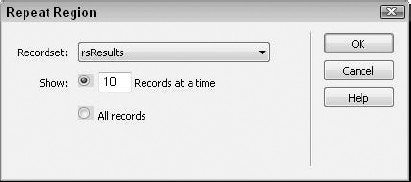
Select the dynamic data and the surrounding code you'd like to repeat. From the Server Behaviors panel, click the Add (+) button and select Repeat Region from the list. The Repeat Region dialog box, shown in Figure 2, appears.

From the Repeat Region dialog box, choose the recordset you want to work with from the Recordset list. If you want to display a subset of the recordset, enter the number of records you'd like to display in the Show Records field. If you want every record in the recordset to be displayed, choose the Show All Records option. Click OK when you're done.
|