Group policies are settings that control how Windows
Vista works. You can use them to customize the Windows Vista interface,
restrict access to certain areas, specify security settings, and much
more.
Group policies are
mostly used by system administrators who want to make sure that novice
users don’t have access to dangerous tools (such as the Registry
Editor), or who want to ensure a consistent computing experience across
multiple machines. Group policies are also ideally suited to situations
in which multiple users share a single computer.
Working with Group Policies
You implement group
policies using the Group Policy editor, a Microsoft Management Console
snap-in. To start the Group Policy editor, follow these steps:
1. | Press Windows Logo+R (or select Start, All Programs, Accessories, Run) to open the Run dialog box.
|
2. | Type gpedit.msc.
|
3. | Click OK.
|
4. | If the User Account Control dialog box appears, click Continue or type an administrator’s password and click Submit.
|
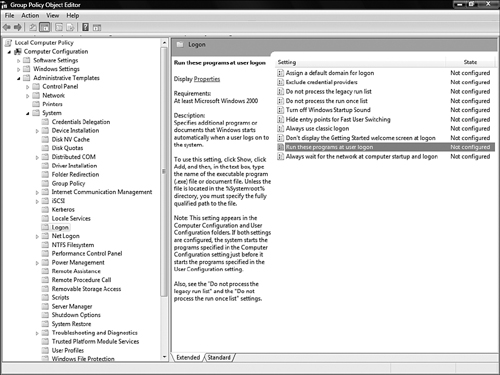
The Group Policy window that appears is divided into two sections:
Left pane—
This pane contains a treelike hierarchy of policy categories, which is
divided into two main categories: Computer Configuration and User
Configuration. The Computer Configuration policies apply to all users
and are implemented before the logon. The User Configuration policies
apply only to the current user and, therefore, are not applied until
that user logs on.
Right pane— This pane contains the policies for whichever category is selected in the left pane.
The idea, then, is to open
the tree’s branches to find the category you want. When you click the
category, its policies appear in the right pane. For example, Figure 1 shows the Group Policy window with the Computer Configuration, Administrative Templates, System, Logon category highlighted.
Tip
Windows
Vista comes with another tool called the Local Security Policy editor,
which displays only the policies found in the Group Policy editor’s
Computer Configuration, Windows Settings, Security Settings branch. To
launch the Local Security Policy editor, open the Run dialog box, type secpol.msc, and click OK.
In the right pane, the
Setting column tells you the name of the policy, and the State column
tells you the current state of the policy. Click a policy to see its
description on the left side of the pane. To configure a policy,
double-click it. The type of window you see depends on the policy:
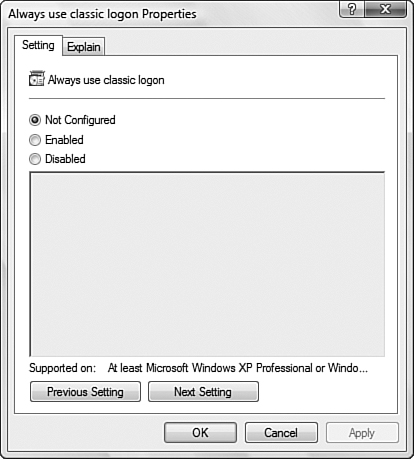
For simple policies, you see a window similar to the one shown in Figure 2.
These kinds of policies take one of three states: Not Configured (the
policy is not in effect), Enabled (the policy is in effect and its
setting is enabled), and Disabled (the policy is in effect but its
setting is disabled).
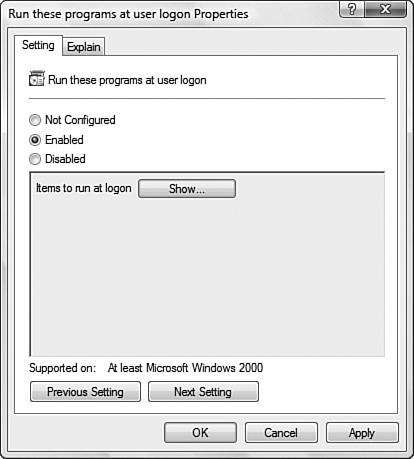
Other kinds of policies require extra information when the policy is enabled. For example, Figure 3
shows the window for the Run These Programs at User Logon policy. When
Enabled is activated, the Show button appears; you use it to specify one
or more programs that run when the computer starts.
Example: Controlling Access to Control Panel
You
can use group policies to hide and display Control Panel icons and to
configure other Control Panel access settings. To see how this works,
follow these steps:
1. | In the Group Policy editor, select User Configuration, Administrative Templates, Control Panel.
|
2. | Configure one or more of the following policies:
Hide Specified Control Panel Items
—
If you enable this policy, you can hide specific Control Panel icons.
To do this, click Show, click Add, enter the name of the icon you want
to hide (such as Game Controllers) or the name of the CPL file (such as Joy.cpl), and then click OK.
Force Classic Control Panel View
—
If you enable this policy, Control Panel is always displayed in the
Classic View and the user can’t change to the Home Page view. If you
disable this policy, Control Panel is always displayed in the Home Page
view and the user can’t change to the Classic View.
Prohibit Access to the Control Panel
— If you enable this policy, users can’t access Control Panel using the Start menu, Windows Explorer, or the control.exe executable.
Show Only Specified Control Panel Applets
—
If you enable this policy, you hide all Control Panel icons except the
ones that you specify. To do this, click Show, click Add, enter the name
of the icon you want to show (such as Game Controllers) or the name of
the CPL file (such as Joy.cpl), and then click OK.
|
3. | When you’ve finished with a policy, click OK or Apply to put the policy into effect. |
