Before you can use Phone Dialer, HyperTerminal, the
Windows XP Fax service, or any other communications software, you need
to tell Windows XP what kind of modem you have. After that’s done, you
need to configure the modem to suit the types of online sessions you
plan to run. To that end, the next few sections take you through the
rigmarole of installing and configuring your modem.
Installing a Modem
If you have an
internal or PC Card modem, chances are Windows XP will recognize the
modem automatically and install the necessary drivers. If not, here are
the steps to follow to install your modem:
1. | Double-click Control Panel’s Phone and Modem Options icon. The Phone and Modem Options dialog box appears.
|
2. | Display the Modems tab.
|
3. | Click Add. The Add Hardware Wizard appears.
|
4. | Click Next.
|
5. | Windows
XP queries your system’s serial ports to see whether a modem is
attached. When it’s finished, Windows XP displays the message Your modem has been set up successfully. Click Finish.
|
If Windows XP cannot
find your modem or if your modem isn’t attached to your computer yet,
follow these steps to specify the modem by hand:
1. | Double-click Control Panel’s Phone and Modem Options icon. The Phone and Modem Options dialog box appears.
|
2. | Display the Modems tab.
|
3. | Click Add. The Add Hardware Wizard appears.
|
4. | Activate the Don’t Detect My Modem; I Will Select It from a List check box.
|
5. | Click Next. Windows XP displays a list of standard modem types.
|
6. | In
the Models list, select the standard modem type that corresponds to
your modem. (Alternatively, click Have Disk to install the drivers from a
disc provided by the modem manufacturer.)
|
7. | Click Next. The wizard asks you to select a serial port.
|
8. | Select the appropriate port and click Next. Windows XP installs your modem.
|
9. | Click Finish.
|
Testing the Modem
After you’ve configured
your modem, you should test it to make sure that things are working
correctly. To do this, follow these steps:
1. | Double-click Control Panel’s Phone and Modem Options icon. The Phone and Modem Options dialog box appears.
|
2. | Display the Modems tab.
|
3. | Select the modem you want to test.
|
4. | Click Properties to display the modem’s property sheet.
|
5. | Display the Diagnostics tab.
|
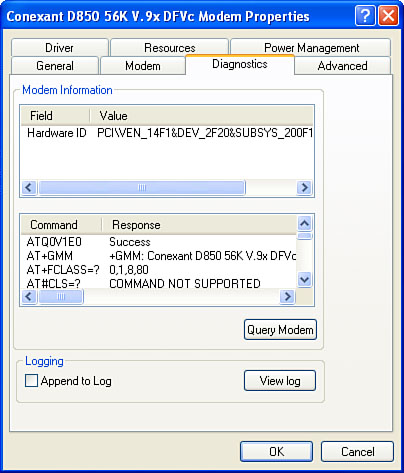
6. | Click
Query Modem. Windows XP attempts to communicate with the modem and then
displays the results in the Command and Response lists, as shown in Figure 1.
|
7. | Click OK.
|