Windows Internet Explorer 8 is a built-in application
in Windows 7. On the surface, it's a web browser used to surf the
Internet. However, it has many extra capabilities you should understand.
NOTE
Internet Explorer
version 8 is installed by default with Windows 7. Windows Vista included
Internet Explorer version 7, and Windows XP included Internet Explorer
version 6. It is possible to install Internet Explorer version 8 on
older operating systems.
Because it's a built-in
application, it's important to understand Internet Explorer settings and
capabilities. Knowing how to manipulate these settings will help you
support your enterprise Window 7 users. This section covers the
following settings and capabilities:
Managing cache
InPrivate Browsing
InPrivate Filtering
SmartScreen Filter
Security zones
Protected Mode
1. Managing Cache
Windows Internet
Explorer maintains different types of information for each web page you
visit. Much of this stored data is used to make your next visit quicker.
The data is stored in a location commonly called cache.
NOTE
Cache can be either
hardware cache or software cache. For example, a hard drive includes
memory used to cache data to improve performance. Cache on a hard drive
is hardware cache. Cache used by IE is software cache. IE stores these
files in a location on the hard drive so that it doesn't have to
retrieve them over the Internet. Retrieving the files from the local
cache is much more efficient than retrieving them from the Internet.
Data stored in cache includes
List of web pages by URL
Copies of web pages
Cookies
Images such as .jpeg and .gif
Media files such as music or video files
Style sheets including cascading style sheets (CSS) and Extensible Stylesheet Language (XSL) style sheets
Script files
Any data that is typed into forms if AutoComplete settings are enabled
Any saved passwords that are automatically filled in when you sign on to a website
Some installation applications that were downloaded for immediate installation
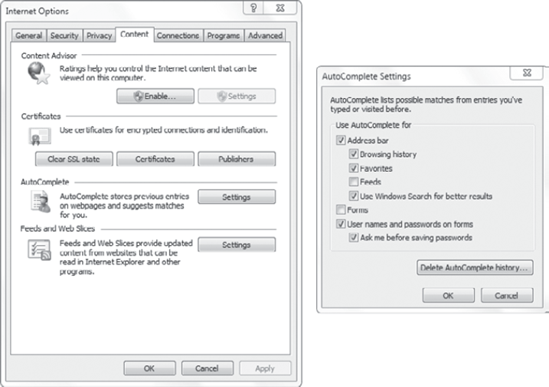
Forms data and passwords that are saved depend on how IE is configured. Figure 1
shows the settings page you can use to enable or disable the data
entered into web page forms. You can access this page via Internet
Options by clicking Tools => Internet Options from any open IE window.
1.1. Viewing Cache Contents
You can view the files
stored in cache. Similarly, if someone else has access to your system,
they can view the files stored in cache.
The default cache location for IE is C:\Users\%username%\AppData\Local\Microsoft\Windows\Temporary Internet Files.
AppData is a hidden
folder, so it probably won't show up unless you've already changed the
settings. You can cause hidden files to appear in Windows Explorer by
clicking Organize and then choosing Folder And Search Options, selecting
the View tab, and picking Show Hidden Files, Folders, And Drives.
|
The Organize drop-down menu is on the left of the Windows Explorer toolbar.
|
|
You will then be able to browse to C:\Users\%username%\AppData\Local\Microsoft\Windows.
However, the Temporary Internet Files
folder is a system folder. You need to enable the display of protected
operating system files before you'll see it. You can do this from the
same View tab that allows you to enable viewing of hidden files and
folders. Deselect Hide Protected Operating System Files (Recommended).
The display will look similar to Figure 2. The two arrows show the settings needed to display the contents of cache.

Cookies are simple text
files that are written to your hard drive by many websites. Cookies are
used to track user activity and provide targeted advertising. When you
visit a website, cookies are written to the system. When you visit the
website or related sites again, additional data is gathered on your
activities. When you return to the website, the cookie is read, and it
provides the website with information about you.
As an example, if you've
ever purchased something online, a cookie was probably written to your
system that could identify you when you return to that site. When you
return, the cookie is read, and the website knows who you are.
Cookies are stored in the \Users\%username%\AppData\Roaming\Microsoft\Windows\Cookies folder.
History data includes all the sites a user has visited. It is stored in the \Users\%username%\AppData\Local\Microsoft\Windows\History folder. You can also click the Favorites button on the toolbar in the browser and select the History tab to view this data.
When a web page prompts a user to download a file, the file is stored in the Windows\Downloaded Program Files folder.
The Registry also holds some
data related to IE usage. Although this requires you to dig a little
deeper, you may need access to this information at some point. It's
certainly important to realize how easy it is for an attacker to gain
access to this information if they have unrestricted physical access to
the computer. The three relevant IE keys are as follows:
- IE Typed URLs
This key shows URLs that a user typed, as opposed to links that a user clicked. You can access this from the HKEY_Current_User\Software\Microsoft\Internet Explorer\TypedURLs node.
- IE Forms AutoComplete
This key includes
information stored by AutoComplete. Although the information isn't in
clear text, there are tools available that can read the data. You can
access this key from the HKEY_Current_User\Software\Microsoft\Internet Explorer\IntelliForms\Storage1 node.
- IE Password AutoComplete
This key includes
stored passwords used by AutoComplete. Although the information isn't in
clear text, there are tools available that can read the data. You can
access this key from the HKEY_Current_User\Software\Microsoft\Internet Explorer\IntelliForms\Storage2 node.
|
The contents of these
folders depend on the settings for IE. For example, if Forms is
deselected in AutoComplete, there won't be a Storage1 node.
|
|
1.2. Clearing Cache
You can clear cache by manipulating the Internet Options page. Figure 3 shows the page you can use to delete browsing history. You can get to this page by clicking Tools => Internet Options, and clicking the Delete button in the Browsing History area.
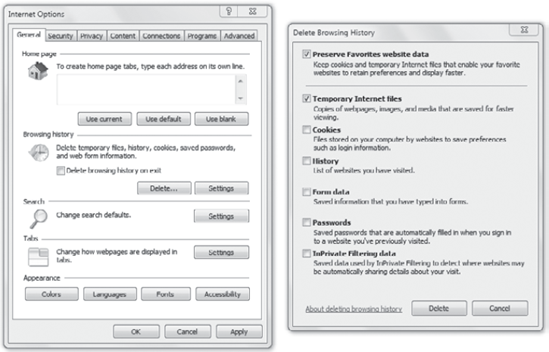
Notice that you can choose what data to delete. Exercise 1 shows you how to view the current contents of cache and then clear it.
Click Start => Computer to start Windows Explorer. Browse to the C:\Users\username folder, where username
is the name of the account you used to log on. If you're not sure what
user account you're logged on with, open a command prompt and type in whoami. Click Organize => Folder And Search Options. Select the View tab. Select Show Hidden Files, Folders, Or Drives. Deselect Hide Protected Operating Files (Recommended). Browse to the C:\Users\%username%\AppData\Local\Microsoft\Windows\Temporary Internet Files folder. At this point, you can look around to see the files stored in cache. View the cookies in this folder: \Users\%username%\AppData\Roaming\Microsoft\Windows\Cookies. View the history data in this folder: \Users\%username%\AppData\Local\Microsoft\Windows\History. View downloaded files in this folder: Windows\Downloaded Program Files.
Open Internet Explorer. Select Tools => Internet Options. The General tab should be selected. Select the browsing history that you want to delete, and click Delete.
|
Several Group Policy settings
allow you to manipulate what a user can delete. Settings exist in both
the User Configuration and Computer Configuration nodes. The settings
are located in the Administrative Templates => Windows Components => Internet Explorer => Delete Browsing History node.
The following settings apply to at least IE version 8.0 in Windows 7:
Prevent Deleting Cookies
Prevent Deleting Web Sites That The User Has Visited
Configure Delete Browsing History In Exit
Prevent Deleting Temporary Internet Files
Prevent Deleting Favorites Site Data
Some settings were introduced with Windows Vista and require at least IE version 7.0:
Turn Off "Delete Browsing History" Functionality
Prevent Deleting Form Data
Prevent Deleting Passwords
