2. InPrivate Browsing
When IE caches all the data
from your browsing sessions, it can improve performance. However, there
are times when you or another user may want to surf the Internet but not
leave any traces. You can do so with InPrivate Browsing.
Any data collected during an
In-Private Browsing session is deleted as soon as the browser session is
closed. You can start an InPrivate Browsing session in one of several
ways.
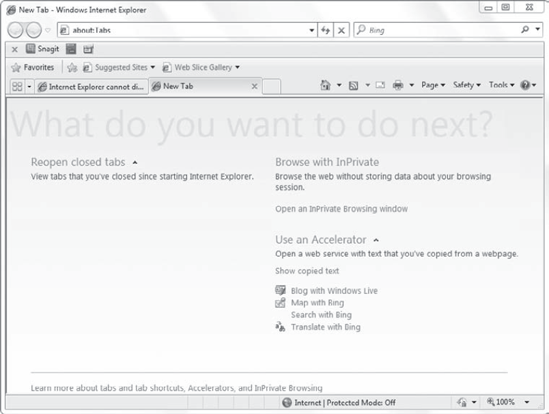
If you create a new tab by clicking a blank tab or pressing Ctrl+T, you'll see a screen similar to the one shown in Figure 4.
You can then click either Browse With InPrivate or Open An InPrivate
Browsing Window. This will open a new IE Windows session in InPrivate
mode.
NOTE
If you have modified the default installation of IE by adding plug-ins or add-ons, the screen shown in Figure 4 may not display.
You can also launch an InPrivate browser window using one of the following methods:
Figure 5 shows an InPrivate Browsing window. Notice the InPrivate icon at the beginning of the URL address bar.
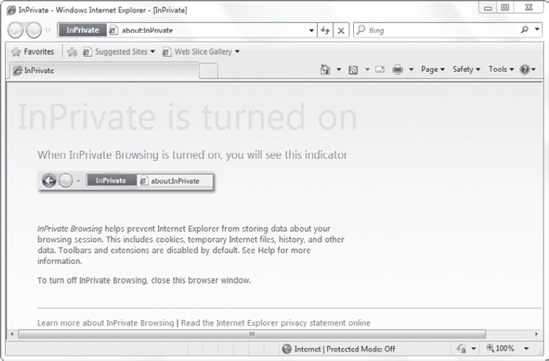
You can browse the
Internet using the InPrivate window just as you would normally. The only
difference is that all of the data from the session is deleted as soon
as you close the browser.
If you want to prevent
users from using InPrivate Browsing, you can do so with Group Policy.
Settings exist in both the User Configuration and Computer Configuration
nodes. The settings are located in Administrative Templates => Windows Components => Internet Explorer => InPrivate Node. The primary setting is Turn Off InPrivate Browsing.
You can also configure Group Policy to disable toolbars and extensions when InPrivate Browsing starts.
3. InPrivate Filtering
The primary purpose of InPrivate Filtering is to improve your privacy by blocking ads, images, and other tracking content.
Many web pages use content
from other websites (referred to as third-party websites). When a
third-party website hosts content on different sites that you visit,
this third-party website can track your activity.
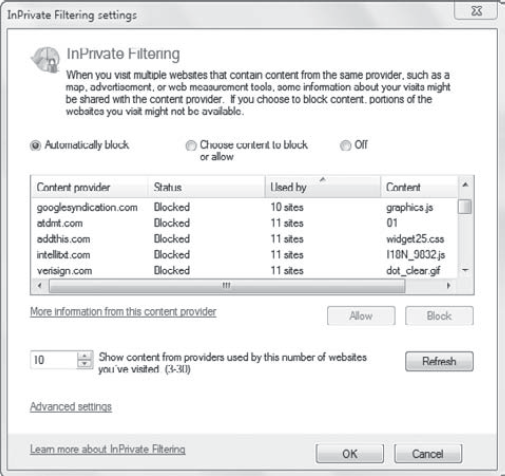
By default, these
third-party websites can track a user's session across 10 different
websites. You can change this threshold to any value between 3 and 30.
This is based on the default InPrivate threshold setting of 10, shown in
Figure 6.
InPrivate Filtering logs data
from content providers. It can then determine through how many sites a
content provider can track a user by analyzing these logs.
If you want to disable
InPrivate Filtering, you can do so with Group Policy. Settings exist in
both the User Configuration and Computer Configuration nodes. The
settings are located in the Administrative Templates => Windows Components => Internet Explorer => InPrivate node. The primary setting is Turn Off InPrivate Filtering.
Several other Group Policy settings exist for InPrivate Filtering:
Do Not Collect InPrivate Filtering Data
Disable Toolbars And Extensions When InPrivate
InPrivate Filtering Threshold
4. SmartScreen Filter
The SmartScreen Filter in IE 8
provides an added layer of protection against phishing sites. Phishing
is a form of social engineering whereby users are tricked into going to a
malicious website.
NOTE
The SmartScreen Filter replaces the Phishing filter used in Windows Vista.
When a user goes to a malicious
website, they are encouraged to reveal sensitive information such as
usernames and passwords or banking account information. Other phishing
attempts encourage a user to download and install malware on their
computer.
However, the SmartScreen
Filter works in real time to protect users. It runs in the background
and sends web addresses to the Microsoft SmartScreen service. If the
visited website is a known phishing or malware site, IE will display a
blocking web page and the address bar will appear in red. Users can
still choose to ignore the warning and visit the website.
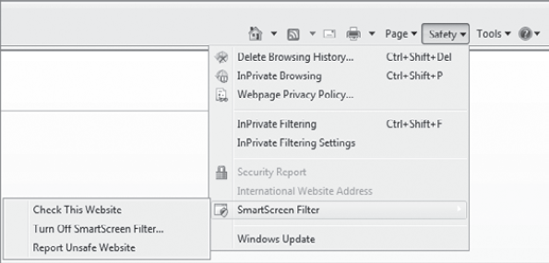
Figure 7 shows how you can access the SmartScreen Filter tools from the Safety drop-down menu.
This menu offers three choices:
- Check This Website
Select this to check any website you visit. When the SmartScreen Filter is enabled, it automatically checks the website.
- Turn Off SmartScreen Filter
This setting toggles back
and forth between Turn Off SmartScreen Filter when it is on and Turn On
SmartScreen Filter when it is off. Figure 7 shows that this setting is on because the selection allows you to turn it off by selecting Turn Off SmartScreen Filter.
- Report Unsafe Website
If you suspect a site is
malicious, you can report it via this selection. Microsoft will
investigate the site and verify that it is malicious before adding it as
a malicious website.
5. Security Zones
Internet Explorer
includes four security zones. Each zone has different levels of security
enabled based on the trust level of the zone. You can access the
security zones property page by clicking Tools => Internet Options and selecting the Security tab.
Figure 8
shows the four security zones with the Internet security zone selected.
Each of these zones has default security settings. You can click the
Custom Level button and view the individual settings.

The four zones are as follows:
- Internet
This includes all
Internet-based websites that aren't in either the local intranet zone or
the trusted sites zone. This zone has a higher level of security than
all other zones except the restricted sites zone.
Security is set to Medium-High for this zone by default.
- Local Intranet
Sites from web servers in
the local intranet are automatically identified. Because the pages are
hosted from an internal web server, they are trusted and security isn't
as strict. You can also add websites to this zone.
Security is set to Medium-Low for this zone by default.
- Trusted Sites
You can add websites to
this zone if you're sure they are safe and you need to do so to ensure
all the functions of the website work. Security is relaxed in this zone,
adding additional risk, so you should add only sites you trust. By
default, the trusted sites zone does not include any sites.
Security is set to Medium for this zone by default.
- Restricted Sites
You can add websites to
this zone that you need to visit but have known risks. The restricted
sites zone adds a higher level of security. It helps protect you when
visiting known malicious websites. By default, the restricted sites zone
does not include any sites.
Security is set to High for this zone by default.
6. Protected Mode
Protected Mode
was introduced in IE 7 on Windows Vista. It's also supported on IE 8 in
Windows 7. Protected Mode runs IE in a restricted privilege mode to
help protect against different types of malware. It makes it harder for
malware to be installed on your computer.
By default, Protected Mode
is enabled for the Internet and restricted sites zones but not for the
local intranet or trusted sites zones. Figure 9
shows how you can easily tell what zone IE is in and the status of
protected mode. They are both displayed on the bottom status bar.
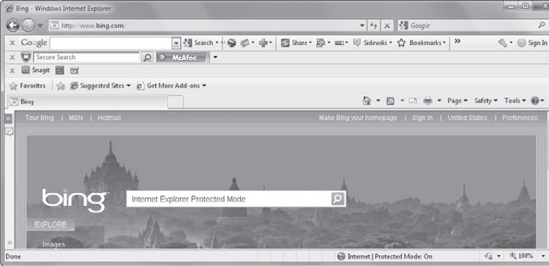
In the figure, the bottom
status bar is labeled Internet | Protected Mode: On. This indicates the
website is in the Internet zone and Protected Mode is On.
If you trust a website and want to disable Protected Mode without adding the site to the trusted sites zone, you can do so. Figure 8,
shown earlier, has a picture of the Internet Options Security tab. The
Enable Protected Mode check box can be checked or unchecked. If you
modify this setting, you need to close IE and restart it for the change
to take effect.
You can ensure that
Protected Mode is enabled for any specific zone using Group Policy.
Settings exist in both the User Configuration and Computer Configuration
nodes. The settings are located in the Administrative Templates => Windows Components => Internet Explorer => Internet Control Panel => Security Page node. Each of the following nodes includes the Turn On Protected Mode setting:
Internet Zone
Intranet Zone
Local Machine Zone
Locked-down Internet Zone
Locked-down Intranet Zone
Locked-down Local Machine Zone
Locked-down Restricted Sites Zone
Locked-down Trusted Sites Zone
Restricted Sites Zone
Trusted Sites Zone
When Protected Mode is enabled for the zone, users will be unable to modify the setting.
