8. Fixing Your Pictures
Windows Live Photo Gallery has built-in features for
fixing pictures. In any picture-related view, you can click the Rotate
Clockwise or Rotate Counterclockwise button on the Controls toolbar to
rotate pictures to the proper orientation. If you select multiple pictures with the same
orientation problem, you can rotate them all to the proper orientation
at the same time by clicking the Rotate Clockwise or Rotate
Counterclockwise button.
NOTE
If a picture has the read-only attribute, you won’t be able to
edit it. To resolve this issue while working with Photo Gallery, click
File and then click Properties. In the picture’s Properties dialog
box, clear the Read-only checkbox and then click OK.
If you don’t have appropriate permission, you won’t be able to
edit pictures, either. You can resolve this by modifying the security
permissions of the folder in which the pictures are stored or by
modifying the security permissions of the picture you are trying to
edit. While working with Photo Gallery, if you can’t edit a picture
due to security permissions, you can resolve this by clicking File and
then clicking Properties to open the picture’s Properties dialog box.
Use the options on the Security tab to add the appropriate permissions
for your user account and then click OK.
If you do not have administrative privileges, you won’t be able
to change the permissions. Consider copying the file and making your
changes to that copy instead.
8.1. Editing picture color, brightness, and contrast
You can perform additional editing of individual
pictures by completing these steps:
In Windows Live Photo Gallery, double-click the picture you
want to edit. If the Edit pane is not already displayed, click the
Fix button on the toolbar.
As Figure 8
shows, the picture is then displayed in view mode with the Edit
pane.
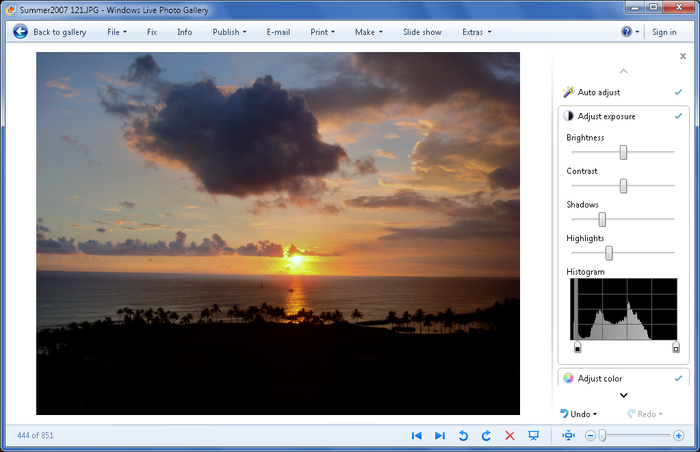
If the color and exposure setting in your picture don’t look
right, you can correct or enhance the picture automatically by
clicking Auto Adjust.
If the brightness and contrast still don’t look right, you
can adjust them independently by clicking Adjust
Exposure and then using the Brightness, Contrast, Shadows and
Highlights sliders to achieve the desired results.
After you’ve adjusted the exposure either automatically or
manually, you can use the black-and-white sliders in the histogram
to shift the highlight and shadow levels.
NOTE
A histogram illustrates how pixels in a picture are
distributed by graphing the number of pixels at each color intensity
level. This helps to depict the tonal range of the picture and show
whether the picture contains enough detail to make a good
correction.
Detail in the shadows is shown in the left part of the
histogram, detail in midtones is shown in the middle, and detail in
highlights is shown on the right. An underexposed picture has a lot
of detail in the shadows. An overexposed picture has a lot of detail
in highlights. A properly exposed picture has full tonality with
detail concentrated in the midtones.
If the colors still don’t look right, you can adjust
them by clicking Adjust Color. You can then use these color
settings to adjust the color:
Color Temperature
Use this slider to adjust the overall tone of the
picture. Move the slider to the left to make the colors
appear cooler (bluer). Move the slider to the right to make
the colors appear warmer (redder).
Tint
Use this slider to adjust the predominant color in the
picture by adding or removing green. Move the slider to the
right to remove green. Move the slider to the left to add
green.
Saturation
Use this slider to make the colors in the picture more
or less vivid. Move the slider to the left to make the
colors less vivid. Move the slider to the right to make the
colors more vivid.
Click the Back to Gallery button to save the changes to the
picture automatically. If you don’t want to save your changes,
press Ctrl-Shift-Z before clicking the Back to Gallery
button.
8.2. Straightening and cropping pictures
Sometimes the person taking a picture didn’t hold the
camera straight. Correcting this by hand isn’t very easy. Don’t worry:
Photo Gallery can help you straighten and crop any picture easily. To
straighten or crop a picture, follow these steps:
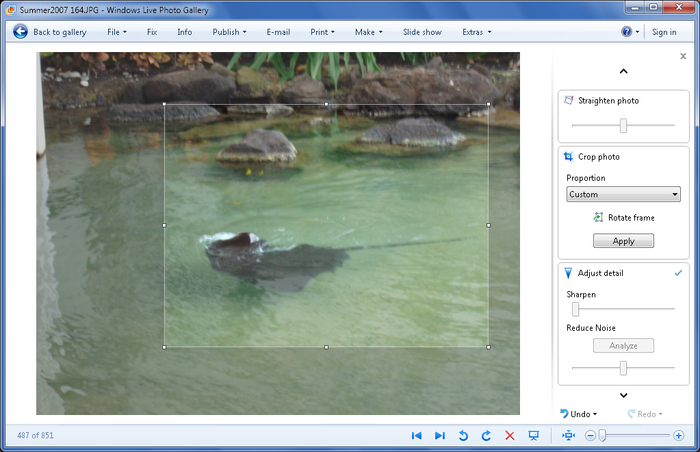
In Windows Live Photo Gallery, double-click the picture you
want to edit. If the Edit pane is not already displayed, click the
Fix button on the toolbar.
The picture is then displayed in view mode with the Edit
pane. To straighten the picture, do one of the following:
To straighten the picture by cropping and rotating to
the left, move the Straighten Photo slider to the left.
To straighten the picture by cropping and rotating to
the right, move the Straighten Photo slider to the
right.
To crop the photo, click Crop Photo to display the options
shown in Figure 9.
Photo gallery then displays a frame selection box. You can click
and drag the frame selection box to any location in the picture.
You can resize the box by moving to a corner or edge, clicking and
dragging to reshape the box. After you’ve sized and positioned the
box, click Apply to save your changes.
Click the “Back to gallery” button to save the changes to
the picture automatically. If you don’t want to save your changes,
press Ctrl-Shift-Z before clicking the “Back to gallery”
button.
8.3. Sharpening, reducing noise and bringing pictures into
focus
Although Windows Live Photo Gallery has many excellent
editing features, my favorites are those for adjusting detail. Not
only can you sharpen pictures and reduce noise, but often you also can
bring slightly out of focus pictures into focus. To do this, you are
going to have Photo Gallery focus on a portion of the picture and then
attempt to sharpen the picture or reduce noise automatically or
manually. With automatic adjustment, Photo Gallery will analyze the
center of focus and use the results of the analysis to determine how
to make appropriate corrections.
To adjust the detail in a picture, follow these steps:
In Windows Live Photo Gallery, double-click the picture you
want to edit. If the Edit pane is not already displayed, click the
Fix button on the toolbar. The picture is then displayed in view
mode with the Edit pane.
When you click Adjust Detail, Photo Gallery displays the
image at actual size. Typically, this makes it look like you’ve
zoomed in on the picture.
Mouse the mouse pointer over the picture. Click and drag
until the item you want to focus on is in view.
If the picture is out of focus or blurry, you can try to
correct the problem automatically by clicking Analyze. After Photo
Gallery analyzes and corrects the picture, move the mouse pointer
over the picture, click and drag the scroll around and to review
the results. If you want to fit the picture to the window, click
the Fit to Window button or press Ctrl-0.
As necessary, use the Sharpen slider to sharpen the details
in the picture and the Reduce Noise slider to reduce noise in the
picture. Review the results by fitting the picture to the window
and zooming in to check details as appropriate.
Click the “Back to gallery” button to save the changes to
the picture automatically. If you don’t want to save your changes,
press Ctrl-Shift-Z before clicking the Back to Gallery
button.
8.4. Fixing red-eye
Camera flash can sometimes make it look like people in
your pictures have red highlights in their eyes. To try to fix
red-eye, follow these steps:
In Windows Live Photo Gallery, double-click the picture you
want to edit. If the Edit pane is not already displayed, click the
Fix button on the toolbar. The picture is then displayed in view
mode with the Edit pane.
Use the Zoom slider to zoom in on the picture. You’ll want
the face of the person with red-eye to be very large in the frame.
Press and hold the Alt key and then click and drag until you see
the problem you want to correct.
Drag the mouse pointer to draw a rectangle around the eye
you want to fix. Be careful to only select one eye at a time and
then only select the eye itself. If you aren’t careful, you may
fill parts of the picture with blue shaded areas. If you make a
mistake, press Ctrl-Z to undo the change.
Click the “Back to gallery” button to save the changes to
the picture automatically. If you don’t want to save your changes,
press Ctrl-Shift-Z before clicking the “Back to gallery”
button.
8.5. Using undo and redo while fixing pictures
While you are fixing your picture, you can use the Undo
button to undo any changes you don’t like and the Redo button to redo
changes you previously undid. Multiple undo and redo changes are
saved, allowing you to step backward and forward through changes. You
can also undo and redo specific changes.
To undo a specific change or changes, follow these steps:
Click the option button to the right of the Undo button.
This displays a shortcut menu with a list of Undo changes, as
shown in Figure 10.
The most recent change is listed first and in bold. To undo
this change, click it or press Ctrl-Z.
To undo a specific change, click the change you want to undo
in the list. This will undo every change that occurred after that
change as well.
To undo all changes, click Undo All or press
Ctrl-Shift-Z.

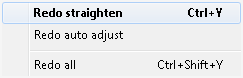
To redo a specific change or changes, follow these steps:
Click the option button to the right of the Redo button.
This displays a shortcut menu with a list of Redo changes, as
shown in Figure 11.
The most recent change is listed first and in bold. To redo
this change, click it or press Ctrl-Y.
To redo a specific change, click the change you want to redo
in the list.
To redo all changes, click Redo All or press
Ctrl-Shift-Y.
8.6. Restoring the original version of a picture
Whenever you edit a picture using the Edit pane, Windows Live
Photo Gallery automatically saves a copy of the original picture. If
you’re unhappy with the results, follow these steps to restore the
original picture at any time (prior to automated deletion of the
original):
In Windows Live Photo Gallery, click the picture you want to
restore and then click the Fix button on the toolbar.
The Undo button is changed to a Revert button. To revert to
the original version of the picture, click the Revert button or
press Ctrl-R.
Confirm the action when prompted by clicking Revert
again.
Click the Back to Gallery button.
8.7. Controlling when the original versions of pictures are
deleted
When you fix a picture in Windows Live Photo Gallery, Windows
saves a copy of the original in case you later want to undo the
changes. By default, these copies are never erased, but over time, you
may find that they are using up space on your disk drive. To free up
this space, you can have Windows automatically delete originals after
a specified period. To do this, complete the following steps:
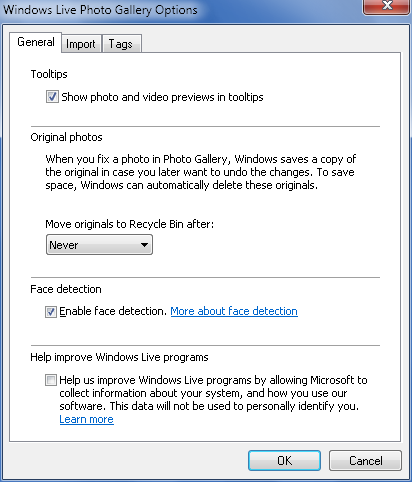
In the Windows Live Photo Gallery main view, click File and
then select Options. This displays the Windows Live Photo Gallery
Options dialog box, as shown in Figure 12.
On the General tab, use the “Move originals to Recycle Bin after” list to
specify whether and when originals are moved to the Recycle Bin.
To save originals indefinitely, select Never. To save originals
for a specific amount of time and then delete them, select the
desired retention time, such as “One week” or “One month.”
Click OK to save your settings.