3. Creating a Live AutoMovie
After you finish creating and editing your storyboard, you
are ready to move on to the next phase of video production, which
involves adding effects, transitions, titles, credits, and a soundtrack.
Though you can perform each of these tasks manually, you can also have
Windows Live Movie Maker perform them for you automatically using the
AutoMovie feature. Not only is this a great timesaver, but it also
allows you to see firsthand how various approaches to video production
work.
To create an AutoMovie, complete the following steps:
In Windows Live Movie Maker, click the AutoMovie button on the
Home pane.
If you are prompted to confirm, select the “Don’t show this
message again” checkbox and then click OK.
As you haven’t added any sound to the video yet, you’ll be
able to add music now. When prompted, click Yes and then use the
dialog box provided to select a song to add to the movie.
Windows Live Movie Maker will then attempt to fit the video to
the song you’ve selected. If this process fails, you’ll see a
warning prompt. Click OK. Later, you can choose a longer song, add
more songs, or remove some photos or videos from the movie to make
the soundtrack fit.
Windows Live Movie Maker will then create the AutoMovie by
inserting a title frame at the start of the movie, setting each
picture or video to use a cross-fade transition with automatic effects, and then
adding a credits frame to the end of the movie.
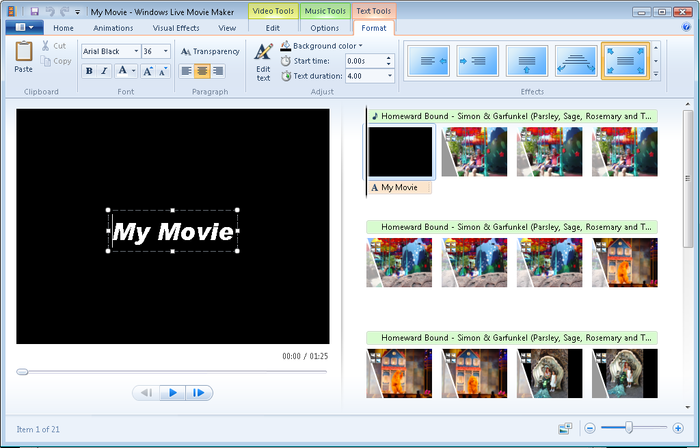
As shown in Figure 6, if
you click the title frame on the storyboard and then click in the
Preview pane, you’ll be able to edit the movie title and frame
formatting. By default, the title frame doesn’t use a transition or
effects. You can add a text effect by clicking any of the available
effects on the Format pane.
If you click the credits frame on the storyboard and then drag
the Timeline slider to the right, you’ll see the end credits. Click
in the Preview pane and then click the credits to edit them.
Click the Save Project button (or press Ctrl-S) to have
Windows Live Movie Maker create the movie for you. If you don’t like
the results, you can always fine-tune the movie before finalizing
it.
4. Adding Animations and Visual Effects to Your Live Video
Your videos can have animations that are used when moving
between media items. Each item can have one transition, one pan and zoom
effect, or both a transition and a pan and zoom effect. For example, you
can transition by cross-fading and then pan right.
Your videos also can have visual effects. Visual effects act as
filters and include a black-and-white filter as well as black-and-white
filters with various color tones.
You work with transitions and pan and zoom effects on the
Animations pane. You work with visual effects on the Visual Effects
pane. Any transition or effect that you can apply to a single item can
be added to multiple items simultaneously as well. Just select all of
the items that should have be modified before applying the transition or
effect.
An item with a transition has transition marker, as shown in Figure 7.

An item with an effect has an effects icon as shown in Figure 8.

An item with both a transition and a pan and zoom effect has an
effects icon as shown in Figure 9.

You can add transitions and pan and zoom effects to media items by
completing the following steps:
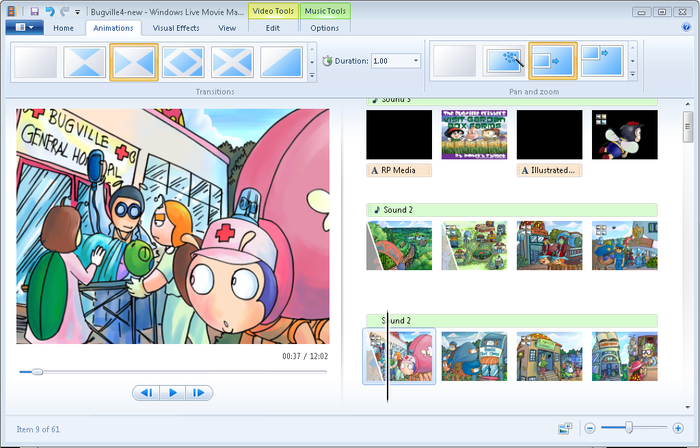
In Windows Live Movie Maker, click Animations on the toolbar
to display the available transitions and pan and zoom effects, as
shown in Figure 10.
Select the item or items to which you want to apply a
particular transition or effect.
Click a transition to apply it to the selected item or items.
So you can see how a transition works, the Preview pane shows how
the transition is applied. To remove a transition, use the up button
to scroll all the way up through the list and then select the No
Transition option.
There are about 70 transitions and not all of them can be
viewed at the same time in the Transitions pane. Use the up and down
buttons provided on the right side of the Transitions pane to navigate
through the list of available transitions. Alternatively, click the More
button in the lower-right corner of the pane to expand the Transitions
pane for easy navigation.
Click an effect to apply it to the selected item or items. The
Preview pane shows how the effect is applied. To remove an effect,
use the up button to scroll all the way up through the list and then
select the No Effect option.
There are about 20 effects and not all of them can be viewed at
the same time in the Pan and Zoom pane. Use the up and down buttons
provided on the right side of the Pan and Zoom pane to navigate through
the list of available effects. Alternatively, click the More button in
the lower-right corner of the pane to expand the Pan and Zoom pane for
easy navigation.
Transitions and effects have separate duration values. To set
the transition duration, click the transition and then choose or
enter the desired duration. To set the pan and zoom effect duration,
click the effect and then choose or enter the desired duration. The
default duration of a transition or effect is one second. The
combined duration for transitions and effects cannot exceed the
display duration of the item.
You can add visual effects to media items by completing the
following steps:
In Windows Live Movie Maker, click Visual Effects on the
toolbar and then select the item or items to which you want to apply
a particular visual effect.
Click a visual effect to apply it to the selected item or
items. So you can see how a transition works, the Preview pane shows
how the transition is applied. There are about 20 visual effects and
not all of them can be viewed at the same time in the Effects pane.
Use the up and down buttons provided on the right side of the
Effects pane to navigate through the list of available transitions.
To remove a transition, use the up button to scroll up through the
list and then select the No Effect option.
Use the Brightness option to adjust the brightness of
an item. Click the Brightness button and then slide the slider to
the left to darken or slide to the right to brighten.
