3. Viewing and Managing Ratings, Tags, and Captions
In Gallery view (when not viewing an individual picture or video),
on the Controls toolbar, in the lower-right corner of the main window,
you’ll find the View Details/View Thumbnails button. This button allows you to switch
between the Details view and the Thumbnails view. You also can switch
between these views by pressing Ctrl-0.
To get more details about pictures and videos, display the
Thumbnails view. As Figure 6 shows, you’ll see
the following:
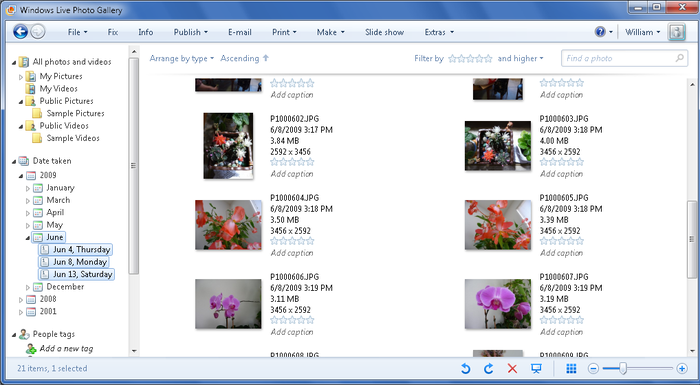
With the Details view, you can add ratings and captions to
individual pictures and videos. To add a rating, move the pointer
over the star rating until the desired rating is
highlighted, and then click. To add or edit a caption, click Add Caption
or click the existing caption, type the desired caption, and then press
Enter or click another area of the window.
Another way to get more detailed information about pictures and
videos is to turn on the Info pane by clicking the Info button on the
toolbar. The Info pane is also shown in Figure 7.
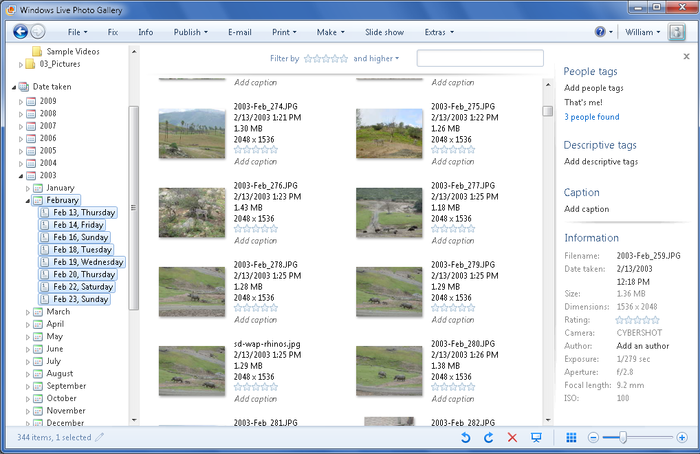
With the Info pane, you can do things that you can’t do with the
Details view. You can:
Add the same rating to multiple items by clicking the pictures
and videos you want to rate, moving the pointer over the star rating
in the Info pane until the desired rating is highlighted, and then
clicking.
Add or edit the captions for multiple items by clicking the
pictures and videos you want to work with, clicking the Add Caption
text in the Info pane, typing the desired caption, and then pressing
Enter or clicking another area of the window.
Add the same tag to multiple items by clicking the pictures
and videos you want to work with, clicking the Add People Tags text
or the Add Descriptive Tags text, typing the desired tag, and then
pressing Enter.
Assign a tag that is used with some of your selected pictures
or videos by right-clicking the tag to assign and then selecting
Assign to All. Such tags will appear with a number in parentheses,
such as vacation(3), which
indicates how many of the pictures have that tag assigned.
Remove a tag from multiple items by clicking the pictures and
videos you want to work with, right-clicking the tag to remove, and
then selecting Remove Tag.
Remove a caption from multiple items by clicking the pictures
and videos you want to work with, clicking the caption to highlight
its text, pressing Delete, and then pressing Enter or clicking
another area of the window.
All these techniques help you provide additional information for
your pictures and videos. You can also use tags and ratings to help you
view and organize your pictures and videos in different ways. Once
you’ve assigned tags, you can click the People Tags or Descriptive Tags
node in the Navigation pane to see a list of all the tags you’ve
assigned. Then, by clicking a tag, you can view all the pictures and
videos with that tag.
Once you’ve assigned ratings, you can filter by the rating to
see:
Only pictures with that rating
Pictures with that rating or higher
Picture with that rating or lower
4. Identifying People in Your Pictures
Adding people tags to your pictures can make it easy to
sort and find pictures of friends, family, and others. You can add
people tags with or without face detection. Without face detection, the
people tag works like a descriptive tag. With face detection, the people
tag identifies the people in your pictures by their face. By moving the
mouse over a person’s face, you then can view the name of each person in
a picture. By selecting the person’s name under People’s tags, you can
highlight their face in the picture.
Face detection is a feature that can be turned on or off.
In Gallery view (when not viewing an individual picture or video), click
File→Options, select or clear the Enable Face Detection checkbox and
click OK. You can use the face detection feature to identify the faces
of people in your pictures.
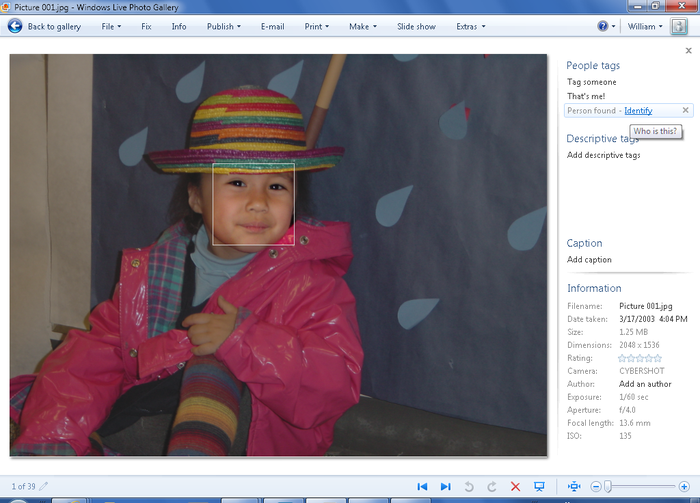
When the Info pane is displayed or you’ve opened a picture for
viewing by double-clicking it, face detection automatically identifies
the faces in pictures you select. Under the People Tags heading, Photo
Gallery will specify how many people were found in the picture. In the
example shown in Figure 8, Photo Gallery has
detected one person in the picture. The way you identify the person
depends on how you are viewing the picture. If you are working with the
main window, you can identify the person by clicking the “1 person
found” link, typing the person’s name and then pressing Enter. If you’ve
opened the picture for viewing, you can identify the person by clicking
the person’s name under the People Tags heading or by clicking the
“Identify” link under the People Tags heading, typing the person’s name
and then pressing Enter.
NOTE
When you are logged in to the Windows Live service, you can
identify the faces of Windows Live contacts in your pictures. Under
the People Tags heading, expand the group that contains the contact
that you want to add. Drag the photo to the contact and then
double-click the photo. In the Info pane, click Locate next to the
people tag you just added and then click the face of the person in the
picture.
You identify a person in a picture with multiple people in a
slightly different way. You can:
You identify a person using the Tag Someone dialog box either by
clicking the person’s name or using the search feature. If the person
isn’t listed yet, type the person’s name, click Add New Person, and then
press Enter.
Although face detection works fairly well, it won’t always detect
every person in your pictures. Face detection can fail for a variety of
reasons, such as if the person’s face is only partially seen or if the
face is very small in the frame. To resolve this, move over the person’s
face and do one of the following:
If Photo Gallery detects the face, the face will be
highlighted when you move the mouse pointer over it. You’ll be able
to specify who the person is by clicking the person’s name under the
People Tags heading or by clicking the corresponding “Identify” link
under the People Tags heading, typing the person’s name and then
pressing Enter.
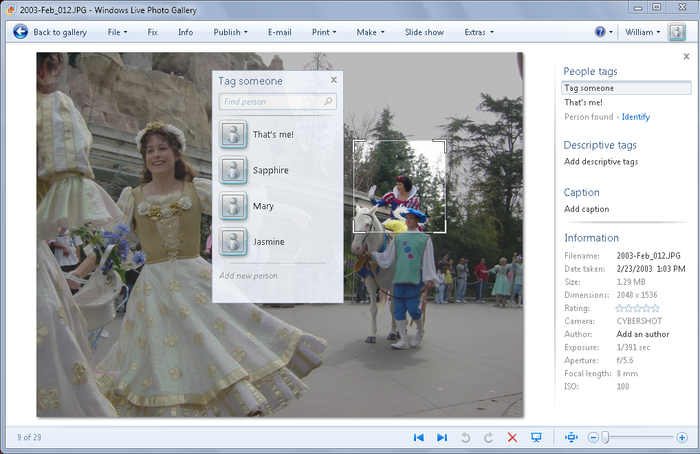
If Photo Gallery doesn’t detect the face, you’ll be able to
specify who the person is by clicking the person’s face or by
clicking Tag Someone under the People Tags heading. As shown in
Figure 9, Photo Gallery then displays a
face selection box and the Tag Someone dialog box. You can click and
drag the face selection box to any location in the picture. You can
resize the box by moving to a corner, clicking and dragging to make
the box bigger or smaller. After you’ve sized and positioned the
box, you can select the person’s name in the Tag Someone dialog box
either by clicking the name or using the search feature. If the
person isn’t listed yet, type the person’s name, click Add New
Person, and then press Enter.