Like any other device, printers, scanners, and fax machines have
properties that you can configure. This section looks at the properties
you’ll work with most.1. Changing Ports for Printers, Scanners, and Fax Machines
If a setup program works correctly but configures the
device incorrectly, the likely problem is the associated port. Each
printer, scanner, and fax machine you use with your computer is
configured to work with a specific port. USB printers, fax machines, and
scanners use virtual USB ports. Parallel and serial printers use
LPT and COM ports. Network-attached printers use standard
Transmission Control Protocol/Internet Protocol (TCP/IP)
ports. A problem you may encounter is the case of a printer being
configured to print using the FILE port instead of the correct port. Because the FILE
port prints documents to a raw printer file, your computer won’t spool
to the device.
You can view and set the ports for a printer or fax machine by
following these steps:
Click Start→Devices and Printers. In Devices and Printers,
right-click the printer you want to configure and then select
Printer Properties (not Properties).
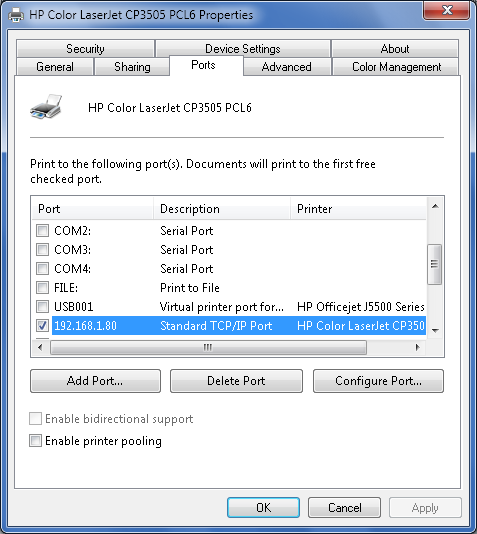
In the Properties dialog box, select the Ports tab, as shown
in Figure 1.
In the Port column, clear the checkbox for the incorrect port
and then select the checkbox for the correct port.
If you are experiencing problems with a
TCP/IP port, ensure that the IP address associated with the port is
correct. The IP address typically is listed as part of the name of the
port. If the IP address isn’t correct and no port is available for the
correct IP address, follow these steps to resolve the problem:
On the Ports tab, click Add Port.
In the Printer Ports dialog box, click Standard TCP/IP Port
and then click New Port.
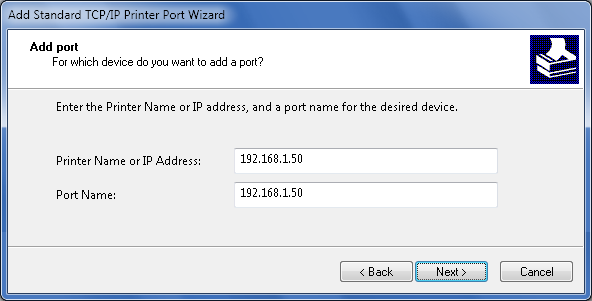
In the Add Standard TCP/IP Printer Port Wizard, click
Next.
As shown in Figure 2, type
the IP address of the printer or fax machine and then click
Next.
When you click Next, the wizard attempts to contact the device
and automatically determine the protocol details as well as the
adapter type. If the wizard is unable to detect the print device,
make sure that the print device is turned on and is connected to the
network. Also ensure that you typed the correct IP address or
printer name in the previous page. If you entered the incorrect
information, click the Back button and then retype this
information.
Before you click Finish, note the protocol and adapter type
details. This information must be correct for your computer to work
with the printer. Click Finish and then click Close.
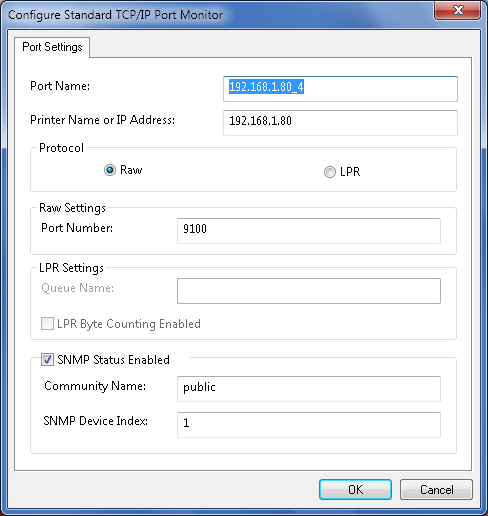
If the protocol and adapter type were incorrect, click the
port in the Properties dialog box and then click Configure Port. Use
the options in the Configure Standard TCP/IP Port Monitor dialog box to
specify the correct information and then click OK twice. (See Figure 3 for an
example.)
To resolve a problem with a network-attached scanner,
follow these steps:
In Windows Explorer, access C:\Program Files\Windows Photo Viewer,
where C: is your system drive, and then
double-click ImagingDevices.exe.
In the Scanners and Cameras window, click the scanner and then
click Properties.
On the Device Settings tab, the current hostname or IP address
is listed. If this information isn’t correct, enter the correct
hostname or IP address of the scanner, and then click OK.
