To Windows 7, printers, scanners, and fax machines are all
pretty much the same thing. Windows 7 prints to and accepts input from any
of these devices in similar ways. What sets these devices apart, however,
is the way they are connected.Printers, scanners, and fax machines can be either physically
attached or network-attached. A
physically attached device is connected directly to your computer with a
USB cable. A network-attached device is connected directly to your network
via Ethernet, Bluetooth, or Wi-Fi, and is accessed remotely rather than
directly.
NOTE
If your computer has a built-in fax modem, it will appear in the
Windows Fax and Scan utility
Many networked scanners can be used over the Web without needing
an install. If you know the IP address or hostname of your scanner, open
Internet Explorer and navigate to http://SCANNER,
replacing SCANNER with the host name or IP
address of the scanner. If you see an informational web page, look
around for an option called Scan or Webscan. This will let you access
most of the scanner’s functions over the Web without needing to install
a driver.
Both physically attached and network-attached devices can be shared
as well. The computer sharing these devices for other computers on the
network is referred to as a print server, regardless
of whether the computer is actually running a server version of Windows.
The print server also handles sending the formatted document and receiving
an incoming document. For ease of reference, I’ll refer to both processes
as spooling. A key advantage of using a
computer as a print server is that your printers, scanners, and fax
machines will have a central queue that you can manage.
At home or at the office, you don’t have to share printers,
scanners, or fax machines from your computer, or any computer, for that
matter. Instead, you can have everyone connect directly to a
network-attached device. When you do this, the network device is handled
much like a local device attached directly to a computer. However,
everyone who uses a network-attached device will then have separate
queues, which can make tracking down problems extremely difficult.
1. Installing Physically Attached Printers, Scanners, and Fax
Machines
Physically attached printers, scanners, and fax machines
are connected directly to your computer through a USB cable. Although
Windows 7 will automatically install most devices that are Plug and Play–compatible automatically, printers, scanners
and fax machines are exceptions in some cases. Why? Windows 7 won’t
automatically install drivers that aren’t designed for and known to be
fully compatible with the operating system. Additionally, Windows 7
won’t automatically install non–Plug and Play devices. Unfortunately,
many older printers, scanners, and fax machines fall into one of these
two categories and it’ll take a bit more work to install and use them
with Windows 7.
NOTE
Some very old printers may connect directly via serial or parallel cables. Windows 7 continues to support these
devices and you’ll need to install them using the manual installation
technique.
Most printers come with management software and device drivers on a CD. To avoid
problems, my advice is this: unless you are installing a
network-attached printer and are an administrator, you probably do not
need to install and use the management software. The reason for this
is that Windows 7 includes device and printer management features and
these can be used accessed by clicking Start→Devices and Printers and
then double-clicking the printer you want to manage.
With respect to device drivers shipped by the manufacturer, my
advice is this: if the device software wasn’t designed for Windows
Vista or later, don’t use it. Instead, rely on Windows 7’s automatic
or manual installation process to install the printer, scanner, or fax
device. If during a manual installation your device is not listed,
check Windows Update for driver software first and then check the
manufacturer’s website.
You can install most physically attached printers, scanners, and
fax machines by completing the following steps:
Turn on the printer, scanner, or fax device.
Connect the device to your computer using the appropriate USB
cable.
Let Windows 7 automatically detect and install the device.
Your computer will search its driver cache and may search the
Windows Update site.
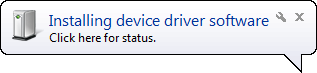
Windows 7 should automatically detect the printer, scanner or fax
device as shown in Figure 1, and then
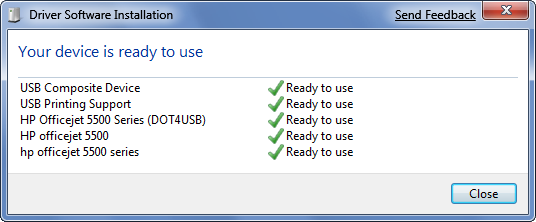
automatically install a built-in driver to support it. As shown in Figure 2, the Driver Software
Installation component handles the installation task. The printer,
scanner, or fax device should then run immediately without any
problems.
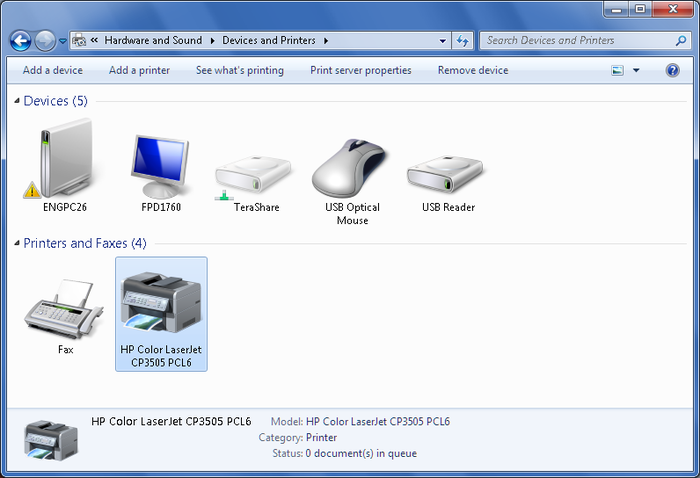
You can confirm that the printer, scanner, or fax device is
available by clicking Start→Devices and Printers. As shown in Figure 3, the printer,
scanner, or fax device should be listed as an available device.
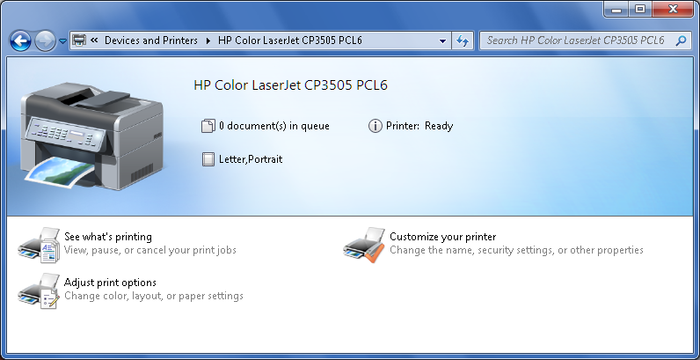
Double-click the printer, scanner, or fax device to check its status.
The device status should be “Ready,” as shown in Figure 4.
Automatic installation is great when it works, but it doesn’t work
100 percent of the time. Windows 7 might also automatically detect the
printer, scanner, or fax device, but the Driver Software Installation
component may run into problems installing the device. If this happens,
you’ll see errors similar to those shown in Figure 5. For example, the
HP printer that installed automatically on 32-bit Windows
7 would not install automatically on 64-bit Windows 7. Why? At the time,
the 64-bit printer driver was not designed for and known to be fully
compatible with the operating system.

1.1. Installing a printer or fax machine manually
If automatic installation fails, you can install the
printer or fax machine manually by completing the following
steps:
With the printer, scanner, or fax device powered on and
connected to your computer using the appropriate cable,
Start→Devices and Printers.
In Devices and Printers, click “Add a printer.”
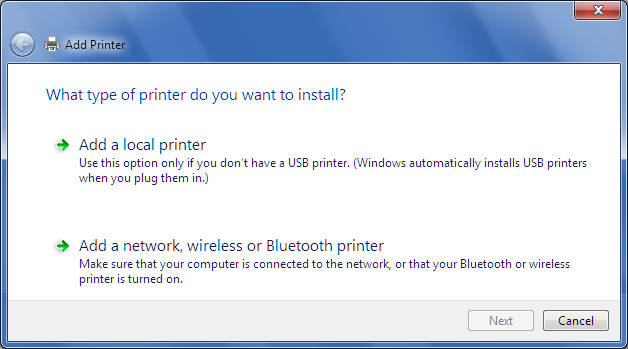
In the Add Printer Wizard, shown in Figure 6, click “Add a local
printer.”
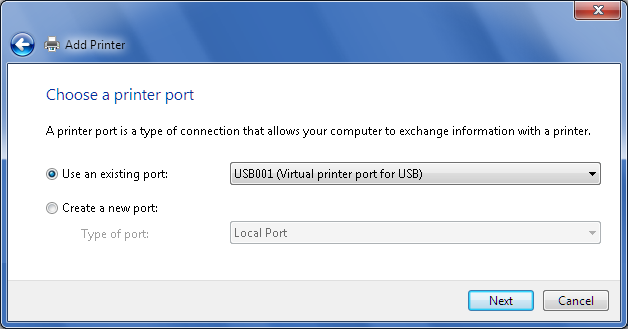
On the “Choose a printer port page,” ensure that “Use an
existing port” is selected, choose the printer port to use, and then click Next.
If you are trying to manually install a USB printer that did not
install automatically, choose USB001 (Virtual Printer Port for
USB), as shown in Figure 7.
Otherwise, choose the COM port (for serial printers) or LPT port
(for parallel printers) that your printer is connected to.
As shown in Figure 8, you must
now specify the device manufacturer and model. This allows Windows
7 to assign a driver to the device. If the device manufacturer and
model you are using are displayed, choose a manufacturer and a
model, and then skip steps 6–9.
If the device manufacturer and model you’re using aren’t
displayed in the list, ensure that your computer is connected to
the Internet and then click Windows Update. Windows will then
update the list of printers to show additional models. This
feature is part of Windows 7’s automatic driver provisioning and
it can take several minutes to retrieve the updated list.
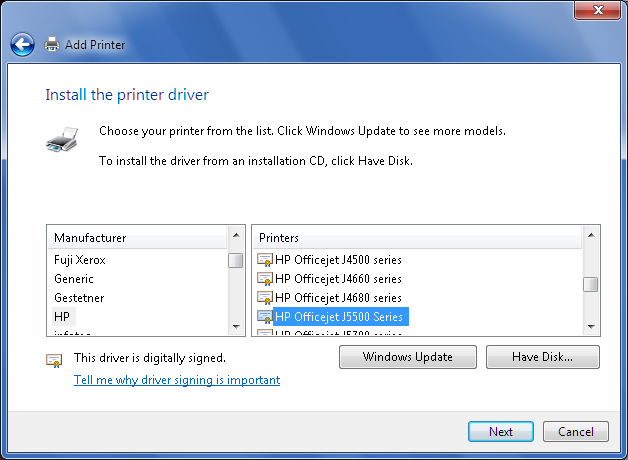
You should then be able to select your printer manufacturer
and model. If you aren’t, download the driver from the
manufacturer’s website and then extract the driver files.
Click Have Disk. In the Install from Disk dialog box, click
Browse.
In the Locate File dialog box, locate the .inf driver file for the device and
then click Open.
Click Next. On the “Type a printer name” page, type a name
for the device or accept the default name. You’ll see this name on
the Printers page in the Control Panel. Click Next, and the
printer driver will be installed.
The printer or fax machine is automatically
configured for sharing. If you don’t want the printer or fax
machine to be shared, select “Do not share this printer.”
Otherwise, you can set the share name and location, and add an
optional comment.
When you click Next, the Add Printer Wizard will install the
printer and set it as the default automatically. If you don’t want
the printer to be the default, clear the “Set as the default printer” checkbox (you will see
this checkbox only if you had a default printer before you
installed this one).
To print a test page, click Print a Test Page. The wizard
will then print a test page. Click Close.
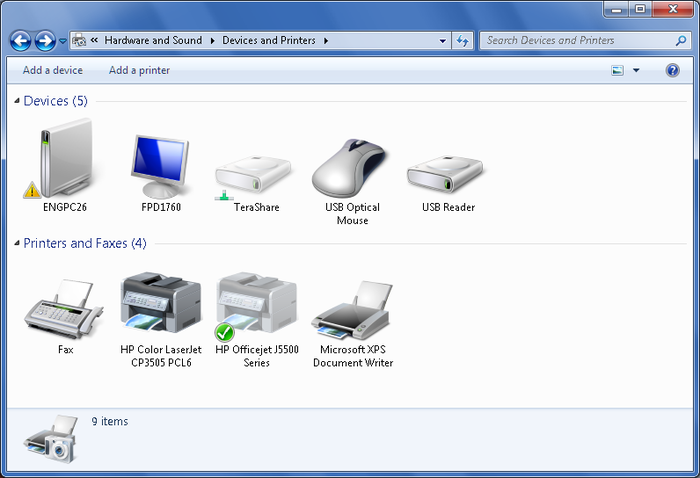
Click Finish. Click Start→Devices And Printers. The Devices
and Printers page in the Control Panel will have an additional
icon with the name set the way you specified (see Figure 9). You can
change the printer or fax properties and check printer or fax
status at any time.
1.2. Installing a scanner manually
You can install a scanner manually by completing the
following steps:
In Windows Explorer, access C:\Program Files\Windows Photo Viewer,
where C: is your system drive, and then double-click ImagingDevices.exe.
In the Scanners and Cameras window, click Add Device. This
starts the Scanner and Camera Installation Wizard.
You must now specify the device manufacturer and model. This
allows Windows 7 to assign a driver to the device. If the device
manufacturer and model you are using are displayed, choose a
manufacturer and a model, and then skip steps 5–7.
If the device manufacturer and model you’re using aren’t
displayed in the list, download the driver from the manufacturer’s
website and then extract the driver files.
Click Have Disk. In the Install from Disk dialog box, click
Browse.
In the Locate File dialog box, locate the .inf driver file for the device and
then click Open.
Click Next. On the “What is the name of your device?” page, type a name
for the scanner or accept the default name. You’ll see this name
in the Scanners and Cameras window.
Click Next and then click Finish.
The Scanners and Cameras window will have an additional icon
with the name set the way you specified. You can change the
scanner properties and check scanner status at any time.
