2. Installing Wireless and Bluetooth PrintersWindows 7 fully supports wireless and Bluetooth. Often,
wireless and Bluetooth printers will include installation software that
you may be able to use to install and begin using the device. Before you
use the installation software, however, you should ensure it is
compatible with Windows 7. If it isn’t, you may want to check the device
manufacturer’s website for updated software. Some wireless and Bluetooth printers connect directly to a
computer. Others connect to a computer via a network. You can connect a
wireless or Bluetooth printer directly to a computer by completing the
following steps: Typically, wireless and Bluetooth devices require that you
connect a receiver to the computer. You’ll need to plug the receiver
into a USB slot on the computer. Position the computer and receiver so that the receiver is
within range of the printer to which you want to connect. Configure the printer as necessary and ensure that it is
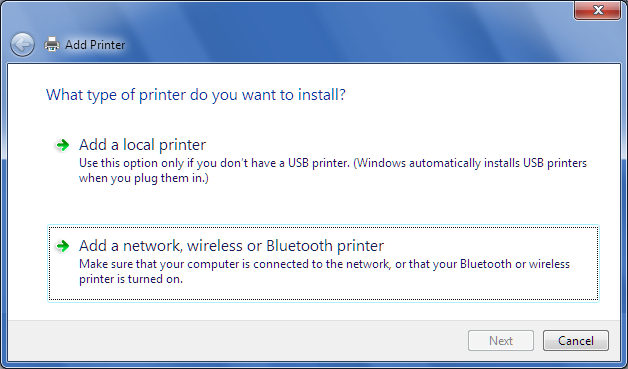
powered on. Click Start→Devices and Printers. In Devices and Printers,
click “Add printer.” In the Add Printer Wizard, shown in Figure 10, click “Add a
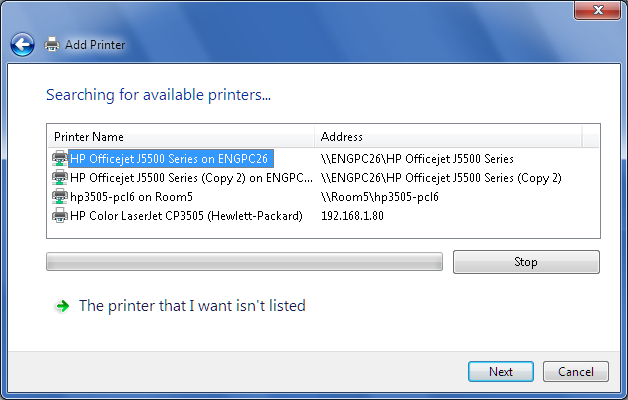
network, wireless or Bluetooth Printer.” As shown in Figure 11, your computer
will then search for available printers. If the printer you want to
use is shown in the list of available printers, select the printer,
and then click Next.
NOTE If your computer can’t find the wireless printer, make sure that
the printer is powered on and that the wireless/Bluetooth transmitter
is switched on. If you suspect the printer is out of range, try moving
it closer to the computer. Make sure the printer is positioned away
from air conditioning units, microwave ovens, etc. Then click Search
Again to have your computer search again for the printer. If this
resolves the problem, select the printer and then click Next to
continue this procedure. Otherwise, click “The printer that I want
isn’t listed,” and then click Next. On the “Find a printer by name or TCP/IP address” page, select
“Add a printer using a TCP/IP address or hostname,” and then click Next. On the “Type a printer
hostname or IP address” page, use the “Device type” list to select
the type of device. If you don’t know the type of device, choose
Autodetect. In the “Hostname or IP address” text box, type the
hostname or Internet Protocol (IP) address of the device. If you are
unsure, use the device’s control menu to print a configuration page.
The port name is set for you based on the hostname or IP address
entry. The port name doesn’t matter as long as it’s unique for your
computer. When you click Next, the wizard attempts to contact the device.
If the wizard is unable to detect the print device, make sure that the
print device is turned on and connected to the network. Also, ensure
that you typed the correct IP address or printer name in the previous
page. If you entered incorrect information, click the Back arrow and
then retype this information. Complete the installation by setting the
printer name and sharing options as discussed in steps 7–11. On the “Type a printer name” page, type a name for the device
or accept the default name. You’ll see this name on the Printers
page in the Control Panel. Click Next. The printer is automatically configured for sharing. If you
don’t want the printer to be shared, select “Do not share this
printer.” Otherwise, you can set the share name and location, and
add an optional comment. When you click Next, the Add Printer Wizard will install the
printer and set it as the default automatically. If you don’t want
the printer to be the default, clear the “Set as the default
printer” checkbox (you will see this checkbox only if you had a
default printer before you installed this one).
To print a test page, click Print a Test Page. The wizard will
then print a test page. Click Close. Click Finish. Click Start→Devices and Printers. The Devices
and Printers page in the Control Panel will have an additional icon
with the name set the way you specified. You can change the printer
properties and check printer status at any time.
To connect a wireless printer to a computer via a network, do the
following: Power on the printer. Configure its initial settings as
appropriate for the network. For example, you may need to configure
TCP/IP settings to use Dynamic Host Configuration Protocol (DHCP) or
you may need to use a static IP address. Wait 30–60 seconds for the device to be detected. The device
should be detected and installed automatically. If the device isn’t
detected and installed, click Start and then click Devices and
Printers. In Devices and Printers, ensure that the device isn’t
already listed as available. If the device isn’t available yet,
click “Add printer.” You’ll then be able to install the printer as
discussed in steps 5–11 of the previous procedure. If you have trouble connecting to the printer, make sure that
a firewall isn’t blocking connectivity to the printer. You may need
to open a firewall port to allow access between the computer and the
device. Also double-check the printer’s TCP/IP configuration. If
your network consists of multiple subnets connected together, try to
connect the device to the same network subnet. Keep in mind that Network Discovery settings control whether your
computer can find other computers and devices on the network and
whether other computers on the network can find your computer. By
default, Network Discovery is not enabled (but you may have enabled
this feature already by creating a homegroup, sharing folders, or
performing other tasks). To enable Network Discovery, click
Start→Control Panel→Network and Internet→Network and Sharing Center.
In the left pane, click “Change advanced sharing settings.” Access
the appropriate network profile, such as Home or Work. Under Network
Discovery, click “Turn on network discovery,” and then click Save
Changes.
|
