| |
|
|
|
Configuring Printer, Scanner, and Fax Machine Properties (part 2)
|
|
|
|
|
|
|
|
|
4/4/2011 5:14:18 PM
|
|
2. Changing Printer, Scanner, and Fax Machine DriversYou can manage drivers for printers, scanners, and fax
machines just like you can any other drivers. To change the drivers for
a printer or fax machine, follow these steps: Click Start→Devices and Printers. In Devices and Printers,
right-click the printer you want to configure and then select
Printer Properties (not Properties). On the Advanced tab, click New Driver. Use the Add Printer Driver Wizard to select and install the
new driver.
To change the drivers for a scanner, follow these steps: In Windows Explorer, access C:\Program Files\Windows Photo Viewer,
where C: is your system drive, and then
double-click ImagingDevices.exe. In the Scanners and Cameras window, click the scanner and then
click Properties. On the Device Settings tab, click New Driver.
3. Setting Printer Scheduling, Prioritization, and Other
OptionsThe Advanced tab of the Printer properties dialog box provides
most of the options you’ll want to configure. You can use these options
to configure your printer by completing the following steps: 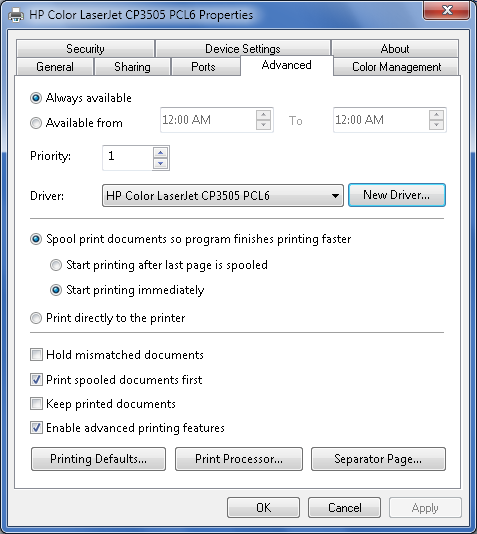
Click Start→Devices and Printers. In Devices and Printers,
right-click the printer you want to configure and then select
Printer Properties (not Properties). In the Properties dialog box, select the Advanced tab, as
shown in Figure 4. Use the following options to optimize the printer
configuration:
Always available and Available from Printers are either always available or
available only during the hours specified. Select “Always
available” to make the printer available at all times or
select “Available from” to set specific hours of operation.
Print jobs sent outside the designated hours are held in the
printer’s queue until the scheduled use time.
Priority Print jobs always print in order of priority.
Jobs with higher priority print before jobs with lower
priority. Use the Priority box to set the default
priority.
Driver Shows the current driver being used for the
printer. If you click the Driver list, you’ll see a list of
all printer drivers being used on your computer. See Section 12.3.2 for more
information.
Spooling options The spooling options control whether and how a
document is spooled to a hard disk before being sent to the
printer. Spooling a document before printing allows
applications to finish printing faster. To enable spooling,
select “Spool print documents so program finishes printing
faster.” To disable spooling, select “Print directly to the
printer.” With spooling, select “Start printing after last
page is spooled” if you want to ensure that the entire
document makes it into the print queue before printing. Otherwise, select
“Start printing immediately” if you want printing to begin
immediately when the print device isn’t already in use.
Hold mismatched documents A mismatch can occur if a document tries to use
a form or type of paper not currently available in a printer
tray. Typically, printers will stop all printing and wait for
the mismatch to be resolved. If you want the printer to hold
mismatched documents rather than try to prevent them, select
this option.
Print spooled documents first Select this option to allow the printer to print jobs
that have completed spooling before jobs in the process of
spooling, regardless of whether the spooling jobs have higher
priority. This helps to maximize printer efficiency by
ensuring that documents that have started printing can finish
printing without interruption.
Keep printed documents Select this option to keep a copy of documents in the
printer queue on the print server. If you’re printing files
that can’t easily be recreated, you might want to use this
option so that you can easily reprint a document without
having to recreate it.
Enable advanced printing features Select this option to allow the use of advanced printing
options, if available, such as “Page order” and “Pages per sheet.” If you encounter
compatibility problems when using advanced options, you can
disable the advanced printing features by clearing this
checkbox.
Printing Defaults Clicking this button displays the Printing
Defaults dialog box, which you can use to specify defaults for
paper sources, document sizes, color matching, print
resolution, and more.
Print Processor Clicking this button displays the Print
Processor dialog box, which you can use to set the print
processor and default data type for a printer. The print
processor is the software component that tells your computer
how to render the raw printer data. About the only time you
may need to configure print processor options is when you are
working with an older Unix printer.
Separator Page At the office, separator pages may be a
requirement. To select a separator page to print before each
document, click the Separator Page button. In the Separator
Page dialog box, click Browse, scroll down, and then click
Sysprint.sep if you have
a PostScript printer or Pcl.sep if you have a PCL printer.
Click Open and then click OK.
|
|
|
|
|
|
| Related ----------------- |
|
|
|
|
|
|
|
|
|
| |
|
|
