2.3. Filling the MDT Database Using PowerShell
After you configure the MDT database and define
access to it, you can add computers to the database and define their
settings. If you need to perform this task for hundreds of computers,
you don't want to do it one by one. You can instead use PowerShell to
perform a bulk import of computer objects in the MDT database. In this
example, we are going to use a CSV file that contains information about
the computers we want to import.
2.3.1. Setting Up the Module
To begin, you'll use the MDT PowerShell module, provided by Michael Niehaus described in his blog posting:
http://b1ogs.technet.com/b/mniehaus/archive/2009/05/15/manipu1ating-the-
microsoft-dep1oyment-too1kit-database-using-powershe11.aspx
Also keep in mind that you need PowerShell 2.0, which is included in Windows Server 2008 R2 by default. Follow these steps:
Download the MDTDB.zip file from the blog posting and unblock the file after you downloaded it. You can do this by opening the properties of the MDTDB.zip file and clicking Unblock on the General tab.
Unzip the contents of MDTDB.zip to a new folder and explore that folder. The zip file contains the MDTDB.psm1 file, which is the PowerShell module, and the MDTDB_Test.ps1
script, which contains samples on how to use the module in your own
script. Notice that you should make a reference in your script to the
module using the import-modu1e cmdlet in PowerShell.
Be sure you set the PowerShell Execution policy to Unrestricted.
2.3.2. Creating the CSV File
You will use Microsoft Excel to create an input CSV file, which you can use to import a batch of machines into the database.
In Excel, open a new workbook and create three columns named Name, MAC, and Roles, respectively (Figure 2).
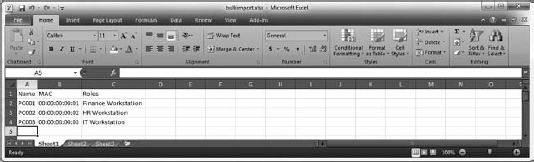
Fill
the rows with the information you have on each computer you want to
import: its name, its MAC address, and which role it should belong to.
Export the spreadsheet to a CSV file (Figure 3) and name it bulkimport.csv.
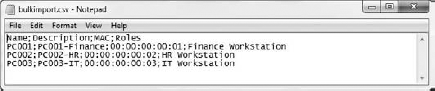
|
Depending on your regional settings, sometimes when
exporting an Excel sheet to a CSV file, you can end up having a
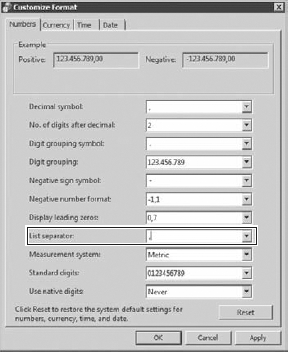
semicolon (;) instead of a comma (,) as the separator. You can modify
this by going to Control Panel =>
Region And Language, selecting the Formats tab, and clicking Additional
Settings. Here you have the option to set the list separator value,
which should be set to comma. If you don't use the comma as a separator,
PowerShell will not understand the CSV when using the import-csv cmdlet.
|
2.3.3. Using the CSV File with the PowerShell Module
You can use the following PowerShell script to import your CSV file into your MDT database. You should modify the Connect-MDTDatabase
cmdlet line with your own SQL Server name and MDT database name. If you
are using a named instance, you should also add the option -instance instance name after the provided SQL Server computer name. Make sure that the PowerShell script, the CSV file, and the MDTDB.psml file are in the same folder.
Import-Module -name .\MDTDB.p$m1
Connect-MDTDatabase -sqlServer SRV-SQL01 -database MDT
$computers = Import-Csv .\bulkimport.csv
$computers
For ($x=1; $x -le $computers.count; $x++)
{
   New-MDTComputer -macAddress Scomputers[$x-1].mac -description
$computers[$x-1].description -settings @{
      OSInsta11='YES';
      OSDComputerName=$computers[$x-1].name;
  }
  Get-MDTComputer -macAddress $computers[$x-1].mac ? Set-MDTComputerRole -roles
Scomputers[$x-1].ro1es
}
If you want to see the output of the scripts
directly, run a refresh on your database in order for the new computers
to be reflected.
This is just one example of what you can do with the PowerShell module provided by Michael Niehaus.
