Logo
programming4us
programming4us
programming4us
programming4us
Home
programming4us
XP
programming4us
Windows Vista
programming4us
Windows 7
programming4us
Windows Azure
programming4us
Windows Server
programming4us
Windows Phone
 
programming4us
Windows 7

Microsoft OneNote 2010 : Using the Research and Translate Tools (part 2) - Translating a Word or Phrase with the Research Pane

- Free product key for windows 10
- Free Product Key for Microsoft office 365
- Malwarebytes Premium 3.7.1 Serial Keys (LifeTime) 2019
6/19/2014 9:08:51 PM

Translating a Word or Phrase with the Research Pane

Whether you’re reviewing documents and notes from your company’s foreign subsidiaries, or you work with an exchange student at your school, there might be times when you want a quick text translation when working in OneNote.

To translate a single word or short phrase in your notes, do the following:

1.
Select the foreign word or phrase in your notes, right-click the selection, and then click Translate. The Research pane opens, this time with Translation set as the default search engine.

2.
If necessary, select the appropriate languages in the From and To boxes under Translation. For example, if you’ve selected the word étudiant in your notes, you could select French in the From box and English in the To box (see Figure 3).
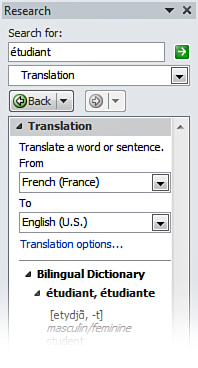
Figure 3. When using the Research task pane for language translation, you can choose the language from which to translate and the language into which to translate the selected text.


3.
Click the green Start Searching arrow at the top of the task pane and then look for the translated result in the results list.

If you frequently translate text in your notes in this way, you might want to set specific translation options to exclude languages that you’ll never use. To do this, click the blue Translation Options link that appears under the Translation heading in the Research task pane, and then select your choices there.


If using the Research task pane for on-the-fly translations isn’t quick enough for you, you can opt to use OneNote’s built-in Mini Translator instead. This built-in translation engine lets you rest the mouse pointer over foreign words in your notes and translate on the fly. Using the Mini Translator, you can also play back certain text to hear its pronunciation.

Setting Your Preferred Mini Translator Language

Before you can use the Mini Translator, you must first set the language into which you want to translate selected text in OneNote.

To set your preferred Mini Translator language, do the following:

1.
On the OneNote ribbon, click Review, and then, in the Language group, click the small downward-facing arrow at the bottom of the Translate button.

2.
On the pop-up menu that appears, click Choose Translation Language.

3.
In the Translation Language Options dialog box that appears, click the Translate to drop-down list and then select French (France) or any other language that you prefer.

4.
Click OK.

Once your preferred translation language is set, you can start using the Mini Translator.

Other -----------------
- Microsoft OneNote 2010 : Doing Research with Linked Notes (part 2) - Ending a Linked Notes Session, Viewing Linked Notes
- Microsoft OneNote 2010 : Doing Research with Linked Notes (part 1) - Beginning a Linked Notes Session
- Microsoft OneNote 2010 : Doing Research with Side Notes (part 3) - Moving Side Notes to Your Existing Notes
- Microsoft OneNote 2010 : Doing Research with Side Notes (part 2) - Reviewing Side Notes
- Microsoft OneNote 2010 : Doing Research with Side Notes (part 1) - Creating Side Notes
- Games and Windows 7 : Installing and Playing Third-Party Games
- Games and Windows 7 : Using the Games Explorer (part 4) - Managing Your Game Controllers and Other Game-Related Hardware
- Games and Windows 7 : Using the Games Explorer (part 3) - Rating Your System's Performance
- Games and Windows 7 : Using the Games Explorer (part 2) - Customizing Games Explorer
- Games and Windows 7 : Using the Games Explorer (part 1)
 
 
Top 10
- Microsoft Visio 2013 : Adding Structure to Your Diagrams - Finding containers and lists in Visio (part 2) - Wireframes,Legends
- Microsoft Visio 2013 : Adding Structure to Your Diagrams - Finding containers and lists in Visio (part 1) - Swimlanes
- Microsoft Visio 2013 : Adding Structure to Your Diagrams - Formatting and sizing lists
- Microsoft Visio 2013 : Adding Structure to Your Diagrams - Adding shapes to lists
- Microsoft Visio 2013 : Adding Structure to Your Diagrams - Sizing containers
- Microsoft Access 2010 : Control Properties and Why to Use Them (part 3) - The Other Properties of a Control
- Microsoft Access 2010 : Control Properties and Why to Use Them (part 2) - The Data Properties of a Control
- Microsoft Access 2010 : Control Properties and Why to Use Them (part 1) - The Format Properties of a Control
- Microsoft Access 2010 : Form Properties and Why Should You Use Them - Working with the Properties Window
- Microsoft Visio 2013 : Using the Organization Chart Wizard with new data
 
programming4us
Windows Vista
programming4us
Windows 7
programming4us
Windows Azure
programming4us
Windows Server