Overtime work isn’t defined the same way in every
organization. In some organizations, overtime is considered any work
totaling more than 40 hours in one week. In other organizations,
overtime is considered any work beyond eight hours in one day. Overtime
sometimes is calculated on a monthly basis, and other times, extra
hours don’t count as overtime costs because the resources are salaried.
Even within one organization, there may not be a single hard-and-fast
rule about overtime. Some resources may be salaried; other resources
may record overtime on a daily basis; and others may account for
overtime weekly.
Because of this, Project makes no assumptions about
overtime. If a resource reports that he or she has worked 10 hours in
one day, Project records those 10 hours as regular work. It’s up to the
project manager to determine whether two of those 10 hours are actually
overtime work. After the project manager has manually changed the
reported work to eight hours of regular work and two hours of overtime
work, the overtime rate for the resource will apply for those two
hours, and costs will be accounted for correctly.
Planning for Overtime Work and Costs
If you know that some of the work on your project
will be done as overtime work, you can plan for that overtime work
before it actually happens. This enables you to more accurately
estimate project costs by including overtime rates for resources during
the planning process.
Follow these steps to plan for overtime work in Project 2010:
1. | On the View tab, in the Task Views group, click Task Usage.
|
2. | On the View tab, in the Data group, click Tables and then click Work.
|
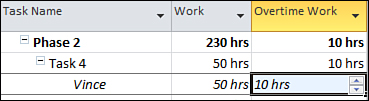
3. | On the left portion of the Task Usage view, click the Add New Column header and then click Overtime Work.
|
4. | Type the amount of overtime you want to plan for in the Overtime Work column for an italicized resource assignment, as shown in Figure 1.
|
|
Overtime work is considered part of the total work
for a resource assignment. If the resource assignment is set to 40
hours of work, and you add 10 hours in the Overtime Work column, the Work
column will stay set to 40 hours. If you meant to indicate that those
10 hours would be in addition to the existing 40 hours, you need to
adjust the Work column to add the overtime (50 hours of work). Project calculates costs as follows:
| (Overtime Work × Overtime Rate) = Overtime Cost | | [(Work − Overtime Work) × Standard Rate] + Overtime Cost + Fixed Costs + Costs Per Use = Cost |
|
Recording Actual Overtime Work and Costs
As resources on your project begin work on tasks,
their actual work hours will begin rolling in. As the project manager,
you’ll need to be recording how much of each resource’s time is
actually overtime.
To add actual overtime work to your project, follow these steps:
1. | On the View menu, in the Task Views group, click Task Usage.
|
2. | On the View tab, in the Data group, click Tables and then click Work.
|
3. | On the Format tab, in the Details group, click Add Details.
|
4. | In the Available fields box, click Actual Overtime Work and then press Ctrl and click Actual Work.
|
5. | Click Show to move the selected fields to the Show these fields box.
|
6. | Click Actual Work in the Show these fields box to select it and then click the up arrow button on the right side of the box to move the Actual Work field above the Actual Overtime Work field.
|
7. | Click OK to add these fields to the time-phased (right) portion of the Task Usage view.
|
8. | Scroll
through the list of tasks and resource assignments to display the
resource assignment that has overtime and then click the row header to
select the row.
|
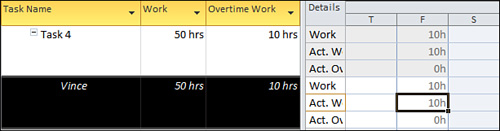
9. | On the View tab, in the Zoom group, click Zoom Selected Tasks, as shown in Figure 2.

|
10. | For each resource assignment, look at the Actual Work
row in the time-phased portion of the view and watch for reported work
that exceeds the resource’s standard amount of work. For example, look
at Figure 3.
The highlighted resource normally works eight hour days, and I see 10
hours of actual work reported in one day, so I know that resource has
worked some overtime on that day, according to company policy.
|
11. | Determine how much of the reported Actual Work
is overtime work and subtract that from the work total. For example, if
my resource reported 10 hours of work, I know that two of those hours
are overtime, so I subtract 2 from 10 to get eight hours.
|
12. | Type the new work total, minus the overtime work, in the corresponding cell in the Actual Work row.
|
13. | In the corresponding Actual Overtime Work row, type the amount of overtime work that the resource reported and then press Enter. The Actual Work row will be updated to add back the overtime work.
|
After the actual overtime work has been correctly
recorded in your project, the resource’s overtime rate will be used to
calculate the overtime costs.
