Using the Max Units and Resource Availability Table to Specify Resource Availability
Use the Max Units field to
enter the maximum number of units that can currently be assigned to
tasks at any one time. Project uses the Max Units field to determine
when the resource is overallocated (when more units of the resource have
been assigned than are available) and when leveling resources.
For instance, suppose that
Greg’s Max Units field shows 80%. That means that Greg is available to
spend up to 80% of his working time on tasks in your project. If you
assign Greg to spend 30% of his time on one task and 60% of his time on
another task, and if the scheduled dates for those two tasks overlap,
you will have assigned 90% of Greg’s time during the period of the
overlap. Because this is more than the Max Units of 80%, Project
calculates that the resource is overallocated; the resource name turns
red in the Resource Sheet view and displays a symbol in the Indicator
field to flag the overallocated resource.
You can format the Max Units
field as a percentage or as a decimal. The default is the percentage
format. You can change the format for the Max Units field in the Options
dialog box by following these steps:
1. | On the File tab, select Options.
|
2. | In the Options dialog box, select the Schedule tab.
|
3. | Use the drop-down list in the Show Assignment Units as A box and select either Percentage or Decimal.
|
Project applies a default
Max Units of 100% (or 1 in decimal format) when you create a resource.
However, you can change the value to anything between 0% and
6,000,000,000% (between 0 and 60,000,000 in decimal format). For a
single-unit resource, the default value of 100% means that this resource
is available to work 100% of the hours on its calendar on this project.
It can also signify that the resource is fully dedicated (100%) to
complete the assigned task during the defined period. If you are
grouping resources into a group resource, you enter a greater value than
100%. Thus, if you have two full-time movers in a Movers resource, you
can enter 200% (or 2 in decimal format).
Note
There
is no Max Units value for material or cost resources. Project assumes
that you will acquire as many units as you have assigned. |
A resource may have
some variability concerning its actual availability. For instance,
sometimes a resource is not hired until after the project starts, so up
until that date, its Max Units remains 0%. On the reverse side, a
resource might leave the company before the project is completed, so
after his or her last day with the company, the Max Units field will be
0%. At all other times, the resource availability may vary from 0 to
100% for very specific reasons during very specific times.
You might also intend to add
more units of the resource over the duration of the project. In this
case, you need to record the dates when the additional units would come
on board using the Resource Availability table.
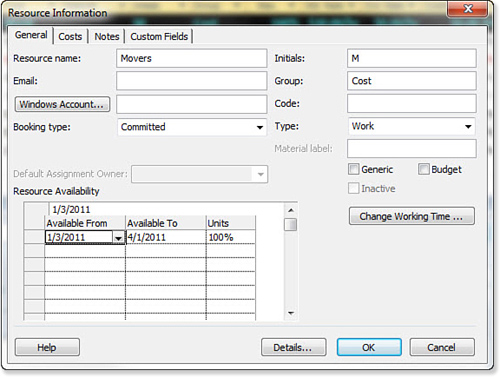
You can find the Resource
Availability table on the General tab of the Resource Information dialog
box. Use this table to define the time periods and the max units for
each time period .
The default values for both the Available From and Available To columns
in the Resource Availability table are NA (not applicable), and the
default value in the Units (Max Units) field is 100%. The NA value means
from the earliest possible date (Jan. 1, 1984) and latest available
date (Dec. 31, 2049), respectively. Figure 2
shows that the Movers resource will not start work until 1/3/2011, even
though the project starts earlier, and will be available until 4/1/2011
per the contract agreement, even though the project still continues
after 4/1.
The Max Units field on the
Resource Sheet view and on the Resource Form view displays the Units
value from the Resource Availability table for the current date. The
current date is normally the computer’s current date, but it can be any
date you choose to enter into the Current Date field in the Project
Information dialog box. If you look at the Max Units field for Movers on
the Resource Sheet view on any date prior to 1/3/2011, the value will
be 0%, because the movers are unavailable to work on the project before
1/3/2011 according to the Available From column. After 1/3/2011, it will
be 200%.
Tip
Be sure
that the dates in the Resource Availability table are in sequential
order and that you leave no gaps in the dates from one row to the next.
If you have an Available From date that is more than one day later than
the Available To date on the previous row, Project assumes the resource
is unavailable between those dates and uses 0% as the Max Units value
for the dates in the gap. |
When Project examines
this schedule to see if the Movers resource is overallocated, it shows
the overallocated indicator if the total assignments for the Movers
resource exceed 200% on any date outside the date range of
1/3/2011–4/1/2011.
To change the Resource Availability table for a resource, follow these steps:
1. | In
a view that shows resource names, such as the Resource Sheet view,
select the resource and click the Resource Information button on the
Resource tab of the Ribbon. You can also simply double-click the
resource name.
Caution When
entering dates in the Available From and Available To columns, be aware
that those dates are fixed unless you change them. If a resource’s
availability dates change, be sure to correct the changes in the
Resource Availability table. |
|
2. | Click the General tab, if it is not displayed.
|
3. | Click
the cell for the date you want to change under the Available From or
Available To column. You can either type in the date or use the
drop-down arrow to select the date.
|
4. | Enter the max units for that row’s date range in the Units column.
|
5. | After
all entries are completed, click OK to save the changes. Or you can
click Cancel to close the dialog box without saving any changes.
|
Note
The
Resource Availability table is not available for material resources,
which are assumed to be always available to the project. |
