Selecting Resource Calendar to Specify Resource Base Availability
In addition to Max
Units and the Resource Availability table, Project 2010 uses resource
base calendars to specify resource availability. One of the project’s
base calendars is designated to define the normal working days and hours
for the resource.
To select a specific resource
calendar, use the drop-down arrows to display a list of all the base
calendars that have been defined and select the one that most closely
fits the resource. The resource calendar inherits all the chosen base
calendars’ values: the working days and hours, as well as the
individually marked non-working days and hours that are defined in the
base calendar. The default base calendar is Standard.
Tip
You
might want to create a special base calendar if you have more than one
named resource with the same set of exceptions to one of the standard
base calendars. Otherwise, you will have to mark the same exceptions in
each of the resource calendars. For example, if several resources will
be assigned to work on a project on a night shift and they all have the
same basic schedule on night work hours, you can save time by creating a
base calendar for night shift work and then using that base calendar
for all resources with these hours. Instead of customizing each night
shift worker’s resource calendar, you can define the hours only once and
apply the base calendar wherever necessary. If
you create additional base calendars in your project that resources or
tasks are linked to, remember to make company-wide changes in working
days and hours to all base calendars. For example, if your company
decides to make the day after Thanksgiving a holiday, you need to edit
each base calendar used by resources or tasks in order to apply the
holiday to all schedules. |
Specifying the Resource Working Time
As previously mentioned, a
resource calendar is based on one of the base calendars, and it inherits
the base calendar’s normal working times per week, as well as all the
holidays or other exceptions to the normal working times. You can enter
exceptions to working time on the base calendar for a resource by using
the resource calendar. In order to modify the working time for the
resource on a particular day, follow these steps:
1. | In the Resource Information dialog box, select the General tab if it’s not already selected.
|
2. | On the General tab, click the Change Working Time button.
|
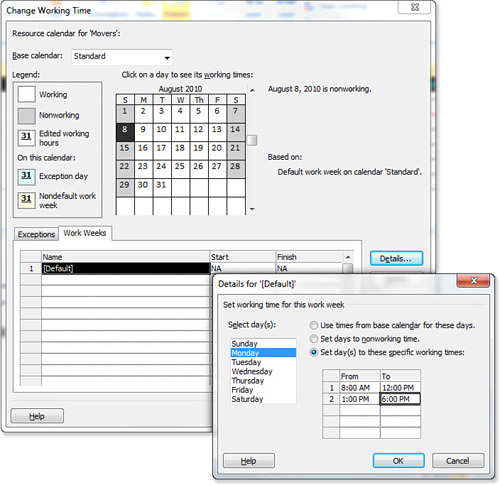
3. | Ensure that the Work Weeks tab is selected and then select a date on the calendar.
|
4. | Click the Details button and enter the working time hours for the resource in the resulting dialog box, as shown in Figure 3.
|
In order to create an exception, follow these steps:
1. | In the Resource Information dialog box, select the General tab if it’s not already selected.
|
2. | On the General tab, click the Change Working Time button.
|
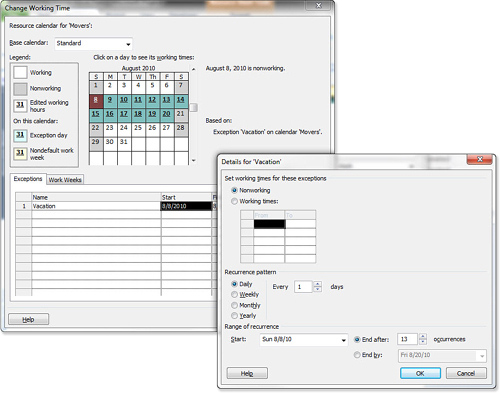
3. | On the Exceptions tab, enter the name of the exception and then enter the exception start and end dates.
|
4. | Click the Details button and ensure that the Nonworking option is selected.
|
For example, in Figure 4,
the resource calendar for Brian Smith shows that he will not be
available to work August 10–17 because he has scheduled vacation during
that time.
Note
You
can edit a resource calendar from the Change Working Time dialog box,
although you cannot change the name of the base calendar the resource
calendar is linked to from there. Select the Project tab, Change Working
Time to display the Change Working Time dialog box, and then use the
drop-down list in the For box to select the resource name. |
Follow these additional steps to edit a resource calendar:
1. | Select
the resource in a resource view or on the Assign Resources dialog box
and double-click the resource name to display the Resource Information
dialog box. Click the Change Working Time button to display the resource
calendar and time fields.
|
2. | Use the Base Calendar drop-down list to select the base calendar for the resource.
|
3. | To
give the resource time off on dates that are normal working dates on
the base calendar, select the dates on the calendar and click the
Details button. Select the Set Days to Nonworking Time option.
|
4. | Similarly,
to schedule a resource for work on dates that are normally non-working
dates, select the dates (they are shaded before you select them), click
the Details button, and select the Set Day(s) to These Specific Working
Times option. In the Working Times table, specify the From and To hours
the resource will be available to work on that day.
|
5. | Modify
the hours of work on any date as needed. The date appears with a
diagonal shading pattern to indicate that the hours are nonstandard for
that day of the week, and the date is underlined to show that it is an
exception to the base calendar.
|
6. | Click
the OK button to save your changes in the resource calendar, or click
the Cancel button to abandon the changes without saving them. |
