3. Using Your Tablet PC Pen
Tablet PCs use pens as input devices. You can use pens for
writing as well as for interacting with items on the screen by tapping
and flicking. To ensure that your Tablet PC recognizes your tapping and
flicking actions, you should take a few minutes to configure the related
options.
3.1. Tapping your pen
Pen taps allow you to perform actions equivalent to
using a mouse. You can perform the following actions:
Double-tapping the pen on the screen is equivalent
to a double-click mouse action.
Pressing and holding the pen to the screen is equivalent to
a right-click mouse action, or pressing the pen button to perform
a right-click.
On some Tablet PC pens, you can grip the top of the pen to
erase ink from the screen.
You can set pen tap options by following these steps:
Click Start→Control Panel.
In the Control Panel, click Hardware and Sound, scroll down,
and then click Pen and Input Devices. This displays the Pen and
Input Devices dialog box with the Pen Options tab selected.
To configure double-tapping, click “Double-tap” in the “Pen
action” section and then click Settings. You can then adjust how
quickly you can tap the screen and the distance the pointer can
move between tapping. Use the test area provided to test your
settings. Fine-tune your settings as necessary and then click
OK.
To configure pressing and holding, click “Press and hold” in
the “Pen action” section and then click Settings. You can then
change the amount of time you must press and hold the pen to the
screen to perform the equivalent of a right-click, and the amount
of time to perform the right-click action. Use the test area
provided to test your settings. Fine-tune your settings as
necessary and then click OK.
To open Input Panel automatically when you move the pen
quickly from side to side while it is positioned slightly above
the screen, click Start Tablet PC Input Panel in the “Pen action”
section and then click Settings. Select the “Enable start input panel gesture” checkbox. Use the
slider to specify the relative distance you must move the pen from
side to side, and then click OK.
To allow clicking the pen button to be used as a right-click
equivalent, select the “Use the pen button as a right-click
equivalent” checkbox.
To allow erasing ink by gripping the top of the pen (if
supported) select the “Use the top of the pen to erase ink”
checkbox.
Click OK to save the settings.
Each tapping action of the pen is accompanied by some
type of visual feedback. To view or change visual feedback options,
follow these steps:
Click Start→Control Panel→Hardware and Sound, scroll down,
and then click Pen and Input Devices.
In the Pen and Input Devices dialog box, click the Pointer
Options tab.
A different type of visual feedback is provided for each pen
tap action. If you don’t want to see visual feedback for a tap
action, clear the related checkbox.
If you don’t want pen cursors to be shown instead of mouse cursors
when you use the pen, clear the “Show pen cursors instead of mouse
cursors when I use my pen” checkbox.
Click OK to save the settings.
3.2. Flicking your pen
Pen flicks allow you to perform navigation and editing
actions by flicking the pen in a specific direction. Only navigational
flicks are enabled by default.
The navigational flicks are as follows:
Flick left to go back—equivalent to clicking the Back button
in Windows Explorer or Internet Explorer.
Flick right to go forward—equivalent to clicking the Forward
button in Windows Explorer or Internet Explorer.
Flick up to drag up—equivalent to dragging a selected item
up or to using a scrollbar to scroll up the page in an extended
document or the browser window.
Flick down to drag down—equivalent to dragging a selected
item down or to using a scrollbar to scroll down the page in an
extended document or the browse window.
The editing flicks you can enable are as follows:
Flick up and to the right to copy a selected item to the
clipboard.
Flick down and to the right to paste a previously selected
item into a document or email message.
Flick up and to the left to delete a selected item.
Flick down and to the left to undo a previous action.
You can set pen flick options by following these steps:
Click Start→Control Panel→Hardware and Sound, scroll down,
and then click Pen and Input Devices.
In the Pen and Input Devices dialog box, select the Flicks
tab.
To enable flicks, select the “Use flicks to perform common
actions quickly and easily” checkbox. Clear this checkbox to
disable flicks.
When flicks are enabled, use the options provided to enable
only navigational flicks or both navigational and editing
flicks.
If you’ve enabled both navigational and editing flicks, you
can click Customize to define alternative actions for each
possible pen flick. Any alternative actions override the default
actions.
Use the Sensitivity slider to adjust how easily pen flicks
are recognized. In most cases, you’ll want the sensitivity to be
midway between Relaxed and Precise. However, if you are having
issues with accidental flicks, you may want to use a more precise
setting.
Click OK to save the settings.
3.3. Writing with your Tablet PC pen
When you are using a Tablet PC, you can enter text using
the Tablet PC pen and a utility program called Input Panel. Input
Panel converts to typed text any handwriting you enter using the pen,
and it supports AutoComplete, Back-of-Pen Erase, and scratch-out
gestures.
On a Tablet PC, the Input Panel icon is displayed next to text
entry areas in programs that accept handwriting input from a Tablet PC
pen. With Microsoft Office Word, Windows Mail, and other Windows
programs, this allows you to display Input Panel by tapping the icon.
You can then use the pen to write and insert the converted text by
clicking the Insert button. In Input Panel, the Insert button is
displayed below and to the right of your converted text. You can also
start Input Panel by selecting Start→All Programs→Accessories→Tablet
PC, and then selecting Tablet PC Input Panel.
Input Panel has changed in several ways since it was introduced
with Microsoft Windows XP Tablet PC Edition. When you run Input Panel,
it appears as a tab on the left side of the screen. To open Input
Panel, move the mouse pointer over the tab and then click to slide
Input Panel out from the edge of the screen. Clicking the Close button
hides Input Panel.
By default, Input Panel floats in a separate window. You can
move Input Panel by dragging it to a desired position or by docking it
at the top or bottom of the screen. If you then hide Input Panel, it
will slide out from the same location the next time you open it. The
Input Panel tab on the side of your screen remains available even if
the program you are using is running in full-screen mode.
Input Panel has two input modes:
Writing Pad Mode
Use this mode, shown in Figure 6, when you want to write
continuously with the pen as though you are writing on a lined
sheet of paper. Each word you write is converted to text
separately and then displayed. If you click the word, you can
correct letter case, change punctuation around the word, modify
the letters, or delete letters. The buttons on the right provide
quick access to common functions. Click Num to display the
number pad, which contains the digits 0 through 9 and arithmetic
symbols. Click Sym to display the symbols pad, which contains
options for the most commonly used characters. Click Web to
display the web pad, which contains character shortcut options
for entering URLs.

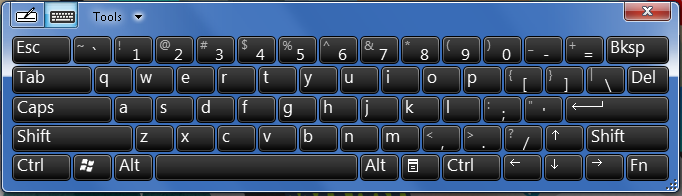
On-Screen Keyboard Mode
Use this mode, shown in Figure 7, to display an onscreen
keyboard that allows you to use pen taps to select characters,
press function keys, or click a special-purpose key, such as
Home, Page Up, or Insert. To use the function keys, you must
first tap the Fn key. Also, note that the Ctrl, Windows, and Alt
keys are provided, allowing you to enter keystroke combinations,
such as Ctrl-Alt-Delete, by tapping each required key. Between
the right Alt key and the right Ctrl key, you’ll find a
properties button. Clicking this button is the equivalent of
right-clicking and selecting Properties in the active
window.
With Input Panel, AutoComplete works much like AutoComplete in
other Microsoft programs. As you enter text, AutoComplete lists
possible matches based on items that you’ve entered before. If an item
in the list matches the text that you want to enter, simply tap the
suggestion to enter it in the text entry area.
You can enable and disable AutoComplete and other Input Panel
options by following these steps:
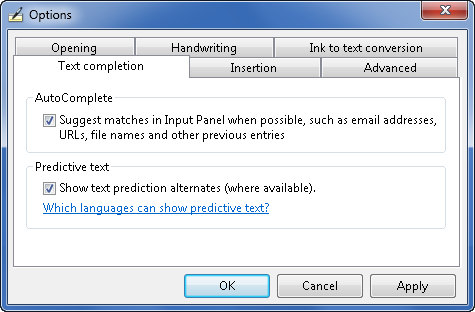
In Input Panel, click Tools, and then click Options. This
opens the Options dialog box shown in Figure 8.
On the Text Completion tab, select or clear the “Suggest
matches in Input Panel when possible…” checkbox as
appropriate.
Optionally, select or clear the “Show text
prediction alternates…” checkbox as appropriate.
Back-of-Pen Erase allows Input Panel to support Tablet PC pens
that have erasers. If the Tablet PC pen has an erase function, you can
use the eraser to delete entries from Input Panel. Another way to
delete entries is to use scratch-out gestures. As in Windows XP, the Windows 7
Input Panel supports the Z-shaped scratch-out gesture. If you draw a Z
over an entry or a series of entries, the entry or entries are
deleted.
Windows 7 supports these scratch-out gestures as well:
Strikethrough scratch-out
Delete entries by drawing a horizontal line across an
entry or a series of entries. You can draw the horizontal line
from right to left or left to right.
Angled scratch-out
Delete entries by drawing a line at an angle across an
entry or a series of entries. You can draw the line at an angle
from the upper right to the lower left or from the upper left to
the lower right.
Vertical scratch-out
Delete entries by drawing an M or a W from right to left
over an entry or a series of entries. The M or W should be
larger than the entries you are deleting.
Circular scratch-out
Delete entries by drawing a circle over an entry or a
series of entries. You can draw the circle around or within the
entries.
