All laptop computers include the Mobility Center for optimizing
laptop settings. When you are working with laptops, you may also need to
connect to a network projector, and there’s an option for this, too. When
you are working with Tablet PCs, you’ll find even more accessories,
including tools for configuring Tablet PC pens, Input Panel for entering
text using a pen, and Windows Journal for creating journal entries using a
pen.NOTE
Tablet PC extras are provided as Windows features that you can
turn on and off. Click Start→Control Panel→Programs→“Turn on or off
Windows features.” This displays the Windows Features dialog box. Select
or clear Tablet PC Optional Components as appropriate, and then click
OK.
1. Navigating the Windows Mobility Center
The Windows Mobility Center provides a central console for
accessing the most commonly used mobile PC settings. On a laptop or Tablet PC, you can access the Mobility Center by
right-clicking the Power icon in the taskbar’s notification area and
then selecting Windows Mobility Center. However, if you’ve disabled the
display of the Power icon, you won’t be able to access it on the
taskbar. Instead, click Start→Control Panel→Hardware and Sound→Mobility
Center.
As Figure 1 shows, each
configurable mobile PC setting is managed through a separate control tile. Generally, control
tiles allow you to make direct adjustments to your mobile PC settings by
using available options such as a toggle button to turn presentation
settings on and off, or a slider to adjust the brightness of the
screen.
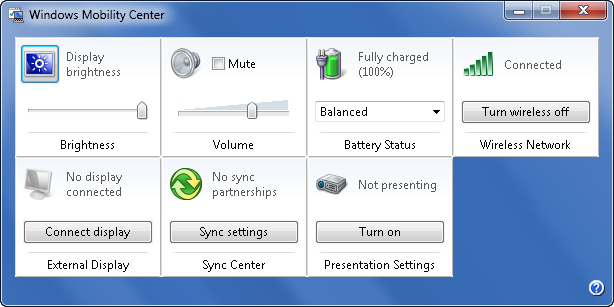
The control tiles available depend on the type of mobile PC and
the mobile PC manufacturer. Typically, laptops have seven standard
control tiles and Tablet PCs have either seven or eight standard control
tiles. The most common control tiles are:
Brightness
Displays the current brightness setting. If
brightness is configurable on your computer, you can use the
slider provided to adjust the brightness of the display. Click the
Display icon to edit the settings of the currently selected power
plan.
Volume
Displays the current volume setting. If volume is
configurable on your computer, you can use the slider provided to
adjust the volume. Click the Speaker icon to access the Sound
dialog box.
Battery Status
Displays the status of the computer’s battery. You
can use the selection list provided to change quickly from one
power plan to another. If you’ve created custom power plans, these
are available as well. Click the Battery icon to access the Power
Options page in the Control Panel.
Wireless Network
Displays the status of your wireless network connection.
Click “Turn wireless on” to enable your wireless connection for
use. Click “Turn wireless off” to disable wireless networking.
Click the Wireless Networking icon to display the Network
Connections dialog box.
External Display
Provides options for connecting a secondary display to give
a presentation. If a secondary display is available and you’ve
connected the cables, you can click “Connect display” to connect
to the display. Click the Display icon to access the Screen
Resolution page in the Control Panel.
Sync Center
Displays the status of file synchronization. Click
Sync to start a new sync using Sync Center. Click the “Sync
settings” button or the Sync icon to access Sync Center.
Presentation Settings
Displays whether you are in presentation mode. In presentation mode, the display
and hard disk do not go into sleep mode due to inactivity. Click
“Turn on” to enter presentation mode. Click the Projector icon to
access the Presentation Settings dialog box.
Tablet Display
Displays the current display orientation. Click
“Change orientation” to change from landscape to portrait display
or vice versa. (Tablet PC only)
If your mobile PC includes other control tiles, these were
probably provided by the PC manufacturer. You can learn more about these
control tiles from the documentation that came with your mobile PC, or
by visiting the manufacturer’s website.
2. Connecting to Projectors
Before you use your laptop or Tablet PC for presentations,
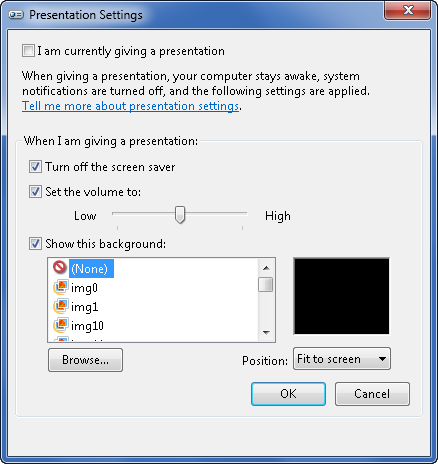
you may want to configure the default presentation settings (Figure 2). To do this, follow
these steps:
In Windows Mobility Center, click the Presentation
icon.
In the Presentation Settings dialog box, select “Turn off the
screen saver” to disable the computer’s screen saver when you are
giving a presentation.
To override the output volume when you are giving a
presentation, select “Set the volume to” and then use the related
slider to set the desired volume level.
To show an alternative desktop background, select “Show this
background” and then select a background image to use. Images from
your Pictures library are listed and available for selection by
default. Choose None to display a black background. Click Browse to
select a different background.
Click OK to save your settings.
Basic projectors connect to computers via a cable. To use this
type of projector, you must connect the projector cable to your laptop
or Tablet PC. Once you’ve connected the cable, you can connect your
computer to the projector by completing the following steps:
To use the presentation settings you specified previously,
access Windows Mobility Center and then click Turn On in the
Presentation Settings control.
Click Start→All Programs→Accessories→Connect to a Projector.
You can also use the keyboard shortcut Windows-P.
Select one of the following output options for the
display:
Select Duplicate to duplicate the computer’s display to
the projector.
Select Extend to extend the computer’s display to the
projector.
Select “Projector only” to show the computer’s display on
the projector only.
Your computer’s display is configured per your selection.
Typically, Windows will resize the computer screen automatically,
using a resolution that is appropriate for use with
projectors.
When you are done with your presentation, click Start→All
Programs→Accessories→Connect
to a Projector or press Windows-P. In the Connect to a Projector
dialog box, select Disconnect Projector. Your computer will
disconnect from the projector and also will stop using the
presentation settings.
At the office, you may find that your meeting rooms and conference
centers have networked projectors set up for use during presentations.
To use this type of projector, you must connect your laptop or Tablet PC
to the LAN and then connect to the project over the network. In most
cases, connecting your computer to the network is as simple as plugging
in an Ethernet cable or ensuring that you are using the correct wireless
network connection.
Once you are connected to the network in the conference or meeting
room you are using, you can connect to the networked projector by
completing the following steps:
Click Start→All Programs→Accessories→Connect to a Network
Projector.
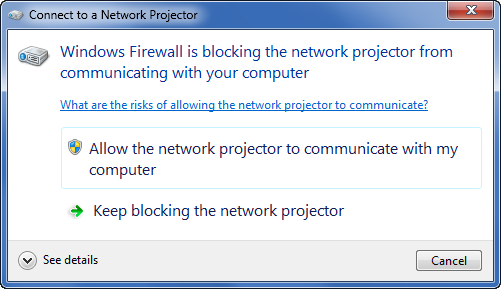
The first time you use a network projector with your laptop,
you’ll see a warning prompt about Windows Firewall, as shown in
Figure 3. To use
the projector, you must allow Windows 7 to communicate through
Windows Firewall, so click “Allow the network projector to
communicate with my computer.”
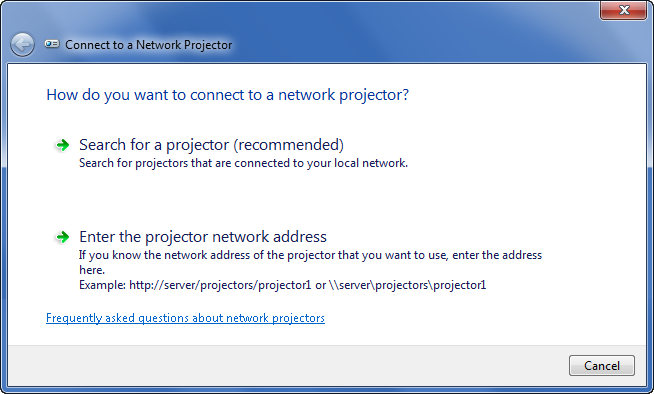
Specify how you want to connect to the projector, as shown in
Figure 4.
If you want to select from projectors found on the local
network, click “Search for a projector.” The wizard searches for
projectors on the network and returns its results along with a list
of any projectors you’ve used recently. Click the projector you want
to use, provide the access password for the projector if necessary,
and then click Connect.
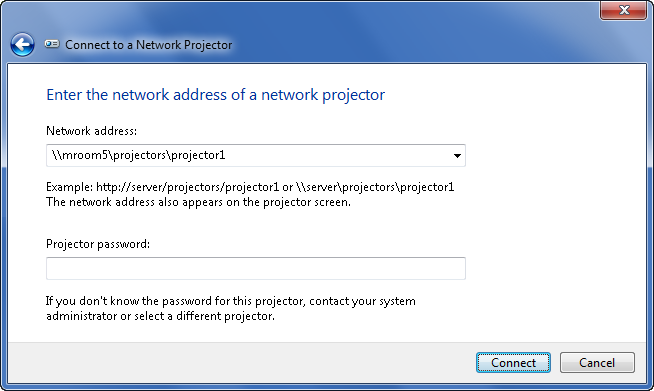
If you know the network address of the projector, click “Enter
the projector network address.” On the “Enter the network address of
a projector” page, shown in Figure 5, type the
network address of the projector, such as
http://intranet.theoffice.local/projectors/projector4.
Enter any required access password, and then click Connect.
