4. Creating a Windows Journal
Another Tablet PC extra is Windows Journal. Windows
Journal gives you a virtual journal that you can use with the Tablet PC
pen in much the same way you would use a stationery pad and an ink pen.
You may prefer Windows Journal to Sticky Notes when you are writing
longer notes and memos with the Tablet PC pen.
You can open Windows Journal by clicking Start→All
Programs→Accessories→Tablet PC, and then selecting Windows Journal. The
first time you start Windows Journal you’ll be prompted to install the
Journal Note Writer print driver. When prompted, click Install to allow
Windows 7 to install the driver. When Windows 7 finishes installing the
driver, click Close. By installing the driver, you ensure that you can
navigate, print, annotate, and share your journal.
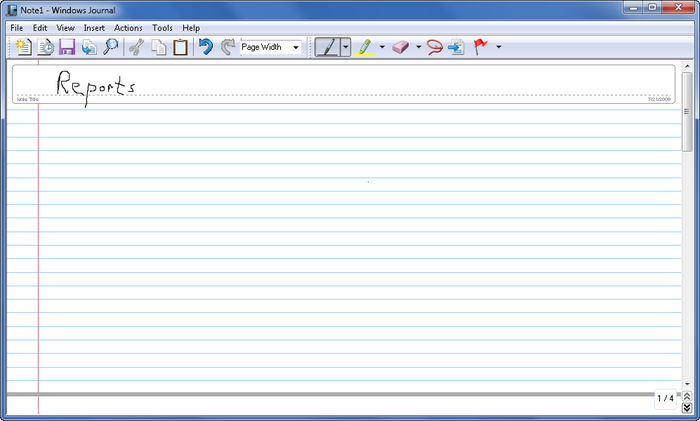
As shown in Figure 9,
the Windows Journal main window looks like a notepad with lined paper,
and you can use the Tablet PC pen to write your notes directly on the
paper. Using Windows Journal is similar to using Sticky Notes. Your
journal can have a stack of pages just like a real journal. When a
journal has multiple pages, you can navigate pages by clicking and
dragging the scroll bar down and up. Beneath the scroll bar are several
buttons:
Previous
Displays the previous page. You can also display the
previous page by pressing Page Up on the keyboard. If you’re on
the first page of the journal, this button is dimmed.
Next
Displays the next page. You can also display the next page
by pressing Page Down on the keyboard. If you’re on the last page
of the journal, this button is replaced by the New Page
button.
New Page
Creates a new page. This button works only if you’re on the
last page of the journal and you’ve written on the page.
Using the pen, you can convert handwriting to text, edit
converted text, and copy converted text to the clipboard. This allows
you to use handwriting entered into Windows Journal as text in other
programs. To copy handwriting as text and edit it, follow these
steps:
Click the Selection Tool button on the toolbar or choose
Selection Tool on the Edit menu.
Press and hold the pen to the screen.
Drag the pen around the handwriting you want to select.
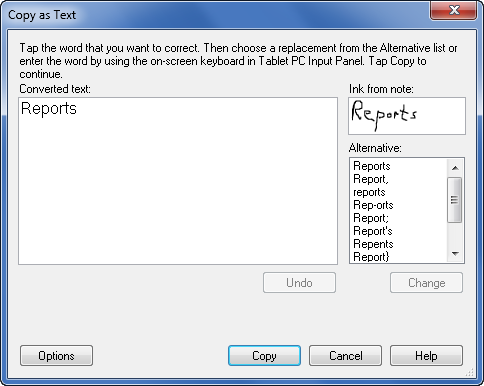
Right-click the selection and then choose Copy as Text.
Windows Journal converts the handwriting to text automatically and
then displays the Copy as Text dialog box, as shown in Figure 10.
In the Copy as Text dialog box, optionally tap any word or
character that you want to correct and then choose a replacement
from the Alternative list as necessary.
Click Copy to copy the text to the clipboard.
When working with Windows Journal, you might also want to insert a
page before the current page. To insert a page before the current page,
click New Page on the Insert menu. The Insert menu also has options for
inserting text boxes, flags, and pictures. You use a text box to insert
typed text. You use a flag to mark a part of the journal with a flag
icon. To insert a picture, follow these steps:
In Windows Journal, click Insert and then click
Picture.
In the Insert Picture dialog box, select the picture to insert
and then click Insert. Pictures can be in JPEG, GIF, PNG, WMF, EMF,
or BMP format.
The selected picture is inserted into the journal and selected
so that you can click it and drag it within the journal.
After you drag the picture to the desired location, you can
drop the picture in that location by clicking another part of the
journal.
If you later want to move the picture, choose the Selection
Tool option on the Edit menu and then click the picture to select
it. You can then drag and drop the picture in a new location.
Windows Journal uses a college-ruled notepad as the default
stationery style. You can change to other stationery as
well. To do this, follow these steps:
In Windows Journal, click Options on the Tools menu.
On the Stationery panel, make sure that the Stationery option
is selected, and then click Default Page Setup.
In the Default Page Setup dialog box, click the Style tab, as
shown in Figure 11.
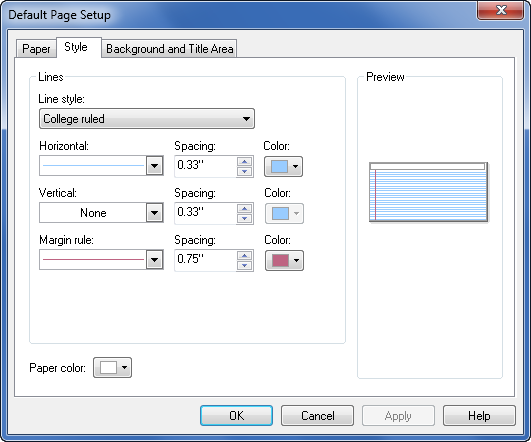
Use the “Line style” list to choose the style to use. Options
include Standard ruled, Narrow ruled, College ruled, Wide ruled,
Large grid, Small grid, and Blank.
Use the Horizontal list to select the style for horizontal
lines on the paper and the related Color list to select a line
color.
Use the Vertical list to select the style for vertical lines
on the paper and the related Color list to select a line
color.
Use the “Margin rule” list to select the style for margin rule
lines on the paper and the related Color list to select a line
color.
Use the “Paper color” list to select a background color for
the paper.
NOTE
This change affects new notes you create with File→New Note. To
change the settings for your current journal note, go to File→Page
Setup and make these changes there instead.
