XML comments have a double purpose. The first one is
enabling additional help within IntelliSense when you write code. The
second one is generating an XML file storing information that can be
built into a compiled documentation file, such as the .Chm format that
also allows navigation between documented items. In this section you
learn to implement XML comments understanding the various tags and why
they are important; although in some cases it might not seem to be.
Before implementing comments, create a new Console application and
implement a Person class as follows:
Public Class Person

    Public Overridable Property FirstName As String
    Public Overridable Property LastName As String
    Public Overridable Property Age As Integer

    Public Overridable Function GetFullName() As String
        Dim fn As New Text.StringBuilder
        fn.Append(Me.FirstName)
        fn.Append(" ")
        fn.Append(Me.LastName)
        Return fn.ToString
    End Function
End Class
The Person
class will be the base for our experiments. You implement an XML
comment by typing three apostrophes. The Visual Studio code editor adds a
comment skeleton to your code that first looks like the following
example:
''' <summary>
'''
''' </summary>
''' <returns></returns>
''' <remarks></remarks>
Public Overridable Function GetFullName() As String
    Dim fn As New Text.StringBuilder
    fn.Append(Me.FirstName)
    fn.Append(" ")
    fn.Append(Me.LastName)
    Return fn.ToString
End Function
As you can see, these comments have typical XML structure according to the <tag> </tag> syntax. The summary XML tag enables describing what an object (or member) does. The description will be also available within IntelliSense. The remarks
tag enables providing additional information on what you already
specified in the summary, and the information will also be displayed
within the Object Browser (but not within IntelliSense). The returns
tag specifies the type returned by the member (being a method or a
property); in case the member is a method that does not return a value,
Visual Studio will not add the returns tag. For a better understanding, populate comments as follows:
''' <summary>
''' Gets the complete person's name
''' </summary>
''' <returns>String</returns>
''' <remarks>This method returns the complete person's name</remarks>
Public Overridable Function GetFullName() As String
    Dim fn As New Text.StringBuilder
    fn.Append(Me.FirstName)
    fn.Append(" ")
    fn.Append(Me.LastName)
    Return fn.ToString
End Function
Now go to the Main method in your Console application, and write the following code that instantiates and populates the Person class:
Dim p As New Person With {.FirstName = "Alessandro", .LastName = "Del Sole",
                          .Age = 32}

Dim fullName As String = p.GetFullName
When typing code, you notice how IntelliSense provides information on the GetFullName method according to the XML comment’s content. This is represented in Figure 1.
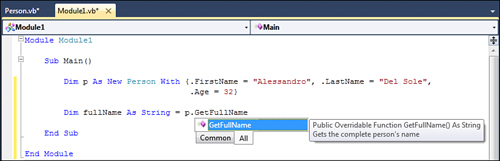
As you can see, IntelliSense basically shows the content of the summary tag whereas it does not show the content of the returns and remarks
tags. This makes sense in that IntelliSense’s tooltips are the fastest
way for getting help. If you instead open the Object Browser on the Person class, you get a result that looks similar to Figure 2.
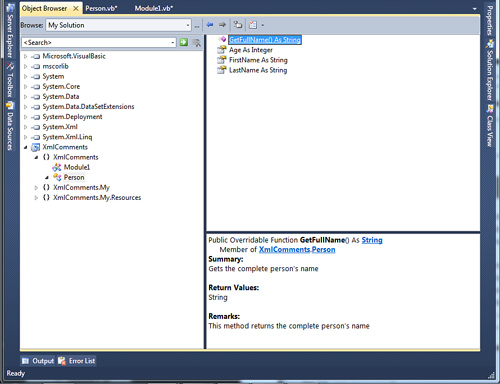
You obtain the same detailed
information if you build a compiled documentation file. The one shown before is the most basic
implementation of XML comments. By the way, this great Visual Basic
feature allows defining complex documentation over your code, which can
be particularly useful also due to the integration with the Visual
Studio environment.
|
XML comments can be applied to both public and private objects and members.
|
Defining Complex Code Documentation
The MSDN documentation says
that the Visual Basic compiler can parse any valid XML tag. The MSDN
also recommends a series of tags that are specific to the code
documentation. Table 1 summarizes recommended tags.
Table 1. Recommended Tags for XML Comments
| Tag | Description |
|---|
| c | Identifies a code element |
| cref | Creates a cross reference to another documented object |
| code | Provides a code snippet about the code usage |
| example | Provides a description about how code can be used |
| exception | Allows specifying the exception that your member could throw |
| include | Points to an external XML file containing documentation for the code |
| list | Allows generating a bulleted, numbered, or tabled list |
| para | Allows formatting its content as a paragraph |
| param | Defines a parameter that can be referenced by paramref |
| paramref | Allows formatting a word as a parameter defined via param |
| permission | Specifies the Code Access Security permission required by the commented member |
| remarks | Provides additional notes on your code |
| returns | Specifies the .NET type returned by your member |
| see | Provides a link to another member |
| seealso | Adds a member in the See Also section of the compiled documentation |
| summary | Provides a description about a member; also shown within IntelliSense |
| typeparam | Provides type parameter name and description when declaring generic types |
| value | Describes the value of a member (for example, a property) |
|
Tags
within XML comments are case-sensitive and lowercase. Take care of this
to ensure that the Visual Basic compiler correctly recognizes tags.
|
|
You can generally
appreciate complex documentation generated with XML comments only when
building compiled help files. This is because within IntelliSense or in
the Object Browser only a few tags’ contents will be shown. For example,
XML comments allow building bulleted lists or specifying links to other
documentation regarding different code; all this cannot be shown in
IntelliSense but makes a lot of sense in a help file or a help system
built on html pages. If you are interested only in building
documentation for Visual Studio internal usage, you can theoretically
limit XML comments to the basic implementations.
|
Let’s go back to the Person class and provide an XML comment for the FirstName property. The XML comment must look like this:
''' <summary>
''' Contains the person's first name
''' </summary>
''' <value>Person's first name</value>
''' <returns>String</returns>
''' <remarks></remarks>
Public Overridable Property FirstName As String
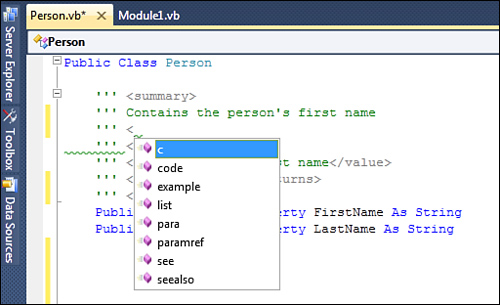
Here there is a new tag, value. The summary tag describes a property whereas value describes the property’s value. Do the same thing on the LastName property specifying the appropriate description, similarly to FirstName. Other tags can be added in a straightforward way, thanks to the always present IntelliSense. Figure 3 shows how IntelliSense provides available XML tags, according to the particular context where they have to be added.
Referring to Code Elements
XML comments enable references to other code elements with specific tags. The first one is c that identifies the element within angle bracket as code. To show an example, rewrite XML comments for the GetFullName method as follows:
''' <summary>
''' Gets the complete person's name
''' </summary>
''' <returns>String</returns>
''' <remarks>This method concatenates <c>LastName</c> and
''' <c>FirstName</c> properties</remarks>
Public Overridable Function GetFullName() As String
    Dim fn As New Text.StringBuilder
    fn.Append(Me.FirstName)
    fn.Append(" ")
    fn.Append(Me.LastName)
    Return fn.ToString
End Function
Notice how the c tag embraces both LastName and FirstName
properties, communicating to the compiler that both tags represent a
code element. Also notice how it is enclosed and nested within a remarks
tag (IntelliSense can be helpful in choosing the allowed tags.) This is
not the only way for referring to code; you can provide an entire code
example that will be included in your documentation. To accomplish this
you first declare an example tag, which contains the example description and then a code tag that contains a code snippet demonstrating the member purpose. With that said, edit the preceding XML comment as follows:
''' <summary>
''' Gets the complete person's name
''' </summary>
''' <returns>String</returns>
''' <remarks>This method concatenates <c>LastName</c> and

''' <c>FirstName</c> properties
''' <example>This example shows how you can invoke
''' the <c>GetFullName</c> method
''' <code>
''' Dim result As String = Person1.GetFullName()
''' </code>
''' </example>
''' </remarks>
Public Overridable Function GetFullName() As String
This is useful because your documentation also shows examples on your libraries.
|
Code, c and example
tags provide documentation that is not available within IntelliSense
whereas it is available within the generated XML file; thus you can
appreciate them when building an html-based or compiled documentation or
within the Object Browser.
|
XML comments easily
allow referring to and documenting members’ arguments. For a better
understanding, write the following overload of the GetFullName method that accepts a Title argument:
Public Overridable Function GetFullName(ByVal Title As String) As String

    If String.IsNullOrEmpty(Title) = True Then Throw New _
                                               ArgumentNullException

    Dim fn As New Text.StringBuilder
    fn.Append(Title)
    fn.Append(" ")
    fn.Append(Me.FirstName)
    fn.Append(" ")
    fn.Append(Me.LastName)
    Return fn.ToString
End Function
Now add an XML comment. It look likes this:
''' <summary>
''' Gets the complete person's name
''' </summary>
''' <param name="Title"></param>
''' <returns>String</returns>
''' <remarks></remarks>
Public Overridable Function GetFullName(ByVal Title As String) As String
The param tag allows referring to a member’s argument, specified by the name attribute. If you try to type name
on your own, you notice how IntelliSense helps you choose the argument.
XML comments also allow specifying an exception that your member could
encounter, according to the actions it takes. For example, the GetFullName method could throw a NullReferenceException if the Title argument is an empty or null string. For this, you use an exception tag to specify the exception. The tag is used with cref.
This one is straightforward in that it allows pointing a reference to a
.NET object taking advantage of IntelliSense. For example, the
following tag (which must be added before the method definition)
specifies what exception can be thrown:
''' <exception cref="ArgumentNullException">
''' The exception that is thrown when <paramref name="Title"/> is Nothing
''' </exception>
''' <returns>String</returns>
''' <remarks></remarks>
Public Overridable Function GetFullName(ByVal Title As String) As String
When typing cref,
you notice the IntelliSense window showing all available objects. You
simply pick the exception you are interested in. This speeds up the way
you write your comment, also ensuring that you type a valid object name.
You can also specify the description for the exception. The good news
about cref is that it creates a
cross-reference to the documentation related to the pointed object. For
example, when you create a compiled documentation file based on the XML
comments, cref allows redirecting to
another page showing information on the pointed object. Also notice how
you can refer to the argument by specifying the paramref tag within a descriptive text, which requires a name attribute pointing to the argument. paramref also takes advantages of IntelliSense.
Referring to an External Documentation File
The Visual Basic compiler can link documentation to your code from an external XML document. To accomplish this, you use the include
tag. The tag requires a file attribute that points to the external
document and a path attribute that points to the position in the
document providing documentation for the given member. The following
code sets external documentation for the Age property:
''' <include file="ExternalDoc.xml" path="Help/Property[@name='Age']"/>
Public Overridable Property Age As Integer
To understand how the path tag works, here is the XML representation of the external document:
<?xml version="1.0" encoding="utf-8" ?>
<Help>
  <Property name="Age">
    <summary>Returns how old a person is</summary>
    <returns>Integer</returns>
  </Property>
  <!–– Other properties...––>
  <Property>

  </Property>
</Help>
Creating Lists
Documentation
often requires bulleted and numbered lists or tables, as in any other
kind of document. Luckily XML comments allow easily building lists. This
is accomplished with the list tag that requires a type
attribute specifying if the list is a bulleted or numbered list or a
two-column table. The following example shows how to build a numbered
list on the Person class documentation:
''' <summary>
''' Represents a human being
''' </summary>
''' <remarks>
''' <list type="number">
''' <item><description>Instantiate the class</description></item>
''' <item><description>Populate its properties</description></item>
''' <item><description>Eventually retrieve the full
''' name</description></item>
''' </list>
''' </remarks>
Public Class Person
....
End Class
The type attribute can have one of the following values: bullet (bulleted list), number (numbered list), and table (two-column table). Notice how each item in the list is represented by an item tag that requires a nested description tag providing the actual description. In case you want to provide a table, each item must contain a termdescription tag as in the following example: tag and a
''' <item><term>Action one</term></item>
''' <item><description>Instantiate the class</description></item>
The items content will be also
shown in IntelliSense and the Object Browser but it will be actually
formatted as a list only in the compiled documentation.
Documenting Permissions Requirements
There are situations where
your objects expose members that require special permissions to access
system resources. You can provide documentation about required
permissions by adding a permission tag with cref, pointing to the
desired .NET permission. The following example shows how to comment the GetFullName method with the UIPermission requirement:
''' <permission cref="System.Security.Permissions.UIPermission"/>
Public Overridable Function GetFullName() As String
Of course, you can specify multiple permissions by adding multiple permission tags.
Specifying Links to Other Resources
When documenting the code, it is not unusual to provide links to other members. XML comments allow this by specifying see and seealso tags. The see tag allows specifying a link to another member’s documentation from within the description text. The seealso tag does the same, but it differs in that the link to the other member appears in the See Also section of the compiled page. The following example demonstrates this on the FirstName property providing a link to LastName:
''' <remarks>Use the <see cref="LastName"/>
''' property for the person's last name</remarks>
Public Overridable Property FirstName As String
If you want the link to be shown in the See Also section, simply replace see with seealso.
Xml Comments and Generics
When you define your custom
generics, you can take advantage of XML comments to describe the type
parameter. This is accomplished via the typeparam tag, as shown in the following code snippet:
''' <summary>
''' A test class
''' </summary>
''' <typeparam name="T">
''' A type parameter that must implement IEnumerable
''' </typeparam>
''' <remarks></remarks>
Public Class TestGenerics(Of T As IEnumerable)

End Class
The Visual Basic compiler automatically recognizes the generic implementation and thus adds for you the typeparam tag when adding the XML comment.
