1. Problem
You want to understand how to
configure a static request/response SOAP send port using BizTalk
Explorer to allow client machines posting to orchestrations that have
been deployed as web services.
2. Solution
SOAP ports are generally
two-way (solicit-response) ports, because consuming web services
generally result in a response to the calling party. The following steps
guide you through the process of configuring a two-way SOAP port:
In BizTalk Administration Console, right-click the Send Ports folder, and select New→Static Solicit-Response Send Port.
On the Property Pages dialog box that opens, select a transport type of SOAP.
Click the ellipsis for the Address (URI) property entry box. The Transport Properties dialog box will open with the General tab active.
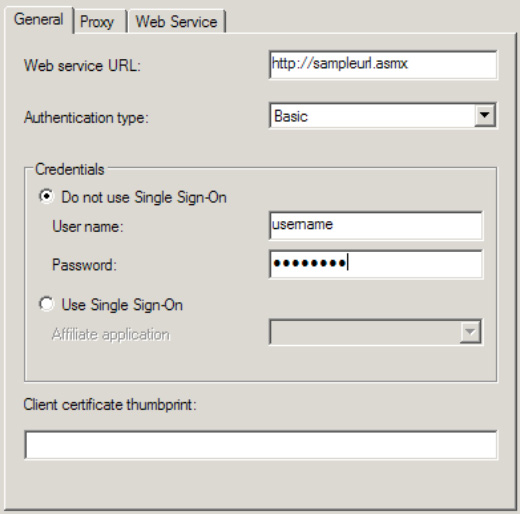
Configure the General tab according to the requirements of the web service, with the following guidelines. See Figure 1.
The value of the Web Service URL property should be entered in the format http://webservice.asmx.
The four authentication types are Anonymous, Basic, Digest, and NTLM.
The value selected for this property will depend on the requirements of
the web service being consumed. Often, it will take some
experimentation to determine the proper authentication settings,
especially when additional security measures, such as certificates, are
required.
If a web service requires an SSL certificate, enter a reference to it in the Certificate Thumbprint property. You can access the thumbprint through the certificate properties and copy and paste it into this property.

Configure the proxy settings on the Proxy tab according to any proxies that may be necessary to call the web service.
Configure the Web Service tab using the following guidelines:
Generally,
all calls to web services should be handled through the orchestration
web port; this provides the robust capabilities for posting over the
supported protocols inherent to SOAP.
Occasionally,
it may be necessary to specify a proxy class for a call to a web
service. In such cases, a proxy class must be created. You can create a
class using the command-line utility WSDL.exe. This tool will create an assembly that can be referenced using the Assembly Name
property. Once referenced, the type and methods available on the
original web service will be made available in the two remaining
property fields.
Click
OK to save the settings entered in the Transport Properties dialog box,
and configure the remaining properties on the SOAP send adapter:
Set the Send and Receive Pipelines settings according to the needs of the solution (generally XMLTransmit and XMLReceive).
If a certificate is required for outbound encryption, set the Certificate Name
property to the appropriate certificate. Only those certificates that
have been installed on the machine will be available in the drop-down
list.
Set any inbound or outbound maps, and configure any filters that may be necessary.
Click OK to complete the configuration of the SOAP port.
3. How It Works
When calling a web service
from an orchestration, it is often useful to be able to specify a
dynamic URL. For instance, in a development environment, the URL being
posted to will be a test URL, and the URL will need to change once the
orchestration has been deployed to a production setting. You have
several approaches to solving the need for supporting a dynamic URL, one
of which is to set the address programmatically in an orchestration
Expression shape.
One way to have a dynamic URL is to store the URL can be stored in a configuration file. Assuming that the BTSNTSvc.exe.config file is used to store a custom property, you can take the following steps:
In the BTNTSvc.exe.config file, add a new key as follows (add this to the <appSettings> node):
[<appSettings>]
 <add key="WSURL" value="http://sample.asmx"/>
[</appSettings>]
Drop
an Expression shape on the orchestration. You can enter the following
code in the orchestration to read the configuration file and to set the
address on the web port created in the previous steps:
strURL = System.Configuration.ConfigurationSettings.AppSettings.Get("WSURL");
Port_1(Microsoft.XLANGs.BaseTypes.Address) = strURL;