When network communications fail to occur because of
IPSec problems, the most common cause of the difficulty is improper
configuration of the IPSec components on one or both of the systems
trying to communicate. You can take steps to check the configuration
settings on the computers to see if they are compatible. Windows Server
2003 also includes tools that you can use to monitor and troubleshoot
IPSec and other policy-based security mechanisms, including the IPSec
Security Monitor snap-in and the Resultant Set of Policy (RSoP) snap-ins
for Microsoft Management Console.
Troubleshooting Policy Mismatches
One common
cause of IPSec communications problems is incompatible IPSec policies or
policy settings. This is particularly true when you create your own
IPSec policies. For example, one of your computers might require IPSec
for a particular port, while the other computer is not configured to use
IPSec for that port. It is also possible for two computers to be
configured to use IPSec for a particular type of traffic, but have
incompatible filter action settings, such as different authentication
methods or encryption algorithms. This prevents the computers from
negotiating a common IPSec configuration, and communications fail.
To determine if a policy
mismatch is the cause of a communications problem, you should examine
the Security logs in the Event Viewer console. The Security log should
contain a warning message if the system attempted to perform an IKE
negotiation that failed.
Tip
In
addition to IKE-related messages, the logs in the Event Viewer console
can contain other valuable information related to IPSec processes.
However, logging some IPSec events requires that you use the appropriate
audit policy settings. To include IPSec events in the logs, make sure
the Audit Logon Events and Audit Policy Change policies are enabled. To
configure the IPSec driver to log dropped inbound and outbound packets,
type the following command at a command prompt, and then press Enter: netsh ipsec dynamic set config ipsecdiagnostics 7. |
To
troubleshoot policy mismatches, you have to examine the policy settings
for each computer involved. You can examine the policies using the IP
Security Policies snap-in, but this tool does not tell you which policy
is active on a particular computer. To view the policy settings
currently in use, you must run one of the tools discussed in the next
sections.
Using the IP Security Monitor Snap-in
IP Security Monitor is an
MMC snap-in that you can use to view the currently active policy on any
network computer, plus other detailed information, including IPSec
statistics, filter details, security associations, and more. To use
IPSec Security monitor, you must manually add the snap-in to an MMC
console, as shown in Figure 1.
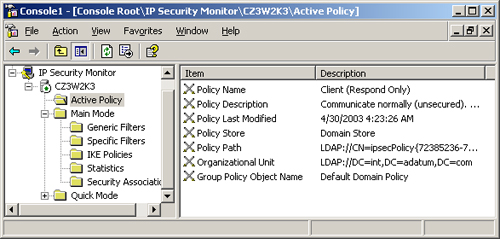
When you open IP
Security Monitor, the Active Policy folder specifies the policy that is
currently in effect on the computer, where the policy is stored, and
what Group Policy Object (GPO) applied it. In some cases, you might
discover that a policy mismatch is caused by a computer that is running a
different policy than you thought. If you have IPSec policies deployed
by Group Policy Objects at different levels of the Active Directory
tree, the IPSec policy that is closest to the computer object is the one
that takes effect. For example, if you assign the Client (Respond Only)
policy to your domain object and the Secure Server (Require Security)
policy to an organizational unit, Secure Server (Require Security) will
be the effective policy for the computers in that organizational unit.
If you have
recently made changes to IPSec policies that you deploy using Group
Policy Objects, your computers might not yet have received the new
policy settings from a domain controller. You can use IP Security
Monitor to examine the details of a computer’s current policy, such as
the details of the IP filter lists shown in Figure 2.
If you determine that the policy settings that the computer is using
are outdated, you can with wait for the system to refresh its group
policy settings or reboot the computer to force an update from the
domain controller.

Using the Resultant Set of Policy Snap-in
The
Resultant Set of Policy snap-in is a more comprehensive tool than IP
Security Monitor. You can use RSoP to view all the effective group
policy settings for a computer or user, including the IPSec policies. To
use RSoP, you must first load the snap-in into an MMC console, and then
perform a query on a specific computer (select Generate RSoP Data from
the Action menu), specifying the information you want to gather. The
result is a display of the group policy settings that the selected
computer is using, similar to the display of the Group Policy Object
Editor console (see Figure 3).
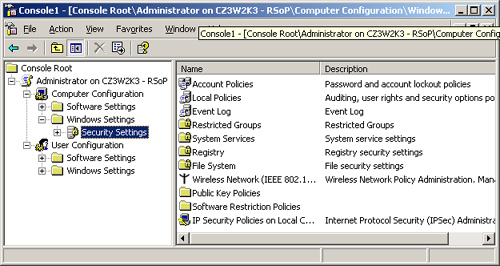
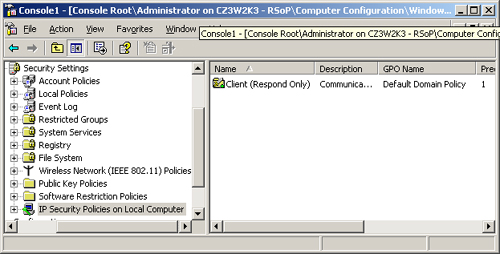
When you expand the
Windows Settings\Security Settings header in RSoP and then click the IP
Security Policies On Local Computer subheading, the details pane
contains a list of the computer’s assigned policies (see Figure 4).
The display specifies the Group Policy Object from which the computer
received the policy (something the IP Security Monitor snap-in cannot
do) and enables you to display a read-only Properties dialog box for the
IPSec policy, so you can review its settings.
Tip
Be
sure you understand the differences between the IP Security Monitor
snap-in and the Resultant Set of Policy snap-in, and know when it is
preferable to use each one. |
Examining IPSec Traffic
Another valuable tool
for IPSec troubleshooting is the Network Monitor application included
with Windows Server 2003. You can use Network Monitor to capture traffic
from your network and examine the structure of the various protocol
headers. Windows Server 2003 Network Monitor includes parsers for IKE,
AH, and ESP traffic. However, you cannot use Network Monitor to examine
packet information that has been encrypted using ESP.
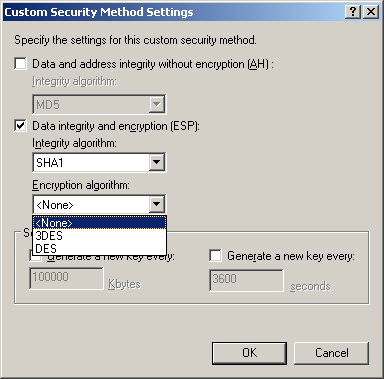
To examine the IPSec
packet structure when ESP is in use, you can temporarily configure the
operative filter action to use null encryption from the IP Security
Policies snap-in, by selecting None for the Encryption Algorithm setting
in the Custom Security Method Settings dialog box, as shown in Figure 5.
This enables IPSec to create packets that include the ESP components
without actually encrypting the contents. (To arrive at this dialog box,
double-click the security policy in the IP Security Policies snap-in
that you want to modify, click Edit for the desired rule, click the
Filter Action tab, click Edit for the filter action you want to modify,
click Edit for the desired security method, click Settings, and then
specify your settings for the custom security method in the Custom
Security Method Settings dialog box.)
Note
If
you use null encryption, be sure to activate the encryption algorithm
of your choice after you are finished testing or troubleshooting, so
that your data is protected. |
Practice: Using Resultant Set of Policy
In this practice, you use the Resultant Set of Policy snap-in to view the policy settings on your computer.
Exercise 1: Creating a Resultant Set of Policy Console
In this exercise, you install the Resultant Set of Policy snap-in into Microsoft Management Console (MMC).
1. | Log on to Windows Server 2003 as Administrator.
|
2. | Click Start, and then click Run. The Run dialog box appears.
|
3. | In the Open text box, type mmc, and then click OK. The Console1 window appears.
|
4. | From the File menu, select Add/Remove Snap-in. The Add/Remove Snap-in dialog box appears.
|
5. | Click Add. The Add Standalone Snap-in dialog box appears.
|
6. | Scroll down the Available Standalone Snap-ins list, select Resultant Set of Policy, and then click Add.
|
7. | Click
Close to close the Add Standalone Snap-in dialog box. The Resultant Set
of Policy snap-in now appears in the Add/Remove Snap-in dialog box.
|
8. | Click OK to close the Add/Remove Snap-in dialog box. The snap-in you selected now appears in the scope pane of the MMC console.
|
9. | Leave the MMC console window open for the next exercise.
|
Exercise 2: Performing an RSoP Scan
In this exercise, you use the Resultant Set of Policy snap-in to scan the computer and display the active policy settings.
1. | Click
the Resultant Set of Policy heading in the MMC console’s scope pane. An
Action Required message appears in the details pane.
|
2. | From the Action menu, select Generate RSoP Data. The Resultant Set of Policy Wizard appears.
|
3. | Click Next. The Mode Selection page appears.
|
4. | Click Next to accept the default Logging Mode option button. The Computer Selection page appears.
|
5. | Click Next to accept the default This Computer option button. The User Selection page appears.
|
6. | Click Next to accept the default Current User option button. The Summary of Selections page appears.
|
7. | Click
Next to begin the scanning process. When the scanning completes, the
Completing The Resultant Set of Policy Wizard page appears.
|
8. | Click Finish. An Administrator On SERVER01 - RSoP heading appears on the scope pane.
|
9. | Expand
the Administrator On SERVER01 - RSoP, Computer Configuration, Windows
Settings, and Security Settings headings. Then click the IP Security
Policies On Local Computer heading.
|
10. | Leave the MMC Console1 window open for the next exercise.
|
