1. Problem
You have completed the build
phase of a BizTalk project and need to import your work from the
development environment to another environment. You must import the
BizTalk application you have been building.
2. Solution
You can use the BizTalk
Administration Console to import a BizTalk application (via an MSI
file). The following steps outline the procedure:
Open the BizTalk Administration Console.
In the left pane, navigate through BizTalk Server Administration to your BizTalk group. Right-click the Applications folder, and select Import→MSI File. This launches the Import Wizard.
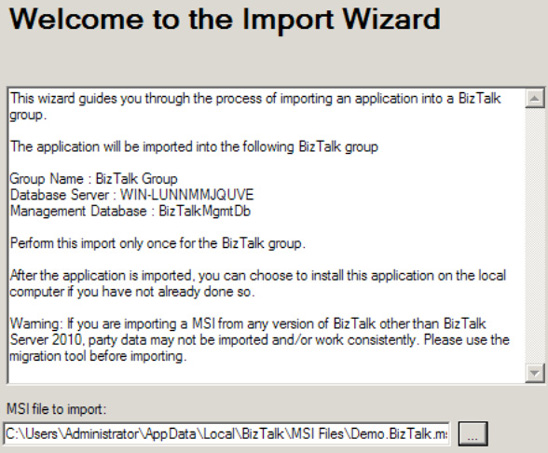
On
the Welcome page, navigate to and select the MSI file that is to be
used to perform the import. In this example, we are importing the
BizTalk Demo.BizTalk application (exported in the previous Recipe), as shown in Figure 1. Click Next.
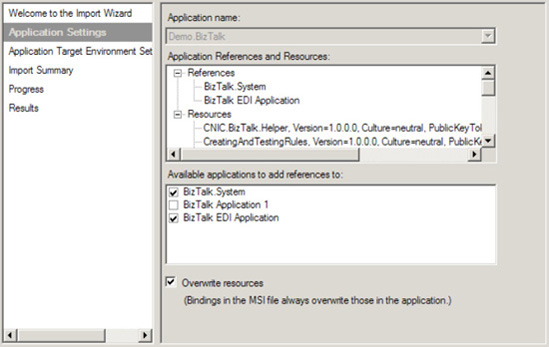
On the Application Settings page, verify the settings for your application, references, and resources, as shown in Figure 2.
In the list of applications available for reference, specify any
references your target application has to existing BizTalk application
assemblies and artifacts. You can also specify a new application
(labeled during the export) or associate with an existing application
within your BizTalk Management database. Click Next to continue.
On
the Application Target Environment Settings page, in the Target Staging
Environment drop-down list, select the environment to which the
application is to be deployed. This option allows for environment
specific considerations. You can partition applications that have been
imported with binding specific settings. By specifying an environment
value at this stage, the Import Wizard will apply only to the
environment specific configuration identified during the import process.
If you leave the value set to <Default>, the configuration will
be applied to all environments.
On the Import Summary page, verify the application import information presented, as shown in Figure 3. Click Import when you're ready to complete the import process.
The
wizard displays the progress of the import operation and then shows a
Results page. Verify that the import was successful by checking for
errors. You can also view more details of the import by clicking the
link to the import operation log. Click Finish to close the wizard.
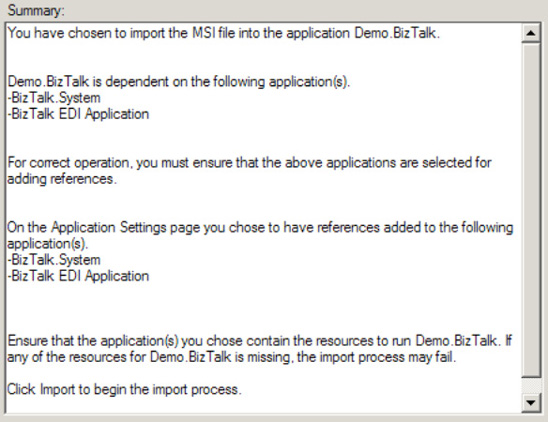
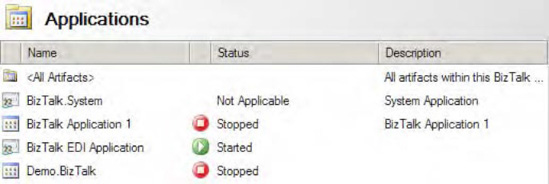
Figure 4 shows the Demo.BizTalk application imported in the example added to the Applications
node in the BizTalk Administration Console. Once an application has
been imported, starting the application will complete the necessary
deployment steps.
3. How It Works
The import process controls
the sequence of shutting down services and provides the administrator
with input to control and consider application references and
dependencies. In addition, it controls the registering of BizTalk and
.NET application artifacts into the Global Assembly Cache (GAC). This
eliminates the need for IT users to know the sequence of specific
BizTalk deployment steps and perform them manually, leading to faster
and easier application deployment cycles.
In this recipe's example,
we imported an MSI file, which contains application artifacts. You can
also import policies (business rules artifacts) and bindings. Binding
information examples could include an address (such as a file or queue
location) port information, or specific properties that specify retries,
security options, and so on. You could import bindings when the BizTalk
solution artifacts already exist and the target requires only binding
input/updates for deployment.
NOTE
Importing an MSI file
can include both bindings and policies. If these artifacts are specified
in the application export process, they will be imported as part of the
MSI file import process.
In addition to using the Import MSI File Wizard, you can access the same functionality via the BTSTask ImportApp
command-line utility. This option could be useful when performing
regular environment promotion activities, fully automated deployments,
and so on.
NOTE
BTSTask commands
should not be used in a preprocessing or postprocessing script run
during an application import. If this is done, any changes made during
the import will not be visible to the scripts; therefore, the success of
the deployment cannot be guaranteed.
The command has the following form:
BTSTask ImportApp /Package:value [/Environment:value]    [/ApplicationName:value]
[/Overwrite] [/Server:value] [/Database:value]
NOTE
There are options on BTSTask that allow for the deployment of the assembly to the GAC.
When importing BizTalk applications, consider the following:
Overwrites:
Determine whether the import process should support overwrites. On the
Application Settings page of the Import Wizard, you can set generic
overwrites of BizTalk artifacts. If this check box is selected, existing
artifacts will be overwritten on the target import. If this box isn't
selected and a duplicate is found, the Import Wizard will raise an
error.
Downstream components:
Keep in mind downstream components, such as URIs, files, queues, and
HTTP URLs. For example, if your solution uses send port URIs, make sure
that the URIs exist before running your BizTalk operation. If a location
doesn't exist (for example, a receive location), BizTalk may detect
this, raise an error to the Windows Event Viewer, and show the
application status as partially started. Whenever an application is in
the status of partially started, it's a good idea to check the
application Windows Event Viewer for failures and information.
Runtime/operational considerations:
When deploying to an existing environment, keep in mind runtime
considerations. Make sure that users have been notified and usages of
running BizTalk processes are known.
Security:
By default, BizTalk does not store passwords for binding information
unless they are explicitly referenced within the binding file build
process. As a matter of caution, always verify your deployment, and
update passwords and access rights appropriately within your BizTalk
artifacts.
