A Brief Tour of a Document Library
This section summarizes the
main features of a document library to provide an overview of the tools
and features provided, and then the following section drills down more
deeply into more of these tools
Figure 4
shows a document library titled New Documents at the root of a Team
Site created in SharePoint Foundation 2010. Note that as shown in the
URL, the view displayed is the AllItems.aspx page. The basic components
include navigation tools in the Quick Launch area on the left, which
includes links to libraries and lists the site administrator has chosen
to include in the Quick Launch, as well as the Recycle Bin and All Site
Content links. The Ribbon tools along the top include the Site Action
drop-down menu, Navigate Up icon, and Browse, Documents, and Library
tools tabs. Figure 4
shows the cursor hovering over a drop-down menu under the All Documents
item in the breadcrumb, which is the new location for the View
drop-down menu that used to be located on
the right side of the toolbar in SharePoint 2007 products. On the right
side can be found a search field, and a ? button that will access the
Help feature.
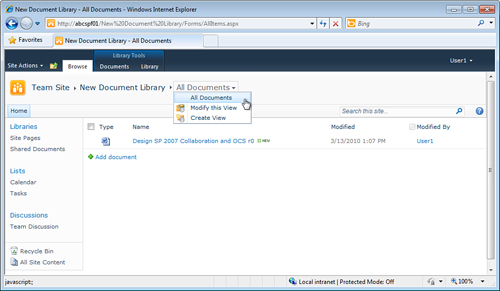
In the working area, one
document is visible with a Word icon in the Type column, name of the
document in the Name column, modified date in the Modified column, and
modified-by information in the Modified By column. It is worth noting
that because SharePoint 2010 is a fourth-generation product, Microsoft
has worked diligently and taken end-user input to create an environment
that provides a good combination of aesthetics, features, and usability,
and SharePoint 2010 has an excellent balance of these components. Be
aware that smaller monitors may limit a user’s productivity if it can’t
display at least a 1024×768 resolution.
Adding Documents to a Document Library
The primary means of
adding items to a document library is to access the Add Document link,
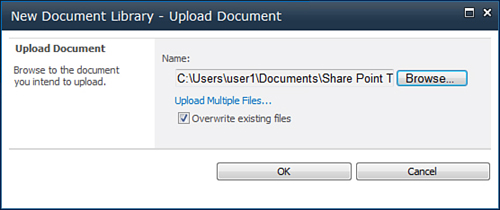
which lives at the bottom of the working area of the document library. Figure 5
shows the Upload Document window that opens when this link is clicked,
and this window provides the Browse button, which allows the user to
browse for and select a single document for uploading, and a check box
to Overwrite Existing Files.
Note
The SharePoint 2010 now employ
AJAX for the pop-up menus instead of aspx pages for most data input
prompts. AJAX stands for Asynchronous JavaScript and XML and arguably
offers many advantages over the previous system of having a new aspx
page render for data entry. To begin with, the previous page stays in
the background and does not need to be re-rendered or downloaded when
the AJAX window is gathering input, as shown in Figure 19.5.
Less data is being transferred between the server and the client, and
with hundreds or thousands of simultaneous connections this can add up
to a significant difference. It should be noted also that the AJAX
interfaces aren’t actual SharePoint pages, so you can’t bookmark them or
use the back and forward buttons to navigate through them. Finally, the
options for resizing the windows are limited for many of the interfaces
(standard size or full screen), which might affect user experience.
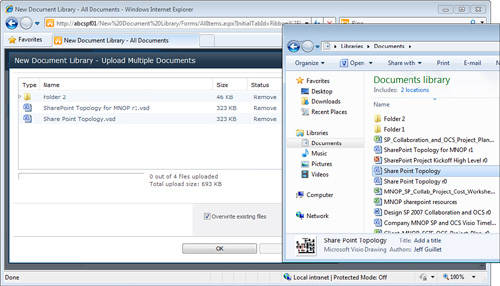
There is also a link to Upload Multiple Files, which is shown in Figure 6,
and is dramatically different from the SharePoint 2007 Upload Multiple
Documents, which launched an Office component for browsing for and
uploading multiple documents. SharePoint 2010 Upload Multiple Documents
window enables the user to drag files and folders from a Windows
Explorer window to the upload pane, or to click a Browse for Files
Instead link. The process of dragging files and folders to the upload
pane is more flexible because the user can drag over virtually any
combinations of folders and files, as shown in Figure 19.6,
where the user has dragged a folder and two documents from the Windows
Explorer window. The Upload Multiple Documents window lists upload
information; there are four files to upload, for a total of 693KB in the
example given in Figure 19.6. After the upload has completed, the user has to then close the window.
Users of previous
SharePoint products might wonder what happened to the Explorer view,
because it does not appear in the drop-down list of views in Figure 4.
This tool can now be found on the Library tab in a document library,
and is titled Open in Explorer. For users new to the SharePoint world,
the Explorer view is a standard view in SharePoint document libraries
that allows users to add documents to the library by copying from
Windows Explorer and pasting into Explorer View in the document library
and clicking Paste. While this is a “bread and butter” tool for many
users, it can be a headache for SharePoint administrators because it
doesn’t work with all desktop configurations.
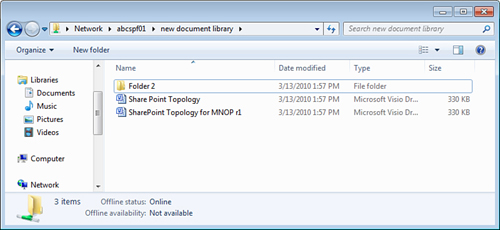
Another method that will be
of interest to power users is the ability to enter in the address of
the document library into the address bar of Windows Explorer in the
format \\servername\site\libraryname (also referred to as WebDAV
access). Figure 7
shows an example where Windows Explorer was opened in Windows 7, the
address was entered as \\abcspf01\new document library, and the contents
that were just uploaded using the Upload Multiple Documents method
appear. If a user right-clicks an item, the normal range of Explorer
tools, such as Open, New, Print, Cut, Copy, Delete, and Rename, are
available.
Note
Explorer view (WebDAV)
access is not always available to end users on a corporate network; it
might be disabled on purpose, or disabled due to operating system
configurations. Microsoft KB Article 841215 (http://support.microsoft.com/kb/841215)
provides additional information about the topic, along with ways to
remedy this behavior should Explorer view access to SharePoint 2010
content be important to the organization.
An additional method of
adding items to a document library is to use the in-bound email feature
for the document library. A farm administrator would need to enable
inbound email from the Configure Incoming E-Mail Settings page in the
Central Administration site, and an email address then assigned to the
document library from the Incoming E-Mail Settings link on the Document
Library Settings page. After that is enabled, users can send emails with
attachments to the document library.
Note
To determine which types of
documents are allowed to be uploaded, a farm administrator needs to
access Web Applications Management page in Central Administration, where
the Blocked File Types icon provides access to all blocked file types.
These include .bat, .cmd, .com, .dll, .exe, .vb, and a number of other
file types.
Note
The default maximum upload
size for a SharePoint 2010 document library is inherited from the web
application that is managed in the Central Administration site. A farm
administrator needs to access the Web Application General Settings for
the web application and change the Maximum Upload Size setting, which is
50MB by default. Although this upload size could be theoretically as
large as 2GB, most organizations choose to keep this in the range of
100MB to 200MB because “very large” files can take a long time to save
and to open when stored in SharePoint. This is an important decision for
the organization to make when setting standards for SharePoint
governance.
