The manual processes noted in
the previous section showed what is involved in manually enabling
security in a Windows and Exchange Server environment. Beyond the
complexity for users having to perform critical system tasks to enable
and access secured information, the security provided by these manual
methods is not even that good. A simple compromise of a shared key can
invalidate the security of files, access systems, and secured
communications. The better method is to use a certificate-based security
system using encryption to provide a significantly higher level of
security. In addition, by automating the process, users do not have to
be involved in the encryption, transport, or communications between
their laptop or desktop, and the network.
This section covers
the creation of a certification authority (CA) server system that issues
certificates and the process known as autoenrollment of certificates
that automatically issues certificates to users and computers in a
Windows Server 2003 or Windows Server 2008 Active Directory environment.
Note
This section assumes that
you have a Windows Server 2008 system that has been fully patched with
the latest Windows Server 2008 service pack and updates, and that the
server is connected to a Windows Server 2008 Active Directory network.
If you are creating this system in a limited lab environment, the
certificate server can be added on the same server system as the global
catalog server so that a single domain controller and certificate server
can be used.
Adding Certificate
Services to a Server
Certificate
Services is the Windows service that issues, maintains, validates, and
revokes certificates to users and computers. It is installed as a
Windows Server 2008 role or a Windows 2003 service. In Windows Server
2008, the role is named Active Directory Certificate Services (AD CS).
To install the AD CS role
on a Windows Server 2008 system, do the following:
1. | On the Windows Server 2008 server that will become your
certificate server, launch Server Manager.
|
2. | Right-click on the Roles node and select Add Roles.
|
3. | Click Next.
|
4. | At the Select Server Roles screen, check the Active
Directory Certificate Service role and click Next.
|
5. | At the splash screen explaining the AD CS role, click
Next.
|
6. | At the
Select Role Service screen, check the Certification Authority Web
Enrollment service. This allows the CA to issue certificates via the web
interface.
|
7. | When you
check the box, the wizard automatically checks for the required Roles
and Features needed to support web enrollment. If prompted, click the
Add Required Role Services button to add the missing roles and features.
|
8. | Click Next to leave the Select Role Services screen.
|
9. | At the Specify Setup Type, choose Enterprise and click
Next. This integrates the CA with Active Directory and allows
certificates to be issued automatically to domain members.
|
10. | Because this is the first CA in the PKI, at the Specify
CA Type screen, select Root CA and click Next.
|
11. | Leave the Create a New Private Key selected and click
Next.
|
12. | At the
Configure Cryptography for CA screen, leave the defaults and click Next.
|
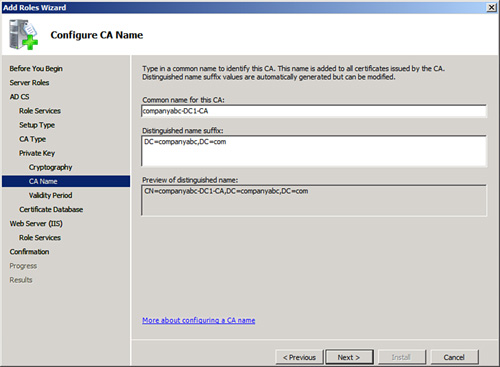
13. | At the Configure CA Name screen, the name of the CA has
been prepopulated, as shown in Figure 1. This is composed
of the domain and the server name. Adjust if needed and click Next.

|
14. | At the
Set Validity Period, the default period is 5 years. This is the
expiration of the CA and hence the limit on the certificates that the CA
can issue. Adjust if needed and click Next.
|
15. | At the Configure Certificate Database, click Next.
|
16. | If any additional roles or features are needed, the
wizard steps you through configuring the options for those.
|
17. | At the Confirm Installation Selections screen, review
the selections and click Install. The installation proceeds.
|
18. | At the Installation Results screen, confirm that
the installation succeeded and click Close.
|
The server is now
installed and integrated with Active Directory; all domain members
trust it, and it’s ready to issue X.509 certificates.