Deploying Software Packages Using Domain Group Policy Objects
Domain Group Policy Objects can
be used to deploy Windows Installer compatible MSI software application
packages. Many software vendors provide their desktop and sometimes even
their server applications as MSI packages, which can make deploying
these applications using domain policies very easy. Some applications,
however, are not so nicely packaged and require the use of a third-party
MSI packaging product or must be deployed using a different method.
Software deployment with domain policies is functional but does not
provide very flexible configuration and deployment options, such as
those included in Windows Server Update Services for Windows and System
Center Configuration Manager 2007 R2, formerly Systems Management
Server, for all types of applications and several other third-party
software vendors that provide software deployment software suites.
Deploying a software package using Group Policy requires the following
steps:
1. | Define the parameters of the installation and locate, create, and customize the Windows Installer MSI package.
| 2. | Place
the MSI package on a network share that allows the necessary Active
Directory computer and/or user accounts to read the package and any
other necessary files during installation. This includes configuring the
share and NTFS permissions as required and, in many cases, selecting
the Authenticated Users group works well unless tighter security of the
software application is required.
| 3. | Add
the software package to a new Group Policy Object to apply to users or
computers and define the deployment options. Deployment options can be
defined when the package is added to a policy, but after the software
package is deployed to a system, any changes to the configuration of the
software package will not be picked up by that system unless the
package is then configured to reapply the package, which can cause some
undesirable results.
| 4. | Link the GPO to a test organizational unit that contains only one or a few computer and/or user accounts to test the policy.
| 5. | If
the software package is being deployed to computers, including Windows
XP, Windows Vista, or Windows 7 systems, configure Group Policy settings
to force these systems to perform Synchronous Foreground Refresh, which
forces the system to wait for the network to start before attempting to
process Group Policy Objects. Windows servers wait for the network
before processing group policies by default.
| 6. | Verify
GPO application and software installation results and, if necessary,
update the GPO settings as required to achieve the desired installation
configuration and behavior.
| 7. | After
the software package has been verified or updated to run correctly,
remove the link from the test OU, and link the GPO to the desired
domain, site, or organizational unit(s).
|
Creating a New Software Installation GPO
Deploying software applications
using a Group Policy Object is a simple task after the package is
created and any necessary customizations to the installation behavior
are defined. In many cases, the desired deployment option is to deploy
the application to computer objects. When applications are deployed to
computers, the applications are installed during the startup cycle of
the system. This, of course, requires that the system starts while
connected to the organization’s network over a fast link and waits for
the network to start before attempting to process group policies with
the software package.
To deploy a packaged MSI software application using a domain group policy to a computer, perform the following steps:
1. | Log on to a designated Windows Server 2008 R2 administrative server.
| 2. | Locate
the MSI package that will be deployed using the new Group Policy Object
and copy it to a network share. Ensure that the Authenticated Users
group has at least Read Share permissions and Read and Execute NTFS
permissions in the shared folder.
| 3. | Open the Group Policy Management Console from the Administrative Tools menu.
| 4. | Expand the domain to expose the Group Policy Objects container and select it.
| 5. | Right-click the Group Policy Objects container and select New.
| 6. | Type in a name for the new GPO such as CorporateSoftwareGPO
and click OK to create the new GPO. Do not select a starter GPO as this
GPO will only contain the software package and does not need to have
any prepopulated information.
| 7. | After the GPO is created, right-click on the new GPO and select Edit.
| 8. | When
the Group Policy Management Editor opens, expand Computer
Configuration, expand Policies, and double-click on Software Settings.
| 9. | Right-click on the Software Installation node and select New, Package.
| 10. | A
Browse window opens. Locate the MSI package and click OK to add the
package to the GPO. The package must be available on a network share and
should be referenced using a UNC path.
| 11. | When the Deploy Software window opens, select the Assigned option button, and click OK to complete the process.
| 12. | After
the process completes, which can take a few minutes, the package will
be listed in the right pane. Right-click the new package and select
Properties to open the advanced property pages.
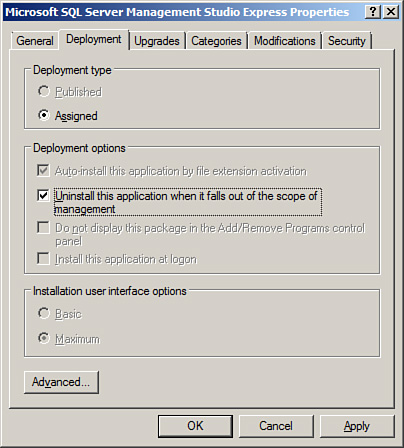
| 13. | In
the property pages for the package, review the settings on the
Deployment tab to determine if the package should be automatically
uninstalled if the computer is removed from the application of this
policy, as shown in Figure 10.
| 14. | With
the property pages still open, review the settings on the remaining
tabs and make any required changes to the way the application package
will function.
| 15. | After the package is configured, click OK to close the property pages, and close the Group Policy Management Editor.
| 16. | Return
to the Group Policy Management Console, and link the GPO to an
organizational unit that has a few test or pilot systems on which the
package can be installed.
| 17. | Locate and log on to a system in the linked OU and reboot it to attempt to apply the new GPO and install the software package.
| 18. | Troubleshoot and repair the GPO and package as necessary to achieve the desired functionality.
| 19. | After the GPO is working as desired, link it to the intended site, domain, or OU.
| 20. | Back up the GPO and log off of the test system and the administrative workstation. |
|
