1. | Create a new list using the Issue Tracking template and name it Issue Tracking.
|
2. | Click the List tab on the Ribbon from within the Issue Tracking list, and then click List Settings.
|
3. | Click
the Issue Status link in the Columns section. Scroll down on the Change
Column page to the choices and note that there are three choices for
this column: Active, Resolved, and Closed.
|
4. | Click Cancel to return to the List Settings Page. Click Workflow Settings in the Permissions and Management section.
|
5. | The Add a Workflow page will open. Select Three-State from the list of workflows.
|
6. | Name the workflow Issues-ThreeState.
|
7. | Verify
that the Task list is set to Tasks (New) and that the History list is
set to Workflow History (New). These settings indicate that a new tasks
list will be created to track tasks associated with this workflow and a
new workflow history list created to track workflow auditing
information.
|
8. | In the Start Options section, verify that the Allow This Workflow to Be Manually Started option is selected. Click Next.
|
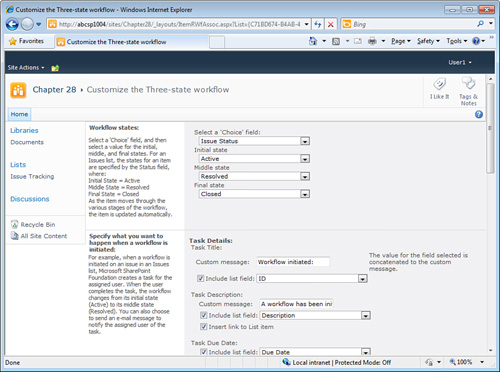
9. | The
Customize the Three-State Workflow page will open. Verify that the
Choice field is set to Issue Status, and the Initial State is set to
Active, the Middle State is set to Resolved, and the Final State is set
to Closed, as shown in Figure 1.
|
10. | Scroll
down to the next section titled Specify What You Want to Happen When a
Workflow Is Initiated. Leave these settings at their defaults, as also
shown in Figure 28.3,
but review the different components of this section. Note that the task
that will be created can be customized, the individual the task is
assigned to can be modified, as can the fields that are included on the
email. Note that the task will be assigned to the individual in the
Assigned To field.
|
11. | Scroll
down to the next section titled Specify What You Want to Happen When a
Workflow Changes to Its Middle State. After again, leave the settings at
their defaults. Note that the Task Assigned to is set to the Created By
column for this stage. Click OK to complete the workflow definition
process and return to the Issue Tracking list.
|
12. | Verify
that you are logged in to the SharePoint site as a user who will be
considered to be the manager for this test (User1 in this example). This
user will create the Issue, and then assign it to another user for
completion.
|
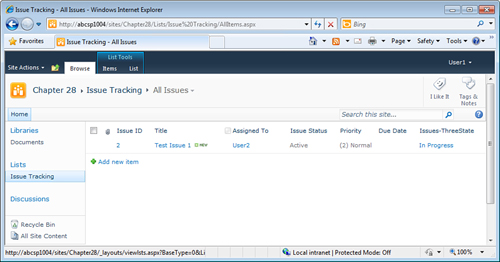
13. | Click Add New Item, and create a new issue title Test Issue 1,
assign it to a test user who will be charged with completing the task
(User2 in this case). Leave the Issue Status to Active, Priority to (2)
Normal, as shown in Figure 2. Enter a brief description for the issue, such as Test issue for workflow testing. Leave the other settings on the page at their defaults and click Save.

|
14. | Navigate
to the tasks list that was defined in step 7 (in this case, Tasks) and
note that no tasks have been created at this point. This is because the
workflow has not been started.
|
15. | The
manager (User1) next manually starts the workflow, which assigns it to
the user in the Assigned To column (User2 in this example). To do this,
access the drop-down list for the Issue (Test Issue 1 in this example)
and click Workflows.
|
16. | The Workflow.aspx page opens. Click the Issues-ThreeState link in the Start a New Workflow section.
|
17. | The workflow starts and the user (User1) is returned to the Issue Tracking list, as shown in Figure 3.
Note that a new column will be visible that is titled Issues-ThreeState
and shows the In Progress status for the workflow. The user also
receives an email with a subject that reads “Workflow initiated” with
the ID number of the workflow include. This email also provides a link
to the Issues list. This helps remind the manager that he did in fact
start the workflow.
|
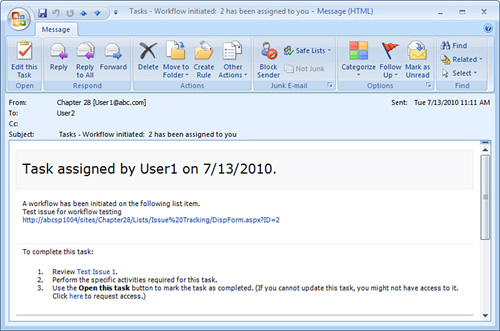
18. | Next,
log off as the manager (User1) and log in as the assignee (User2) and
open Outlook. This user should have received both a copy of the
“Workflow initiated” email and shortly thereafter an email that informs
them that they have been assigned a task, and are given other
information about the task, as shown in Figure 4.
A URL is given to the issue in the Issue Tracking list, as well as
instructions on how to complete the task: Review the issue, perform
specific activities required for this task, and then edit the task and
mark it as completed.
Caution
This is a key point in the
workflow where users forget to edit the task! They click the link to the
issue, update the issue, and then think they are done, but unless the
task is updated the workflow won’t move on to the next step. So, the
training process should emphasize the importance of updating the task as
well as the issue.
|
19. | At
this point in the process, the assignee (User2) now knows he has an
issue to work on, and he clicks the URL to open the issue and get to
work on it, and update the issue. After the issue has been resolved, he
needs to then edit the task to indicate the issue has been resolved. To
do this, while still logged in as the assignee (User2), click the Open
This Task button on the Ribbon to edit the task that was created by the
workflow.
Note
In this example, User2 is
using Outlook 2007, so the button on the Ribbon is titled Edit this Task
as opposed to Open this Task (as shown in Figure 4), as it is labeled in Outlook 2010.
|
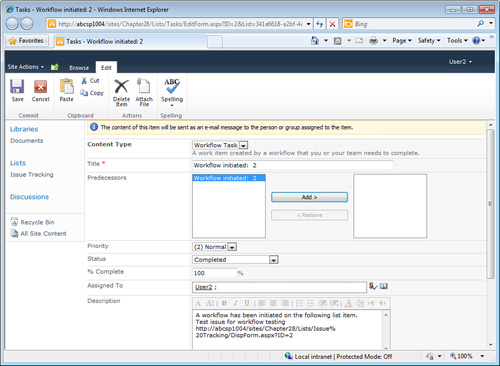
20. | The task will open as shown in Figure 5. Change the Status to Completed, and enter 100 in the % Complete field. Then click Save.
|
21. | The
assignee (User2) will then be returned to the Tasks list and will see
that a new task has been created, which is assigned to the initiator
(User1).
|
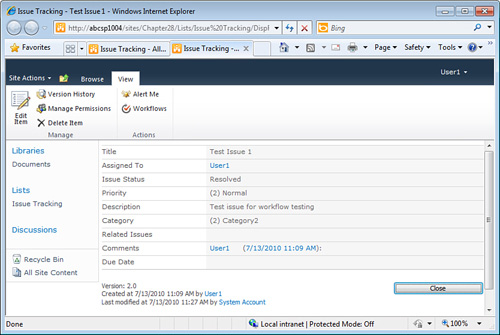
22. | Log
back in as the manager/initiator (User1) and open Outlook. An email
should have been received with a subject line “Review task X” (where X
is the ID of the task created in the Issue Tracking list). Click the URL
to review the issue, which the assignee (User2) claims to have
completed. Note that the issue is now set to the status of Resolved, as
shown in Figure 6.
|
23. | Shortly
after (up to five minutes), the manager receives another email with the
subject line “Tasks – Review Task 2 has been assigned to you.” Open the
email and click the link to the issue, which should have been updated
by the assignee (User2). If this were a real-world situation, the
manager would now review the issue, and any notes added by the assignee
(User2), to make sure it was appropriately updated.
|
24. | After
the manager is satisfied the issue has been taken care of, the task can
be marked as complete. To do this, as the manager (User1), click the
Open This Task button and close the task by setting the Task Status to
Completed and the % Complete field to 100 and then clicking Save.
|
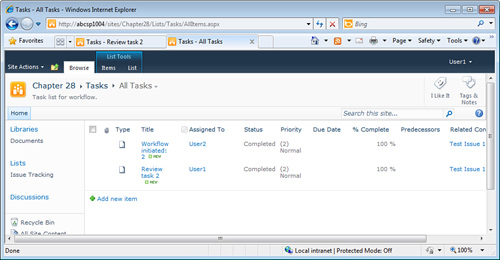
25. | The Tasks list will then be visible, as shown in Figure 7,
and shows both the original task where User2 was assigned a task, and
marked it as complete, and the second task where User1 was assigned a
task and marked it as complete.
|
26. | Still
logged in as the manager (User1), navigate to the Issue Tracking list,
and verify that the status of the issue is now set to Closed and the
field under the column titled Issues-ThreeState shows the value of
Completed.
|
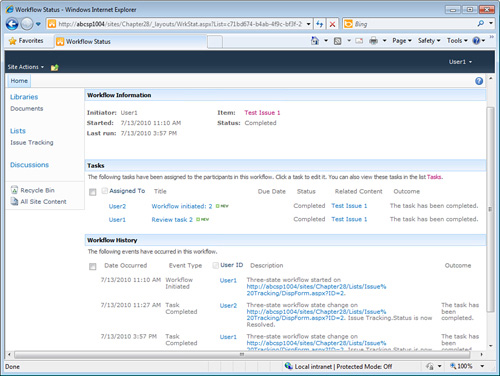
27. | Click the work Completed in the Issues-ThreeState column to view more details about the workflow, as shown in Figure 8.
This page shows information about the initiator (User1), start time,
status, which tasks were created and their outcomes, and the workflow
history, which shows details of the event types that make up the
workflow.
|
