Mapping Drives Using Preferences User Drive Maps Extension
Using the new Preferences
User Drive Maps extension in domain policies, administrators can now map
network drives for end users without scripts. To define a mapped drive
for a user using the Preferences User Drive Maps extension in a domain
policy, perform the following steps:
1. | Log on to a designated Windows Server 2008 R2 administrative server.
| 2. | If necessary, install the Group Policy Management Console on the system.
| 3. | After the tools are installed, click Start, click All Programs, click Administrative Tools, and select Group Policy Management.
| 4. | Add the necessary domains to the GPMC, as required.
| 5. | Expand the Domains node to reveal the Group Policy Objects container.
| 6. | Create a new GPO called UserDriveMapGPO.
| 7. | Open
the GPO for editing and, in the Group Policy Management Editor window,
select and expand the User Configuration node in the tree pane.
| 8. | In the tree pane, expand the Preferences node and the Windows Settings node.
| 9. | Select the Drive Maps preference setting, right-click the setting and select New – Mapped Drive.
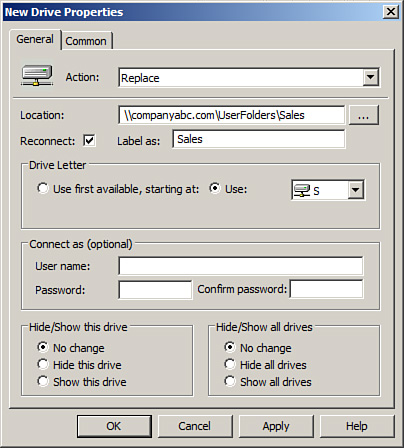
| 10. | When the New Drive Properties window opens, select the Replace action from Actions pull-down menu.
| 11. | Type
in the location of the network share that will be mapped to a drive
letter with this setting. For this example, we will use \\companyabc.com\UserFolders\Sales.
| 12. | In
the Drive Letter section, select the Use option button and select the
desired drive letter by choosing it from the pull-down menu. For this
example, select the S drive.
| 13. | Check
the Reconnect check box to reconnect the Drive Map, enter the Label as
Sales, and click OK to complete the creation of the Drive Map setting
item, as shown in Figure 7.
| 14. | Close the Group Policy Management Editor.
| 15. | In
the Group Policy Management Console, link the GPO to the desired
domain, site, or organizational unit that contains a user account for
testing.
| 16. | Test
the new policy and when the policy delivers the desired results, create
the necessary GPO links from the administrative server, close the Group
Policy Management Console window, and log off of the server.
|
Configuring Preference Item-Level Targeting
There are many instances in
group policy deployments when an administrator desires to apply a
particular preference setting to only a subset of computers or users.
When this is the case, Preference Item-Level Targeting can be used. For
example, a Group Policy administrator can create a single domain policy
named UserDriveMapGPO and leave the policy filtering set to
authenticated users, and it can be linked to the domain. In this case,
if a Drive Map preference is defined, all users in the domain will map
the same drive. Now within this single policy, several Drive Maps can be
created but each Drive Map can be applied to only specified users or
security groups using item-level targeting with the Drive Map preference
options. The following steps detail segmenting the application of a
Drive Map setting to a security group using item-level targeting:
1. | Log
on to a designated Windows Server 2008 R2 administrative server used to
create the UserDriveMapGPO, as detailed in the previous section.
| 2. | Click Start, All Programs, Administrative Tools, and select Group Policy Management.
| 3. | Add the necessary domains to the GPMC, as required.
| 4. | Expand the Domains node to reveal the Group Policy Objects container.
| 5. | Select the UserDriveMapGPO and open it for editing.
| 6. | In
the Group Policy Management Editor window, select and expand the User
Configuration node in the tree pane, and expand the Preferences node and
Windows Settings node.
| 7. | Select
the Drive Maps preference setting in the tree pane and locate the S
drive map in the Settings pane that was previously created.
| 8. | Right-click the S drive map and select Properties.
| 9. | Select the Common tab and check the Item-Level Targeting check box, as shown in Figure 8.
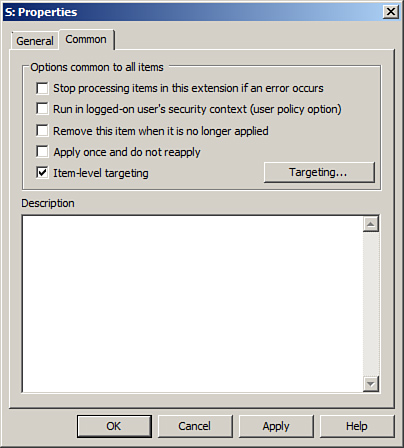
| 10. | Click the Targeting button to open the Targeting Editor.
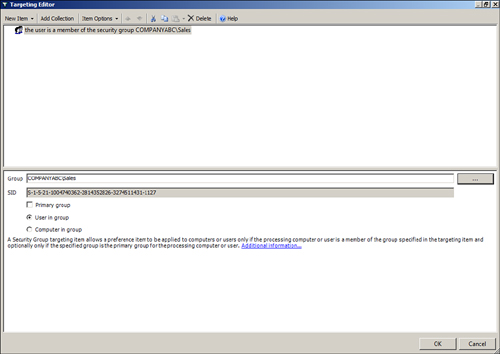
| 11. | In
the Targeting Editor window, click the arrow in the New Item pull-down
menu to reveal each of the different options that can be used for
item-level targeting and select Security Group.
| 12. | When
the security group item is added to the window, click the “...” button
to locate and add a security group from the domain, as shown in Figure 9; for this example, it is the companyabc\sales security group.
| 13. | Click OK when completed and close the Group Policy Management Editor.
| 14. | Test
the application of the policy on a test system with a test user account
in the sales group to verify that the desired functionality is being
delivered.
|
|
