Configuring Windows Update Settings
Many organizations
utilize the Internet services provided by Microsoft known as Windows
Update and Microsoft Update. The main difference between the two is that
Microsoft Update also includes updates for other products such as
Microsoft Office, Microsoft Exchange Server, Microsoft SQL Server,
Microsoft Internet Security and Acceleration Server, and many more.
Starting with Windows XP and Windows Server 2003, all Windows systems
are now capable of downloading and automatically installing Windows
updates out of the box. To upgrade the Windows Update client to support
updates for other Microsoft applications through Microsoft Update, these
machines might need to be upgraded manually, upgraded using a GPO
software installation, or upgraded using Microsoft Windows Server Update
Services (WSUS). A WSUS server can be configured to update the client
software automatically, which is the preferred approach. Depending on
whether the organization utilizes an internal WSUS server or wants to
utilize the Windows/Microsoft Internet-based services to configure these
settings using group policies, the settings are located in the
following sections:
For more information
and recommendations on best practices for configuring Windows Updates,
please refer to the WSUS website located at www.microsoft.com/wsus and also located at http://technet.microsoft.com/wsus.
Creating a Wireless Policy
Wireless networks are becoming
more and more common in both public and private networks. Many
organizations are choosing to deploy secure wireless networks to allow
for flexible connections and communications for mobile users, vendors,
and presentation rooms. As a best practice, organizations commonly
deploy wireless networks as isolated network subnets with only Internet
access or the ability to connect to the company network via VPN. As
wireless networks become more sophisticated and secure, the
configuration of a wireless network on an end user’s machine becomes
complicated. In an effort to simplify this task, wireless network
configurations can be saved on USB drives and handed off to users to
install and they can also be preconfigured and deployed to Windows
systems using domain policies. Group Policy wireless policies can be
created for Windows Vista or Windows XP compatible systems as each
treats and configures wireless networks differently. Windows 7 and
Windows Server 2008 systems will use the Windows Vista wireless
policies. If defined in domain policies, these wireless network settings
will only be used if no third-party wireless network management
software is installed and activated on the desired systems.
Wireless networks are
commonly unique to each physical location, and the GPO-configured
wireless policies should be applied to systems in an Active Directory
site or to a specific location-based organizational unit that contains
the desired computer accounts. Furthermore, if the wireless policy GPO
contains only Windows Vista workstations for the wireless policy, WMI
filtering should be applied to the GPO so that only Windows Vista,
Windows 7, and Windows Server 2008 systems process and apply the policy.
To create a wireless network for a Windows Vista, Windows 7, and
Windows Server 2008 system using a domain policy, perform the following
steps:
1. | Log on to a designated Windows Server 2008 R2 administrative server.
|
2. | Click Start, click All Programs, click Administrative Tools, and select Group Policy Management.
|
3. | Add the necessary domains to the GPMC as required.
|
4. | Expand the Domains node to reveal the Group Policy Objects container.
|
5. | Create a new GPO called WirelessPolicyGPO and open it for editing.
|
6. | After
the WirelessPolicyGPO is opened for editing in the Group Policy
Management Editor, expand the Computer Configuration node, expand the
Policies node and select Windows Settings.
|
7. | Expand Windows Settings, expand Security Settings and select Wireless Network (IEEE 802.11) Policies.
|
8. | Right-click
Wireless Network (IEEE 802.11) Policies and select Create a New
Wireless Network Policy for Windows Vista and Later Releases. Because
this is a new group policy, this option appears, but if the group policy
already has a wireless network policy for Windows Vista and later
releases, the Windows Vista policy will be available beneath the
Wireless Network policy node.
|
9. | When the New Wireless Network Policy window opens, type in an acceptable name and description for the policy.
|
10. | If
Windows will manage the wireless network configuration and connection
of the Windows Vista systems, check the Use Windows WLAN AutoConfig
Service for Clients check box, if it is not already checked.
|
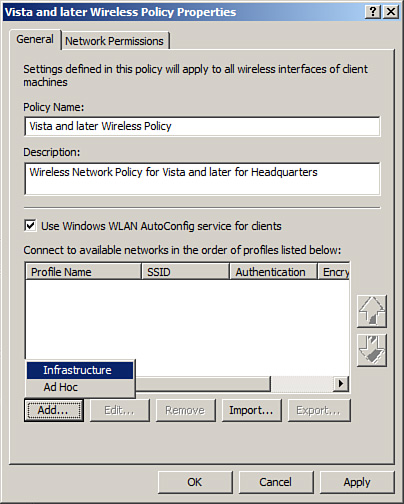
11. | In
the Wireless Network Profile section near the bottom of the window,
click the Add button to define a new wireless network, and click the
Infrastructure link, as shown in Figure 12.

|
12. | When
the new profile opens, type in a descriptive name and in the Network
Name(s) SSID section, type in the SSID name of the network, and click
the Add button.
|
13. | If there is an existing “NEWSSID” network name, select it and click Remove.
|
14. | If
the client machine should automatically connect to this wireless
network when the network is within range, and if the SSID of the
wireless network is not broadcasted, check the Connect Even If the
Network Is Not Broadcasting check box and check the Connect
Automatically When This Network Is in Range check box.
|
15. | Select
the Security tab and configure the security properties of the wireless
network, including the default authentication and encryption
specifications. When finished, click OK to close the profile window.
|
16. | Back
in the Wireless Network Policy window, select the Network Permissions
tab. From this tab, administrators can restrict the configuration. Click
OK to close out of the Vista and Later Wireless Policy Properties
window.
|
17. | Back in the Group Policy Management Editor window, close the GPO.
|
18. | In
the Group Policy Management Console, link the new WirelessPolicyGPO GPO
to an OU with a Windows Vista or later system that can be used to test
the policy.
|
19. | On
the client workstation, after the group policy applies, in the
Available Wireless Network, the network matching the wireless profile
name should be listed. Click on this profile and if a security key is
required, enter this key now. If a key is required, it must be provided
by an administrator as certain authentication and encryption schemes in
GPO wireless policies that require keys do not allow the keys to be
entered into the GPO.
|
20. | After
the testing is completed, configure security filtering and possibly
also WMI filtering to limit the application scope of the
WirelessPolicyGPO policy and link it to the desired organizational
unit(s), domain, or site.
|
One important point to note is
that for Windows to manage the wireless networks and populate wireless
profiles via Group Policy, the WLAN AutoConfig service needs to be
installed and started on Windows Vista and later operating systems.
Configuring Power Options Using Domain Policies
Using group policies to
manage the power profiles on Windows systems is a feature that has been
missing and desired for many years. Starting with Windows Server 2008
R2, Windows Vista and Windows 7 power plans can be defined and applied
using domain policies using computer preference settings. To configure a
centrally managed power plan for Windows Vista and later operating
systems, perform the following steps:
1. | Log on to a designated Windows Server 2008 R2 administrative server.
|
2. | Click Start, click All Programs, click Administrative Tools, and select Group Policy Management.
|
3. | Add the necessary domains to the GPMC as required.
|
4. | Expand the Domains node to reveal the Group Policy Objects container.
|
5. | Create a new GPO called PowerProfileGPO and open it for editing.
|
6. | After
the PowerProfileGPO is opened for editing in the Group Policy
Management Editor, expand the Computer Configuration node and expand the
Preferences node.
|
7. | Expand the Control Panel Settings, right-click the Power Options node, and select New – Power Plan (Windows Vista and Later).
|
8. | On
the Advanced Settings page, change the default action to Update, change
the default power plan from Balanced to High Performance, check the Set
as the Active Power Plan check box, and click OK to complete the
settings. If desired, change any of the default settings to other
values.
|
9. | Close
the Group Policy Management Editor and link the policy in the Group
Policy Management Console to a test organizational unit.
|
10. | Once the new policy passes validation testing, link it to a production organizational unit as desired.
|
Managing Scheduled Tasks and Immediate Tasks with Domain Policies
There
are many times when Group Policy administrators would have liked to run
an application or a command on a remote machine without having to
reboot or log on to that particular system. For example, there might be a
critical security or application update that needs to be rolled out and
executed immediately. Historically, this would require a new group
policy with a script or software package assigned and the machine would
need to be rebooted to run the script or install the application. Now
with Windows Server 2008 R2, this can be accomplished with the new
Scheduled Task and Immediate Task preference settings for both Windows
XP and Windows Vista and later operating systems. As an example of this
that ties to the previous section on AppLocker, the policy
administrators can create a policy that sets the Application Identity
service to Automatic Startup mode, and they can create another policy
that uses the computer Scheduled Task Immediate Task preference to start
the service by running the command Net Start AppIDSvc.
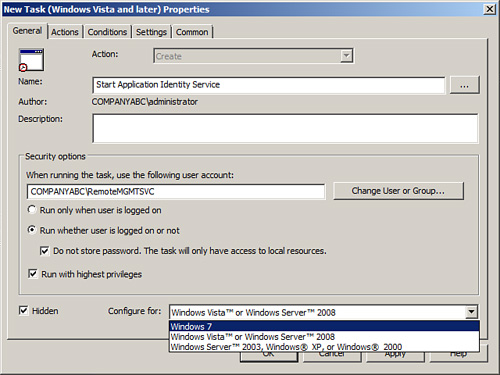
To create a Scheduled Task or Immediate Task preference setting for a
computer, create a new domain policy, open the policy for editing and
navigate to the Computer Configuration\Preferences\Control
Panel\Scheduled Tasks node. Right-click on the node and select New –
Immediate Task (Windows Vista and Later). Configure and save the task
settings, as shown in Figure 13.
Save the policy and test it out to verify it works as desired, and then
deploy it in production or recreate it as a starter GPO so that it can
be updated and reused as a template.
