Creating a Software Restriction Policy
Many
business owners and organizations want to ensure that their employees
are as productive as possible. This might require restricting users from
playing computer games and surfing the Internet, or just providing a
highly reliable computer system. Due to the restrictive nature of
previous Windows operating systems and poor development practices by
software vendors and independent programmers, many applications also
required end users to have local administrator rights. When local users
have the ability, through administrative group membership or reduced
file system security, to perform administrative tasks, it can be helpful
to implement software restriction policies to prevent users from
running undesired programs that might impact system configuration and
reliability. One important point to note about software restriction
policies is that even after the policy is applied, the system will need
to be rebooted before the new policy settings are applied. For example,
restricting access to a certain Registry path, Registry editor, or any
particular executable application can reduce undesired system
configuration changes. Group Policy contains very specific Microsoft
Management Console policy settings, but for undefined or standard
built-in utilities and applications, it might be necessary to define and
enforce a specific software restriction policy.
Note
For Windows 7 and Windows
Server 2008 R2 only, new settings within domain policies named
“application control policies” replace software restriction policies. Although software restriction
policies will be processed and applied to Windows 7 and Windows Server
2008 R2 systems, it is recommended to use AppLocker on these systems and
software restriction policies for all older operating systems.
To create a software restriction policy for a computer using a domain group policy, perform the following steps:
1. | Log on to a designated Windows Server 2008 R2 administrative server.
| 2. | Open the Group Policy Management Console from the Administrative Tools menu.
| 3. | Add the necessary domains to the GPMC as required.
| 4. | Expand the Domains node to reveal the Group Policy Objects container.
| 5. | Either create a new GPO or edit an existing GPO.
| 6. | After
the GPO is opened for editing in the Group Policy Management Editor,
expand the Computer Configuration node, expand the Policies node, expand
the Windows Settings node, and select the Security Settings node.
| 7. | Expand the Security Settings node, and select Software Restriction Policies.
| 8. | Right-click on the Software Restriction Policies node in the tree pane, and select New Software Restriction Policies.
| 9. | After
the previous task is completed, two subordinate policy setting nodes
are created as well as three settings. In the Settings pane,
double-click the Enforcement setting to open the properties of that
setting.
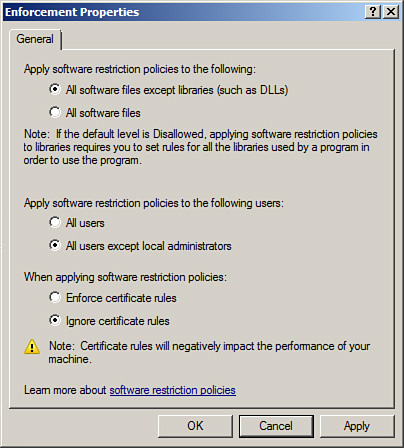
| 10. | In
the Enforcement Properties dialog box, define whether this software
restriction policy should apply to all users or if local administrators
should be excluded from the policy, as shown in Figure 2. Click OK when finished.

| 11. | Open
the Security Levels settings node to reveal the three default levels of
Disallowed, Basic User, or Unrestricted. The default configuration is
the Unrestricted security level, which defines that all software will
run based on the access rights of the user. If this is acceptable, do
not make any changes; otherwise, select the desired security level,
right-click the level, and select Set as Default.
| 12. | Regardless
of which security level was selected as the default, additional rules
will most likely need to be defined to block or allow access. For this
example, the ability to block access to the Remote Desktop Connection
client is outlined. Right-click on the Additional Rules node in the tree
pane beneath Software Restriction Policies, and select New Hash Rule.
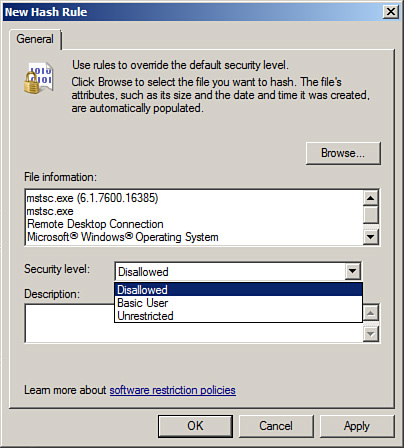
| 13. | When the New Hash Rule window opens, click the Browse button to locate the desired file. For this example, the filename is mstsc.exe
and is located in the c:\windows\system32 folder. After the file is
located, select it and click Open to add it to the hash rule.
| 14. | Select
the desired security level of Disallowed for this particular file, and
then click OK to complete the creation of the new hash rule, as shown in
Figure 3.

| 15. | The
file properties will be used to generate the hash rule and will be
added to the Additional Rules, and this completes the software
restriction policy for this exercise. Close the Group Policy Management
Editor window.
Note
A hash rule uses the filename
and the file’s specific properties when the rule is created. If a
specific application or file needs to be restricted with a hash rule,
each version of that file stored on the computer’s operating system
should be added to the policy because different versions of the same
file will exist in client and server operating systems and in different
service pack levels.
| 16. | Back
in the Group Policy Management Console, link the new software
restriction GPO to an OU with a computer that can be used to test the
policy.
| 17. | Log
on to a test system that the new policy has been applied to, reboot the
system, and verify that the software restriction policy is working by
attempting to launch the Remote Desktop client on the test system.
| 18. | If the policy is working as desired, the user will receive a message stating that the program is blocked by Group Policy. |
|