1. Problem
You are receiving an order file
in flat file format from one of your customers. You would like to use
the Flat File Schema Wizard to expedite the creation of an XML schema.
2. Solution
To demonstrate how to use the Flat File Schema Wizard . To create the flat file schema using the Flat File Schema Wizard, follow these steps:
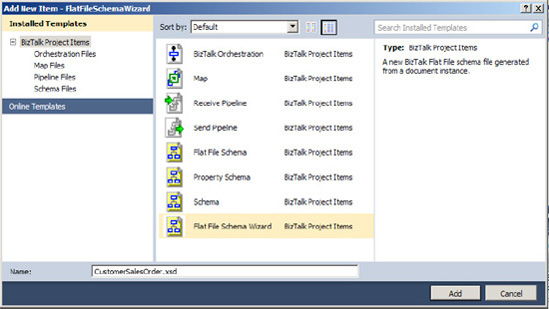
Open a new BizTalk Server project. Right-click the project, and select Add => New Item. In the Add New Item dialog box, select the Flat File Schema Wizard template. Click Add. Figure 1 demonstrates this step.
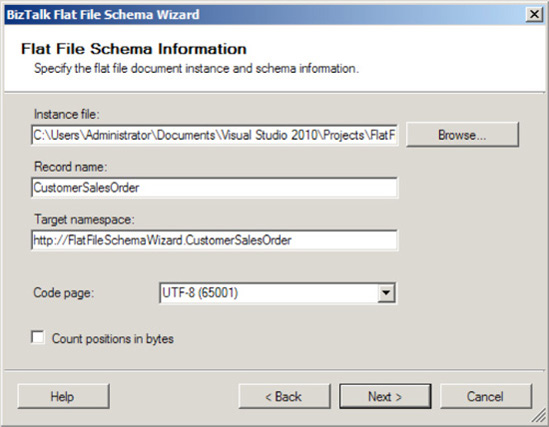
On the Welcome screen of the BizTalk Server Flat File Wizard page, click Next. On the Flat File Schema Information page (shown in Figure 2), specify the information that will be used as input to generate the specifics of the desired flat file schema: Instance File: Use this to specify where your source instance file is located. Record Name: Specify the Root node of the schema you want to create. For this example, enter CustomerSalesOrder. Target Namespace: Specify the namespace of the schema you'd like to create. Code Page: This identifies the encoding format of a file. In this instance, use the default, which is UTF-8 (65001). Count Positions in Bytes: This specifies whether positions are calculated by bytes. If this box is not checked, positions will calculated by characters.
On
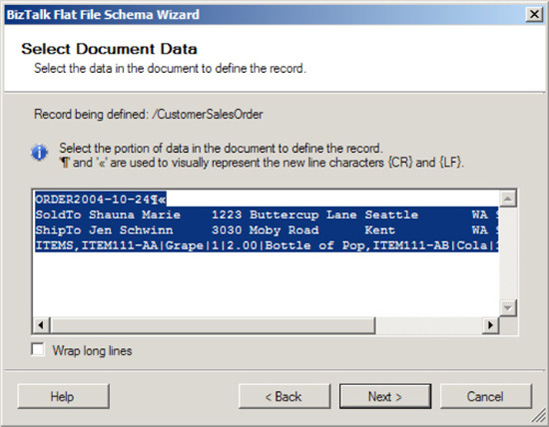
the Select Document Data page, specify the data contents that will be
used to generate the schema. The data contents are based on the instance
file specified on the Flat File Schema Information page. Highlight the
contents of the file that will be used to define the document data, as
shown in Figure 3.
Now
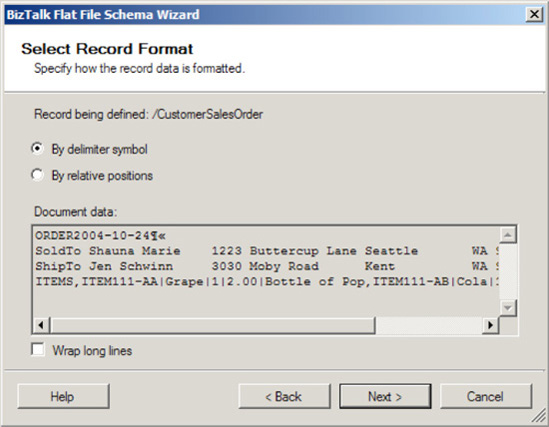
define the record format. In this example, the record is delimited by a
carriage return and a line feed, as shown by the record identifier ORDER2004-10-24. Select the By Delimiter Symbol radio button, as shown in Figure 4.
Now, specify the properties of the record (as shown in Figure 5). This step will define the makeup of the record to represent CustomerSalesOrder:
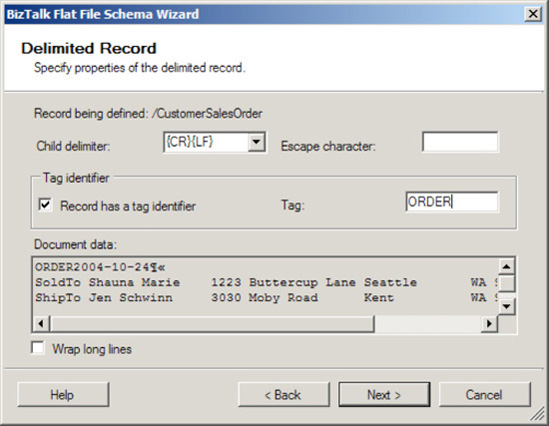
Specify the child delimiter. Given that the record is defined by delimiter, select the child delimiter {CR}{LF}. Select the Record Has a Tag Identifier box. In this example, the tag identifier will be ORDER.
NOTE
ORDER is the identifier
based on it being the text identifier that is specified in the source
record. This text will be searched for to identify the continuation or
creation of a new record. Not all text files will have a record tag
identifier; in these cases, leave this box unchecked.
Now, specify the properties of the child elements for the record (as shown in Figure 6). This step will identify the makeup of the elements for CustomerSalesOrder. Using the grid on the Child Elements page, define the record's child elements. In this example, set the values shown in Table 1.
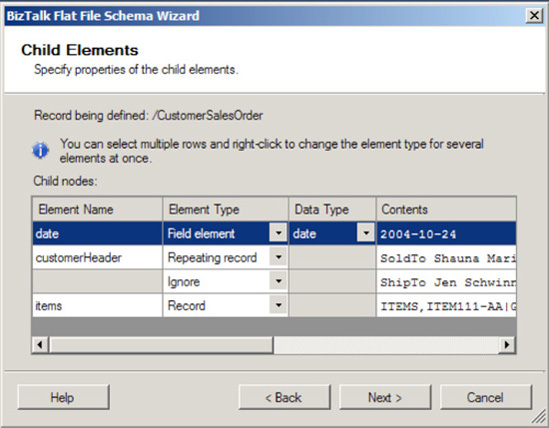
Table 1. Child Element Properties| Element Name | Element Type | Data Type |
|---|
| date | Field Element | Date | | customerHeader | Repeating Record | | | | Ignore | | | items | Record | |
NOTE
Observe that the customer ShipTo information is ignored because the record is the same structure as the customer SoldTo. Instead, the customer Header can be modeled using the Repeating Record element type.
On the Schema View page, the fundamental structure of the CustomerSalesOrder schema appears. Now, you'll define the individual characteristics of the child records of the schema. Figure 7 shows the page showing the schema structure.
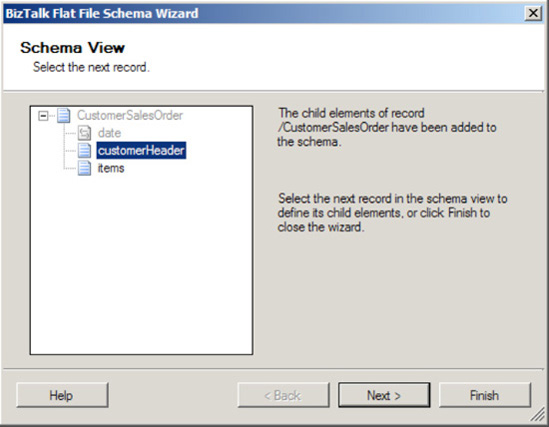
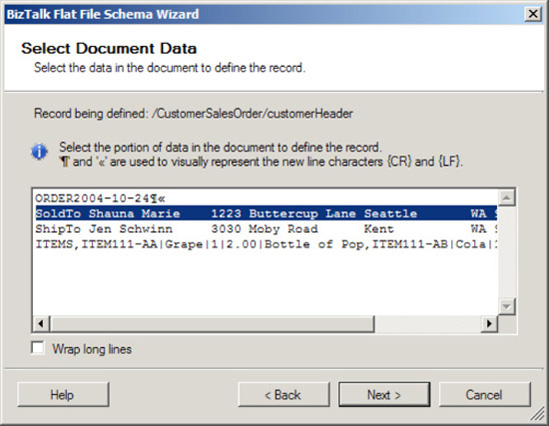
Select the customerHeader element. Click Next to continue. On the Select Document Data page, select the data that will be used to define the customerHeader record by ensuring the first line is selected, as shown in Figure 8.
Now,
you will select the record format for the customer header. In this
example, select the By Relative Positions radio button, as shown in Figure 9.
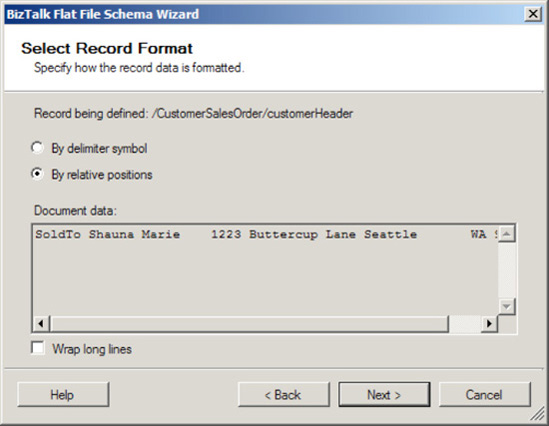
The
wizard will give a visual representation of the record's element
positions. Use this tool by selecting the starting position of each
record element. You can do this by clicking the mouse at each element's
starting point, as shown in Figure 10.
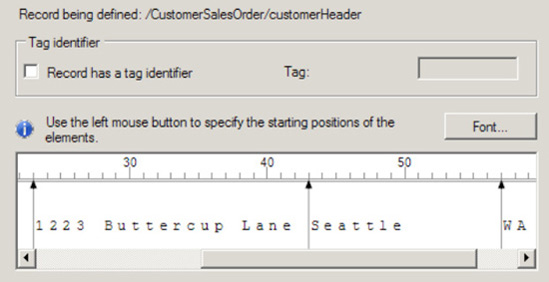
Next,
you will specify the properties of the child elements for the customer
header record. This step will identify the makeup of the elements for CustomerSalesOrder/customerHeader.
These XML elements are derived from the positional representation of
the record elements on the previous page. So, using the grid on the
Child Elements page, define the record's child elements. In this
example, set the values shown in Table 2. Table 2. Child Element Properties| Element Name | Element Type | Data Type |
|---|
| customerType | Field Element | string | | fullName | Field Element | string | | street | Field Element | string | | city | Field Element | string | | state | Field Element | string | | postal | Field Element | string |
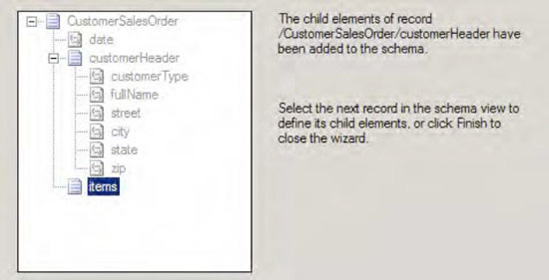
On the Schema View page, the CustomerSalesOrder schema appears with an updated customerHeader structure, as shown in Figure 11. Next, you'll define the characteristics of the items record, so click Next.
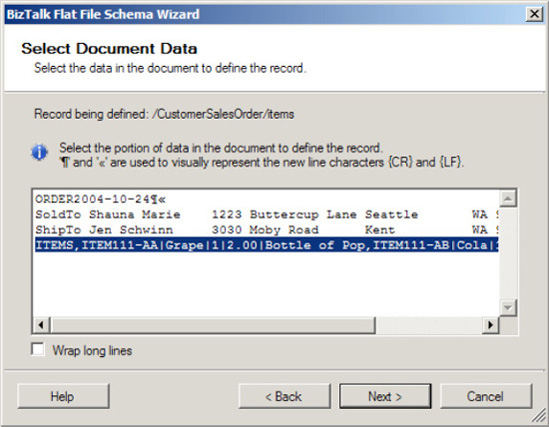
On the Select Document Data page, select the data that will be used to define the items record. Ensure the items data line is selected, as shown in Figure 12.
Now you will select the record format for the items data. In this example, select the By Delimiter Symbol radio button. Next, you will specify the properties of the items record (as shown in Figure 13). This step will define the makeup of the record to represent CustomerSalesOrder/items: Specify the child delimiter. Given that the record is defined by a comma delimiter, select the comma (,) child delimiter. Check the Record Has a Tag Identifier box. In this example, the tag identifier will be ITEMS.
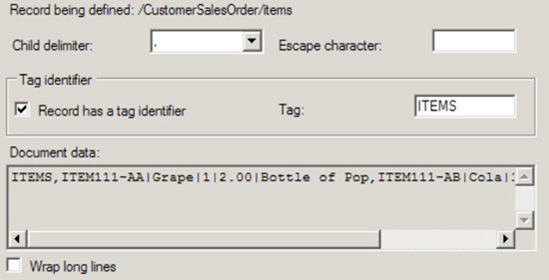
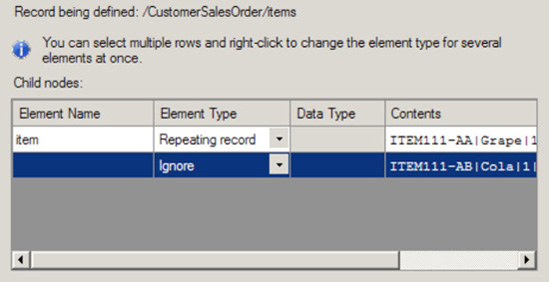
You will now specify the properties of the child elements for the items record (as shown in Figure 14). This step will identify the makeup of the elements for the CustomerSalesOrder/items that are derived from the delimiter specified on the previous page. Using the grid in the Child Elements page, define the items record's child elements. In this example, set the values shown in Table 3. Table 3. Child Element Properties—Items| Element Name | Element Type | Data Type |
|---|
| item | Repeating Record | | | | Ignore | |
On the Schema View page, the structure of the CustomerSalesOrder schema is updated. Now, you can define the individual characteristics of the itemsFigure 15 shows the page with the schema structure. record's child elements.
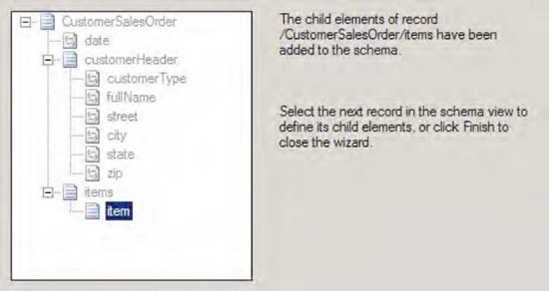
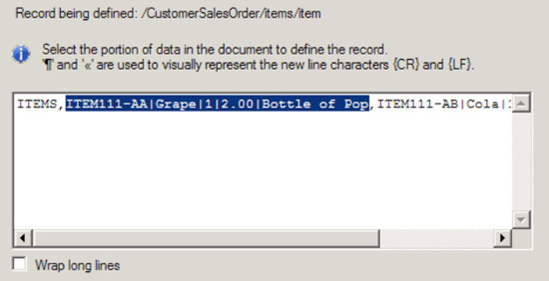
Make sure the item element is selected. Click Next to continue. On the Select Document Data page, select the data that will be used to define the item record. Ensure the items line is selected, as shown in Figure 16.
Now,
select the record format for the items data. This example will use
delimited, so select the By Delimiter Symbol radio button, and click
Next. Next,
you will specify the properties of the items data elements. This step
will define the makeup of the data elements to represent CustomerSalesOrder/items.
You'll now specify the child delimiter: given that the record is
defined by the pipe delimiter (|), select the child delimiter |, as
shown in Figure 17.
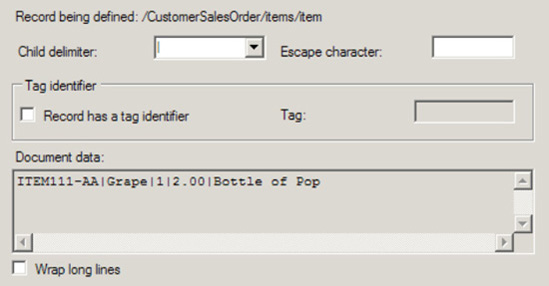
Next, you will specify the properties of the child elements for the items record (as shown in Figure 18). This step will identify the makeup of the elements for the CustomerSalesOrder/items/item
and are derived from the delimited specification. Using the grid on the
Child Elements page, define the record's child elements. In this
example, set the values as shown in Table 4.
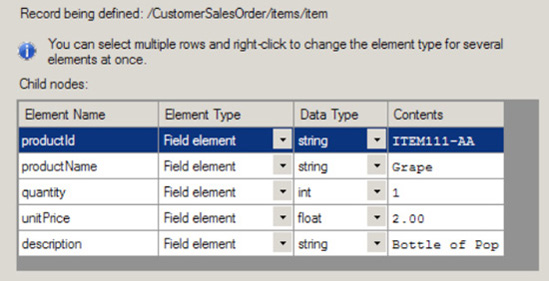
Table 4. Child Element Properties| Element Name | Element Type | Data Type |
|---|
| productId | Field element | string | | productName | Field element | string | | quantity | Field element | int | | unitPrice | Field element | float | | description | Field element | string |
This completes the creation of the schema, so click Finish to complete the schema. Figure 19 shows the finished product.
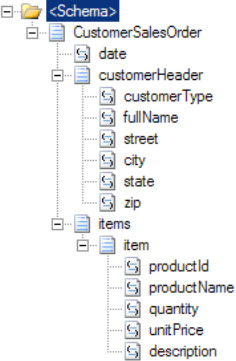
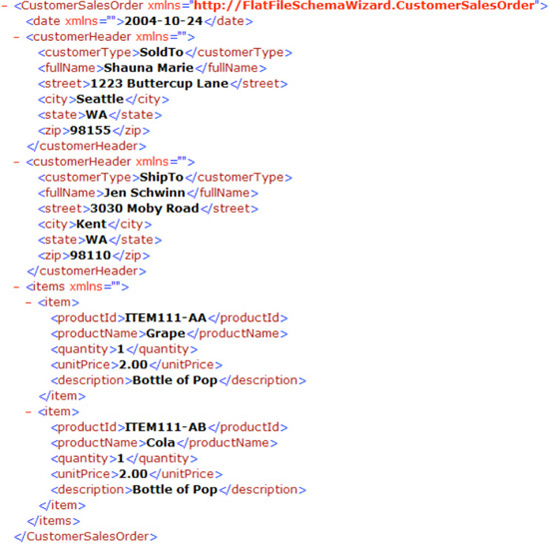
To test the schema, check that the Input Instance File in the properties is set to a valid flat file instance. Right-click the CustomerSalesOrder.xsd file in Solution Explorer, and select Validate. This will generate an XML version of the flat file, which is shown in Figure 20.
3. How It Works
In this recipe, we
demonstrated how to use the Flat File Schema Wizard. To recap the
scenario, you used the wizard to create a fairly complex illustration of
a flat file to XML schema creation using different positional and
delimited flat file references at the record, line, and field levels.
The tool allows a developer to reverse engineer a schema based on a
sample flat file instance.
Not demonstrated in
this example but a common consideration when working with flat files is
the usage of escape characters. You can accommodate escape characters
when defining the properties at the record, line, or field level.
The Flat File Schema
Wizard makes the process of defining schemas simpler, because the user
sees the schema being modeled through the process and, in addition, is
not exposed to the complexity of the schema syntax.
As helpful as the tool might
be, it is still important to understand what the requirements are for
the schema and how specifically the file will be implemented. Given
this, you should spend some design time trying to understand exactly
what the schema will do and how this relates to other processes (such as
other interfaces and other trading partners).
|